Table of Contents
Advertisement
Quick Links
LAUNCH
PAD VII
User Manual
Copyright Information
Copyright © 2019 LAUNCH TECH CO., LTD. All rights reserved. No part of this publication may be
reproduced, stored in a retrieval system, or transmitted in any form or by any means, electronic, mechanical,
photocopying, recording or otherwise, without the prior written permission of LAUNCH. The information
contained herein is designed only for the use of this unit. LAUNCH is not responsible for any use of this
information as applied to other units.
Neither LAUNCH nor its affiliates shall be liable to the purchaser of this unit or third parties for damages,
losses, costs, or expenses incurred by purchaser or third parties as a result of: Accident, misuse, or abuse
of this unit, or unauthorized modifications, repairs, or alterations to this unit, or failure to strictly comply
with LAUNCH operating and maintenance instructions. LAUNCH shall not be liable for any damages or
problems arising from the use of any options or any consumable products other than those designated as
Original LAUNCH Products or LAUNCH Approved Products by LAUNCH.
LAUNCH owns the complete intellectual property rights for the software used by this product. For any
reverse engineering or cracking actions against the software, LAUNCH will block the use of this product and
reserve the right to pursue their legal liabilities.
All information, specifications and illustrations in this manual are based on the latest information available at
the time of printing.
LAUNCH reserves the right to make changes at any time without notice. While information of this manual
has been carefully checked for accuracy, no guarantee is given for the completeness and correctness of
the contents, including but not limited to the product specifications, functions, and illustrations. LAUNCH will
not be liable for any direct, special, incidental, indirect damages or any economic consequential damages
(including the loss of profits).
Trademark Information
LAUNCH is a registered trademark of LAUNCH TECH CO., LTD. (LAUNCH) in China and other countries.
All other LAUNCH trademarks, service marks, domain names, logos, and company names referred to in
this manual are either trademarks, registered trademarks, service marks, domain names, logos, company
names of or are otherwise the property of LAUNCH or its affiliates. In countries where any of the LAUNCH
trademarks, service marks, domain names, logos and company names are not registered, LAUNCH claims
other rights associated with unregistered trademarks, service marks, domain names, logos, and company
names. Other products or company names referred to in this manual may be trademarks of their respective
owners. You may not use any trademark, service mark, domain name, logo, or company name of LAUNCH
or any third party without permission from the owner of the applicable trademark, service mark, domain
name, logo, or company name. You may contact LAUNCH by visiting the website at www.cnlaunch.com, or
writing to LAUNCH TECH CO., LTD., Launch Industrial Park, North of Wuhe Avenue, Banxuegang, Bantian,
Longgang, Shenzhen, Guangdong, P.R.China, to request written permission to use Materials on this manual
for purposes or for all other questions relating to this manual.
www.x431.com
+86 755 8455 7891
I
Advertisement
Table of Contents

Related Manuals for Launch X-431 PAD VI


Summary of Contents for Launch X-431 PAD VI
- Page 1 LAUNCH. The information contained herein is designed only for the use of this unit. LAUNCH is not responsible for any use of this information as applied to other units.
- Page 2 LAUNCH PAD VII User Manual IMPORTANT SAFETY INFORMATION DANgER When an engine is operating, keep the service area well-ventilated or attach a building exhaust removal system to the engine exhaust system. Engines produce various poisonous compounds (hydrocarbon, carbon monoxide, nitrogen oxides, etc.) that cause slower reaction time and result in death or serious personal injury.
- Page 3 LAUNCH PAD VII User Manual Using This Manual This manual contains device usage instructions. Some illustrations shown in this manual may contain modules and optional equipment that are not included in your system. Conventions The following conventions are used. Bold Text Bold text is used to highlight selectable items such as buttons and menu options.
-
Page 4: Table Of Contents
LAUNCH PAD VII User Manual Table of Contents 1 Introduction ..............................1 1.1 Product Profile ............................1 1.2 Accessory Checklist...........................2 2 Components & Controls ..........................4 2.1 Display Tablet ............................4 2.2 SmartLink C Device ...........................6 2.3 Technical Specifications ..........................7 3 Preparations..............................8 3.1 Charging the Tablet ...........................8 3.2 Power ON/OFF ............................8... - Page 5 LAUNCH PAD VII User Manual 6.10 Diesel Particulate Filter (DPF) regeneration ..................35 6.11 Electronic Throttle Position Reset ......................35 6.12 Gearbox Matching ..........................35 6.13 AFS (Adaptive Front-lighting System) reset ..................36 6.14 Sunroof Initialization ..........................36 6.15 Suspension Calibration ........................36 6.16 EGR Adaption ............................
- Page 6 12.1 Remote Diagnose ..........................57 12.1.1 Interface Layout .......................... 57 12.1.2 Add Friends ..........................57 12.1.3 Start Instant Messaging ......................58 12.1.4 Launch remote Diagnosis (Device-To-Device) ................59 12.1.5 Launch remote Diagnosis (Device-To-PC) ................61 12.2 Toolbox ..............................62 12.3 Tablet Setting ............................62 12.4 Files ..............................
-
Page 7: Introduction
System) reset, Sunroof Initialization, Suspension Calibration etc. • SmartLink Diag. A perfect and powerful remote diagnostics solution developed by LAUNCH. In this ecology system, if a technician or car owner (SmartLink C) does not have time to puzzle through a touch vehicle problem, he can seek a trusted second opinion or additional expertise on various vehicle issues from remote master technicians or repair shops (SmartLink B). -
Page 8: Accessory Checklist
LAUNCH PAD VII User Manual allowing for improved efficiency and faster repairs. • Diagnostic History This function provides a quick access to the tested vehicles and users can choose to view the test report or resume from the last operation, without starting from scratch. - Page 9 LAUNCH PAD VII User Manual ’ Power Adaptor (For charging the tablet.) Password Envelope (A piece of paper bearing Product S/N and Activation Code, which is required for your registration.) Cigarette Lighter Cable (To provide power to the non-16pin connector through connection to the Cigarette Lighter receptacle.)
-
Page 10: Components & Controls
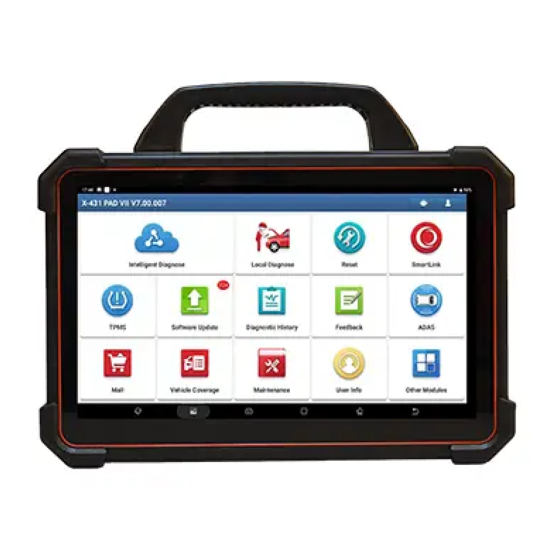
LAUNCH PAD VII User Manual 2 Components & Controls There are two main components to the diagnostic system: • Display Tablet -- the central processor and monitor for the system (For details, please refer to Chapter 2.1.) • SmartLink C Device -- the device for accessing vehicle data (For details, please refer to Chapter 2.2.) 2.1 Display Tablet... - Page 11 LAUNCH PAD VII User Manual The following table formulates ports and indicators of display tablet: Name & Descriptions Charging indicator -- It illuminates red while the tablet is charging. Once charging is finished, it will illuminate solid green. Microphone Front Camera...
-
Page 12: Smartlink C Device
LAUNCH PAD VII User Manual Audio Speaker Adjustable Kickstand - Flip out it to any angle and work comfortable at your desk, or hang it on automotive part. 2.2 SmartLink C Device The SmartLink C device features powerful functions and it can be applied in the following situations: 1. -
Page 13: Technical Specifications
LAUNCH PAD VII User Manual Display Screen LAN/WAN Port -- Connects the SmartLink C device to the Internet via the crossover cable. Data I/O Port -- Connects the SmartLink C device to the PC via the data cable when as a J2534 PassThru device. -
Page 14: Preparations
Tap Power Off. 3.3 Locator & Navigation Buttons On-screen keys and status bar are as follows: to visit the Launch’s official website. to capture the current screen and all captured screenshots are stored in the Screenshots folder. : Shows whether the SmartLink C device is properly connected or not. -
Page 15: Wi-Fi Setup
LAUNCH PAD VII User Manual 3.4 Wi-Fi Setup The tablet has dual built-in Wi-Fi communication modules. One is used to communicate with the tablet, and the other allows the tablet to get online. Once you’re online, you can register your tool, update diagnostic software &... -
Page 16: Adjust Brightness
LAUNCH PAD VII User Manual Disconnect from a WLAN Network 1. On the Home screen, tap Settings -> Network & in- 2. Tap the network with a Connected status, then tap Forget. ternet -> Wi-Fi. 3.5 Adjust Brightness Note: Reducing the brightness of the screen is helpful to conserve the battery power. -
Page 17: Initial Use
Note: Before registering, please make sure that the tablet has a strong and stable Wi-Fi signal. On the home screen, tap the application icon to launch it, and then tap Login on the upper right corner of the screen. The following dialog box will pop up on the screen. - Page 18 LAUNCH PAD VII User Manual Input the Serial Number and Activation Code, which can be found in the Password Envelope. Note: To exit and activate it later, tap Skip. In this case, you can activate it by tapping User Info -> Activate VCI.
-
Page 19: Job Menu
Matching, AFS (Adaptive Front-lighting System) reset, Sunroof Initialization, Suspension Calibration etc. The SmartLink system is powerful remote diagnostics solution developed by LAUNCH. The system consists of SmartLink C dongle, SmartLink Service Platform and SmartLink B dongle. SmartLink C dongle: For technicians seeking technical assistance and SmartLink additional expertise on various vehicle issues. -
Page 20: Connections
LAUNCH PAD VII User Manual This function enables users to perform ADAS (Advanced Driver Assistance System) calibration operations. The ADAS calibration software is disabled by default. Before using this function, users must activate the ADAS function using the ADAS Activation Card. -
Page 21: Vehicle Connection
LAUNCH PAD VII User Manual 4.3.3 Vehicle Connection The method used to connect the SmartLink C device to a vehicle’s DLC depends on the vehicle’s configuration as follows: • A vehicle equipped with an OBD II management system supplies both communication and 12V power through a standardized DLC. - Page 22 LAUNCH PAD VII User Manual This method is not recommended. The USB cable connection is a simple & quick way to establish communication between the tablet and the SmartLink C device. After properly connecting the SmartLink C device to the tablet, the VCI navigation button at the bottom of the screen becomes highlighted indicating the communication is established.
-
Page 23: Start Diagnostics
LAUNCH PAD VII User Manual 5 Start Diagnostics 5.1 Intelligent Diagnose Through simple Wi-Fi communication between the tablet and SmartLink C device, you can easily get the VIN (Vehicle Identification Number) information of the currently identified vehicle. Once the VIN is successfully identified, the system will retrieve it from the remote server and then guide you to vehicle information page without the necessity of step-by-step manual menu selection. - Page 24 B. If the tablet failed to access the VIN information, the following dialog box will appear on the screen. In this mode, you need to input the VIN manually or tap to scan it. 1) Tap to launch the VIN recognition module. www.x431.com +86 755 8455 7891...
- Page 25 LAUNCH PAD VII User Manual Place the VIN inside the viewfinder rectangle to scan it. The most recognizable location for this number is in the top left corner on the vehicle’s dashboard. Other locations include the driver’s door or post, and the firewall under the hood.
-
Page 26: Local Diagnose
LAUNCH PAD VII User Manual 5.2 Local Diagnose Tap Local Diagnose to enter the vehicle selection page. 5.2.1 Main Menu VINScan button: Tap it to scan the Vehicle Identification Number (VIN) code of your vehicle. OBD VIN and INPUT VIN are included. This function does not apply to the commercial vehicles. -
Page 27: Vinscan
LAUNCH PAD VII User Manual 5.2.2 VINSCAN This function enables you to access it more quickly. In this case, camera scan and manual input are available. Tap VIN scan, the screen displays as follows: A. Camera Scan: In this mode, the SmartLink C device should be plugged into the vehicle’s DLC. -
Page 28: Manual Selection
LAUNCH PAD VII User Manual Input the VIN, and tap OK, the system will automatically identify the vehicle model and directly navigate to the function selection page. 5.2.3 Manual Selection Tap a corresponding diagnostic software logo, and then follow the on-screen instruction to access the diagnostic software. - Page 29 LAUNCH PAD VII User Manual 3). Turn the ignition key to ON: Set the ignition switch to on. 5). Read vehicle information: After reading the vehicle information, double check if the vehicle information is correct or not. If yes, tap YES to continue.
- Page 30 LAUNCH PAD VII User Manual The tested system with fault code appears in red and the system with OK displays in green (normally). Warning: Diagnostic Trouble Codes or Fault Codes can be used to identify which engine systems or components that are malfunctioning.
- Page 31 LAUNCH PAD VII User Manual report. Note: Diagnostic report is classified into three categories: Pre-Repair report, Post-Repair report and Diagnostic Scan. No matter which type you saved the report as, the report type will be appended as a tag on the upper right corner of the diagnostic report for easier identification.
- Page 32 LAUNCH PAD VII User Manual 5.2.3.2 System Scan This option allows you to quickly scan which systems are installed on the vehicle. Tap System Scan on the test item selection screen, the system starts scanning the systems. Once the scanning is complete, the screen will display the result.
- Page 33 LAUNCH PAD VII User Manual Warning: Retrieving and using DTCs for troubleshooting vehicle operation is only one part of an overall diagnostic strategy. Never replace a part based only on the DTC definition. Each DTC has a set of testing procedures, instructions and flow charts that must be followed to confirm the location of the problem.
- Page 34 LAUNCH PAD VII User Manual On-screen Buttons: Select Page: Tap to select all items of the current page. Select All: Tap to select all items. To select certain data stream item, just check the box before the item name. Unselect: Tap to deselect all data stream items.
- Page 35 LAUNCH PAD VII User Manual items are marked in different colors. On-screen Buttons: : Tap it to view the waveform graph of the current data stream item. Note: The waveform can be zoomed in or out via: Spread apart/pinch together.
- Page 36 LAUNCH PAD VII User Manual • Value: Tap to display the parameters in texts. Select Sample DS: Tap to select the sample DS file, the values you customized and saved in process of data stream sampling will be imported into the Standard Range (See below) column for your comparison.
-
Page 37: Diagnostic History
LAUNCH PAD VII User Manual Tap the Min./Max. value to change it. After modifying all desired items, tap Save to save it as a sample DS file. All sample DS files are stored under the Data Stream Sample file in User Info. -
Page 38: Feedback
LAUNCH PAD VII User Manual 5.4 Feedback This item allows you to feedback your diagnostic problems to us for analysis and troubleshooting. Tap Feedback, the following 3 options will be displayed on the left column of the screen. A. Feedback Tap a tested vehicle model to enter the feedback screen. -
Page 39: Maintenance Reset
LAUNCH PAD VII User Manual 6 Maintenance Reset In addition to amazing & powerful diagnostic function, the tablet also features various service functions. The most commonly performed service functions contain: • Oil Reset Service • Electronic Parking Brake reset • Steering Angle Calibration •... -
Page 40: Electronic Parking Brake Reset
LAUNCH PAD VII User Manual 2. After changing engine oil or electric appliances that monitor oil life, you need to reset the service lamp. 6.2 Electronic Parking Brake Reset 1. If the brake pad wears the brake pad sense line, the brake pad sense line sends a signal sense line to the on-board computer to replace the brake pad. -
Page 41: Injector Coding
LAUNCH PAD VII User Manual As an anti-theft device, an immobilizer disables one of the systems needed to start a car’s engine, usually the ignition or the fuel supply. This is accomplished by radio frequency identification between a transponder in the ignition key and a device called a radio frequency reader in the steering column. When the key is placed in the ignition, the transponder sends a signal with a unique identification code to the reader, which relays it to a receiver in the vehicle’s computer control module. -
Page 42: Afs (Adaptive Front-Lighting System) Reset
LAUNCH PAD VII User Manual to shift delay or impact problem. In this case, this function needs to be done so that the gearbox can automatically compensate according to the driving conditions so as to achieve more comfortable and better shift quality. -
Page 43: Software Update
LAUNCH PAD VII User Manual 7 Software Update This module allows you to update the diagnostic App and frequently used software. 7.1 Update Diagnostic Software & APP Go to Software Update on the Job Menu and tap the Downloaded tab. -
Page 44: Renew Subscription
LAUNCH PAD VII User Manual 7.3 Renew Subscription If the software subscription is due or expires, the system will prompt you to renew your subscription and a Renewal button will appear on the bottom of the update page. Tap Renewal to navigate to the payment screen. -
Page 45: Smartlink Diag
LAUNCH PAD VII User Manual 8 SmartLink Diag. 8.1 Introduction SmartLink is a newly developed powerful service system dedicated to remote vehicle diagnosis and service. In the SmartLink ecology system, if a technician (SmartLink C) does not have time to puzzle through a touch vehicle problem, he can seek a trusted second opinion or additional expertise on various vehicle issues from remote master technicians or repair shops (SmartLink B). - Page 46 SmartLink C plus a SmartLink B dongle for providing hardware support. 1. Launch Service Link Platform: Binds SmartLink B dongles and accepts orders from SmartLink C. • If the SmartLink B dongle works with the LAUNCH-specific diagnostic tool equipped with SmartLink module, tap SmartLink to add the SmartLink B device and accepts orders on the diagnostic tool.
-
Page 47: Perform Smartlink Remote Operation
LAUNCH PAD VII User Manual 2. SmartLink B Dongle: After accepting the orders, it can work with the compatible diagnostic tool to perform diagnosis of the vehicle connected to the SmartLink C dongle. 8.2 Perform SmartLink Remote Operation 8.2.1 Posting remote assistance request 1. -
Page 48: Connections & Operations
LAUNCH PAD VII User Manual • In the Device S/N column, choose the desired SmartLink C Serial Number from the pull-down list if several SmartLink C is bound to the current account. • In the Vehicle information column, enter the VIN manually and choose the right Make, Car model, Model year, Displacement, Engine type and Function. - Page 49 LAUNCH PAD VII User Manual device, and the other end into the vehicle’s DLC port. Note: During the SmartLink diagnosis, especially during remote online programming, it is recommended that the vehicle battery is connected to a charging power source. Doing so can prevent the vehicle from running out of power and failing to start due to long diagnosis time.
- Page 50 LAUNCH PAD VII User Manual 1 - Network delay status: Indicates the quality of the current network. Different colors represent different delay status. There are three states of network delay: • green: Indicates the network is normal. It is recommended that the diagnosis operation be performed when the network delay is green.
-
Page 51: Tpms
LAUNCH PAD VII User Manual 9 TPMS This module allows you to configure the tablet as TPMS activation & diagnostic tool, which provides the ability to trigger TPMS sensor, program TPMS sensor, perform the relearning procedure. It needs to work with the X-431 TSgUN device (sold separately). -
Page 52: Operation Flowchart
LAUNCH PAD VII User Manual 9.2 Operation Flowchart Below illustrates how the tablet works with the X-431 TSgUN (Take Mercedes-BENZ for example). Steps Corresponding Screenshots Step 1 - Tap TPMS on the diagnostic tool Step 2 - Select the desired X-431 TSGUN from the Bound device list Note :... -
Page 53: Binding/Unbinding
LAUNCH PAD VII User Manual Step 5 - Select vehicle model and year Step 6 - Select the TPMS function and follow on-screen instructions to proceed. For more details on TPMS functions, see the User Man- ual of the X-431 TSGUN. -
Page 54: Unbinding
LAUNCH PAD VII User Manual Note: Serial Number is a 12-digit number starting with 90002 - you can find it on the back of the tool/from the password envelope. Activation Code is a 8-digit number stored in the password envelope included with the device. -
Page 55: Adas
Activation Code (optional) before performing this function. Moreover, it also requires the diagnostic tool to work with the ADAS calibration tool manufactured by LAUNCH (calibration tools from other manufacturers will not be supported). As a comprehensive and flexible calibration tool, the ADAS calibration tool enables you to effectively and accurately calibrate a wide range of camera-based &... - Page 56 LAUNCH PAD VII User Manual 5. Now the ADAS function becomes accessible and is ready for use. www.x431.com +86 755 8455 7891...
-
Page 57: User Info
LAUNCH PAD VII User Manual 11 User Info 11.1 My Report This option is used to view, delete or share the saved reports. Tap My Report, there are total 3 options available. In case the DTC result is saved on read Trouble Code page, the files will be listed under the Health Report tab. -
Page 58: Vci
LAUNCH PAD VII User Manual On-screen Buttons: Graph – displays the parameters in waveform graphs. Value – this is the default mode which displays the parameters in texts and shows in list format. Combine – this option is mostly used in graph merge status for data comparison. In this case, different items are marked in different colors. -
Page 59: My Order
This option is used to establish a wireless connection between the tablet and the printer (sold separately) while performing printing operations. The App is compatible with the “LAUNCH Wi-Fi Printer” (sold separately) and “System” printer (external printers loaded with Wi-Fi hotspot). - Page 60 LAUNCH PAD VII User Manual A. For LAUNCH Wi-Fi mini printer, follow the steps below to connect the printer. 1. Tap Printer Set. A. If it is the first time you have operated this printer, please proceed the following: 2. For initial use, you are suggested to reset the printer: Press and hold [MODE] & [FEED] for 8 seconds,...
-
Page 61: Clear Cache
LAUNCH PAD VII User Manual 4. Tap next to Select a printer on the upper left corner of the screen. 5. Select All Printers -> Add printer and enable the installed printer service, the system starts searching for all available Wi-Fi printers of the brand. -
Page 62: Diagnostic Software Auto Update
LAUNCH PAD VII User Manual 11.11.6 Diagnostic Software Auto Update This option is used to set whether automatic update function is ON. 11.11.7 Login/Exit from current account To logout the current user ID, tap Logout. To login the system again, tap Login. -
Page 63: Others
In the search bar, input the partner’s username and tap Search button next to the search bar to start searching from Launch’s technician database. The partner must be the users who have registered their Launch’s diagnostic tools. They may be the following: •... -
Page 64: Start Instant Messaging
(Contacts). Or tap Ignore to ignore this request. 12.1.3 Start Instant Messaging Note: The I/M (Instant Messaging) function is open to all users who had Launch’s diagnostic tool equipped with this module. After adding your friends, tap the desired one’s photo to enter the following screen: Tap the input field and use the on-screen keyboard to enter the text message, and then tap Send to send it. -
Page 65: Launch Remote Diagnosis (Device-To-Device)
The tablet is allowed to initiate remote diagnosis with other diagnostic tools (including but not limited to the X-431 PAD VII) of Launch family, which are equipped with this module. Notes: Before performing this operation, please make sure the following no matter which side sends the remote request: •... - Page 66 LAUNCH PAD VII User Manual request to control the partner’s device remotely to help him diagnose the vehicle. Notes: • Remote diagnosis has the same diagnostic steps as manual diagnosis. • In process of remote diagnosis, tap the button to send a voice message.
-
Page 67: Launch Remote Diagnosis (Device-To-Pc)
User Manual 12.1.5 Launch Remote Diagnosis (Device-To-PC) Except that the remote diagnosis can be done between different Launch’s diagnostic tools that come loaded with the module, user also can ask for remote control from PC client technician. Slide the switch to ON Notify the partner of the remote diagnostic web link Input the partner’s official account and password... -
Page 68: Toolbox
LAUNCH PAD VII User Manual 3. Tell the partner to input his own official technician account and password, and then tap Login to navigate to the following figure. 4. Tell the partner to check the box Serial number and enter the Serial Number provided by you, and then tap Start remote diagnosis to control your device remotely. -
Page 69: Wireless Upgrade
LAUNCH PAD VII User Manual without using a separate app. The app has built-in ZIP and rAr sources, so you can access compressed files without unpacking them on your computer first. For more information, please refer to the associated ES file explorer documents. -
Page 70: Teamviewer Qs
LAUNCH PAD VII User Manual Note: While performing OTA update, please make sure the tablet battery has at least 70% and DO NOT run any other programs during the update. 1. On the Job menu, tap Other modules -> Built-in apps -> Wireless Upgrade. -
Page 71: Gallery
LAUNCH PAD VII User Manual 12.10 gallery This function allows you to take new pictures and manage the picture library (including screenshots). 12.11 Video Player This video player is a media player said to be the best ever created since it supports all types of video formats. -
Page 72: J2534 Reprogramming Using Smartlink C
Except that the SmartLink C acts as a VCI device and a SmartLink dongle, it also can be used as a J2534 PassThru device, working together with the PC installed with the OEM diagnostic software to perform the J2534 reprogramming. In this case, the PC needs to install with the LAUNCH’s J2534 tool, which can be downloaded from www.cnlaunch.com. - Page 73 LAUNCH PAD VII User Manual www.x431.com +86 755 8455 7891...
-
Page 74: Faq
After the tablet has been successfully reset, follow the steps below to download the App: 1. Launch the browser and the default official Launch website opens (If a blank page pops up, just type in www.x431.com in the input bar). - Page 75 7. How to retrieve the login password? Please follow below steps to proceed in case you forgot the login password: 1. Tap the application icon on the home screen to launch it. 2. Tap the Login button on the upper right corner of the screen.
-
Page 76: About Smartlink Diag
LAUNCH PAD VII User Manual 8. After the total progress reaches to 100%, the backup is OK. Unplug the storage device from the tablet. Note: Another method is available for picture backup. User also can go to Gallery to select the desired folder/ files and share it to the external storage device via ES Save to.. - Page 77 LAUNCH PAD VII User Manual 6. Is it necessary to re-ignite the car after the diagnostic system starts working? For the sake of some vehicle’s conditions, the re-ignition will provide you a more detailed analysis after OBD diagnosis. 7. Can I charge the SmartLink C device through an external DC power supply? No.
-
Page 78: Glossary Of Terms & Abbreviations
LAUNCH PAD VII User Manual 15 glossary of Terms & Abbreviations ABS – Anti-Lock Brake System AC – Alternative Current ADAS -- Advanced Driver Assistance Systems AFS – Adaptive Front-lighting System CAN – Controller Area Network Communication Protocol – Allows different systems and sensors in a vehicle to communicate. - Page 79 Email: overseas.service@cnlaunch.com Statement: LAUNCH reserves the rights to make any change to this manual without notice. We have tried our best to make the descriptions and illustrations in the manual as accurate as possible, and defects are inevitable, if you have any question, please contact local dealer or LAUNCH TECH.
- Page 80 FCC Statement This equipment has been tested and found to comply with the limits for a Class B digital device, pursuant to part 15 of the FCC rules. These limits are designed to provide reasonable protection against harmful interference in a residential installation.
- Page 81 such as a device case and a device holster are not composed of metal components. Keep your device 0 mm away from your body to meet the requirement earlier mentioned. This device was tested for typical body-worn operations. To comply with RF exposure requirements, a minimum separation distance of 0 mm must be maintained between the user’s body and the handset, including the antenna.
Need help?
Do you have a question about the X-431 PAD VI and is the answer not in the manual?
Questions and answers