Table of Contents
Advertisement
Quick Links
CUB EMERGENCY & ACUTE CARE
TM
PEDIATRIC STRETCHER - Model FL19
Technical Assistance and Parts
1 800 428-5025 (Service in English - Canada)
1 800 361-2040 (Service in French - Canada)
1 800 327-0770 (In the United States)
E-mail (Service in Canada): service@bertec.strykercorp.com
Manufactured by Stryker Bertec Medical Inc
OPERATIONS MANUAL
September 2001
72-0382 R1.1
Printed in Canada
Advertisement
Table of Contents

Related Manuals for Stryker Bertec CUB FL19


Summary of Contents for Stryker Bertec CUB FL19
- Page 1 1 800 428-5025 (Service in English - Canada) 1 800 361-2040 (Service in French - Canada) 1 800 327-0770 (In the United States) E-mail (Service in Canada): service@bertec.strykercorp.com September 2001 Manufactured by Stryker Bertec Medical Inc 72-0382 R1.1 Printed in Canada...
-
Page 3: Table Of Contents
2.14 STANDARD ACCESSORY BRACKET USAGE (OPTIONAL)........... 19 2.15 CHART HOLDER USAGE (OPTIONAL)................... 19 Stryker Bertec Medical gives special attention to the quality of the information found in this document. Any comments on its content will be most welcomed. Please forward your remarks to the Technical Service... -
Page 4: Introduction
Trendelenburg/Reverse Trendelenburg +12° Trendelenburg / -12° Reverse Trendelenburg * Stryker Bertec Medical Inc provides special attention to product improvement and reserves the right to change specifications without notice. 1.2 TECHNICAL SUPPORT For questions regarding this product, contact the following Technical Service departments or... -
Page 5: Warning / Caution / Note Definitions
Chapter 1 Introduction 1.3 WARNING / CAUTION / NOTE DEFINITIONS The words carry special meanings and should be carefully WARNING CAUTION NOTE reviewed. The personal safety of the patient or user may be involved. Disregarding this information could result in injury to the patient or user. These instructions point out special procedures or precautions that must be followed to avoid damaging the equipment. - Page 6 • Do not use the stretcher if any components are missing or broken. Contact your dealer or Stryker Bertec Medical for replacement parts. Use only replacement parts provided by Stryker Bertec Medical. •...
-
Page 7: Warranty
1.2) or your local representative. To Obtain Service and/or Parts For an on-site diagnosis of a malfunction by a Stryker Field Service Representative or to order replacement parts (refer to section 1.5 of the Pediatric stretcher maintenance manual for the part ordering procedure), contact our Technical Service department (see section 1.2) or your... -
Page 8: Stretcher Cleaning And Mattress Care
Chapter 1 Cub Operations Manual 1.6 STRETCHER CLEANING AND MATTRESS CARE Cleaning Stretchers Hand wash all surfaces of the stretcher with a soft cloth moistened with a solution of lukewarm water and a mild detergent. Wipe the stretcher clean and dry thoroughly to avoid build up of cleaning solution. Do not use harsh cleaners, solvents or detergents. -
Page 9: Set-Up Procedures
Chapter 1 Introduction 1.7 SET-UP PROCEDURES It is important tthat the stretcher is working properly before it is put into service. The following list will help ensure that each part of the stretcher is verified. Rail operation (on some stretchers, the foot endrail may be fixed): ____ Side/endrail handles operate properly, handle trigger and rotational movement operate smoothly. -
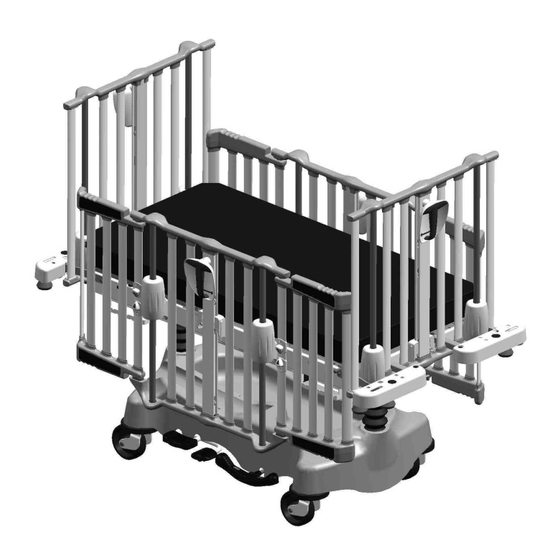
Page 10: Stretcher Illustration
Chapter 1 Cub Operations Manual 1.8 STRETCHER ILLUSTRATION The stretcher illustrated below is equipped with the following options: adjustable height base, fifth steer wheel, adjustable height side/endrails and movable access doors. FOOT ENDRAIL FOOT SECTION RETRACTABLE RIGHT FOWLER SIDERAIL HEAD ENDRAIL LEFT SIDERAIL FOOT PREMIUM ACCESSORY... -
Page 11: Stretcher Operation
Chapter 2 Stretcher Operation 2. STRETCHER OPERATION 2.1 OPERATING BASE CONTROLS There are two types of base options: fixed height base and adjustable height base. The configuration illustrated below is the adjustable height base with the fifth steer wheel. RIGHT HEAD END LEFT Pump to raise litter. -
Page 12: Applying The Brake
Chapter 2 Cub Operations Manual 2.2 APPLYING THE BRAKE Always apply the brakes when a patient is removed from or placed on the stretcher. Always engage the brakes unless the stretcher is being moved. Push on the stretcher to ensure the brakes are securely locked. -
Page 13: Adjusting The Litter Height (Optional)
See illustration below for the support socket functions. PROTECTIVE TOP MOUNTING SOCKETS REQUIRES SET OF FOUR BUMPER SYSTEMS 1/2"-3/4" STRYKER BERTEC IV POLE SOCKETS UPRIGHT O BOTTLE UPRIGHT O... -
Page 14: Operating The Fowler And Foot Section
Chapter 2 Cub Operations Manual 2.7 OPERATING THE FOWLER AND FOOT SECTION There are two types of Fowler options: manually operated and pneumatic assist operated. The foot section is manually operated. To avoid injury, verify the patient is safely positioned on the litter before lowering the siderail and operating the Fowler or foot section. -
Page 15: Operating Siderails And Endrails
Chapter 2 Stretcher Operation 2.8 OPERATING SIDERAILS AND ENDRAILS To avoid injury, ensure the patient’s extremities are clear of all moving parts before operating a rail. Verify the rail is securely locked after moving it. The rails must always remain in the highest position and the litter in the lowest position unless a patient is being tended. -
Page 16: Operating The Iv Caddy (Optional)
Chapter 2 Cub Operations Manual 2.10 OPERATING THE IV CADDY (OPTIONAL) The IVCaddy enables an IV pole to be transported when the stretcher is moved. Always ensure the IV Caddy is secured tightly on the IV pole before transporting to avoid damaging the IV pole or causing injury to the patient or user. -
Page 17: Operating The 2-Stage Permanently Attached Iv Pole (Optional)
Chapter 2 Stretcher Operation 2.12 OPERATING THE 2-STAGE PERMANENTLY ATTACHED IV POLE (OPTIONAL) To use the 2-stage permanently attached IV pole 1. Lift and pivot the pole from the storage position and push down until it is locked into the receptacle. -
Page 18: Operating The 3-Stage Permanently Attached Iv Pole (Optional)
Chapter 2 Cub Operations Manual 2.13 OPERATING THE 3-STAGE PERMANENTLY ATTACHED IV POLE (OPTIONAL) To use the 3-stage permanently attached IV pole 1. Lift and pivot the pole from the storage position and push down until it is locked into the receptacle. -
Page 19: Standard Accessory Bracket Usage (Optional)
Chapter 2 Stretcher Operation 2.14 STANDARD ACCESSORY BRACKET USAGE (OPTIONAL) Optional standard accessory brackets may be installed on each corner of the bed to support optional removable IV Poles and/or an optional retracting protective top (requires the complete set of four standard accessory brackets). A convenient rubber bumper completes the bracket assembly.
Need help?
Do you have a question about the Bertec CUB FL19 and is the answer not in the manual?
Questions and answers