Poly G7500 User Manual
Video mode
Hide thumbs
Also See for G7500:
- Administrator's manual (156 pages) ,
- User manual (58 pages) ,
- Preparation manual (16 pages)
Table of Contents
Advertisement
USER GUIDE
| December 2019 | 3725-xxxx-xxxx-xxx
Poly Video Mode User Guide
Getting Help
For more information about installing, configuring, and
administering Poly/Polycom products or services, go to
Polycom Support.
Plantronics, Inc. (Poly — formerly Plantronics and Polycom)
345 Encinal Street
Santa Cruz, California
95060
©
2019 Plantronics, Inc. All rights reserved. Poly, the propeller
design, and the Poly logo are trademarks of Plantronics, Inc.
All other trademarks are the property of their respective
owners.
Advertisement
Table of Contents

Subscribe to Our Youtube Channel
Related Manuals for Poly G7500


Summary of Contents for Poly G7500
- Page 1 Plantronics, Inc. (Poly — formerly Plantronics and Polycom) 345 Encinal Street Santa Cruz, California 95060 © 2019 Plantronics, Inc. All rights reserved. Poly, the propeller design, and the Poly logo are trademarks of Plantronics, Inc. All other trademarks are the property of their respective owners.
-
Page 2: Table Of Contents
Product Overview of Poly Systems in Poly Video Mode............. 4 LED Status Indicators......................5 LED Status Indicators for the G7500 System............5 LED Status Indictors for the Poly Studio X50 and Studio X30 Systems....6 Overview of Poly G7500, Studio X50, and Studio X30 Hardware........8 Poly G7500 Hardware....................8 Poly Studio X50 Hardware.................. - Page 3 Contents Unfavorite a Contact....................18 Call a Favorite Contact...................18 Joining Meetings from the Calendar................. 18 Meeting Cards......................19 Join an Overbooked Meeting................. 19 Join a Password-Protected Meeting...............20 Sharing Content....................21 Sharing Content from a Computer or Device..............21 Polycom Content App.....................21 Cast Content from an AirPlay- or a Miracast-Certified Device.......
-
Page 4: Before You Begin
Related Poly and Partner Resources This guide contains overview information, procedures, and references you can use to perform tasks with your system. The information in this guide applies to all the following Poly devices except where noted: ▪ Poly G7500 system (P011) ▪... -
Page 5: Getting Started
Product Overview of Poly Systems in Poly Video Mode The Poly G7500, Studio X50, and Studio X30 systems in Poly Video Mode support audio and video calls. The following are the features available on the following Poly systems: Poly G7500 System Features and Capabilities The G7500 system supports the following features: ▪... -
Page 6: Led Status Indicators
LED Status Indicators The following figures display the LEDs on the G7500, Studio X50, and Studio X30 systems. The tables list each LED indicator and it’s associated status. LED Status Indicators for the G7500 System Use the LED on the front right corner of the codec to get information on the state of your system. -
Page 7: Led Status Indictors For The Poly Studio X50 And Studio X30 Systems
Solid red Muted microphone LED Status Indictors for the Poly Studio X50 and Studio X30 Systems The system provides an LED light bar above the camera to help you understand the system’s behaviors. Basic Polycom Studio LED Indicators and Status... - Page 8 Getting Started Indicator Position Status Solid green or white Four to eight (when in the middle), Working indicating the tracked speaker or The lights are green with supported the direction of the camera applications, with the following cases: ▪ Tracking people in the group framing and speaker tracking mode.
-
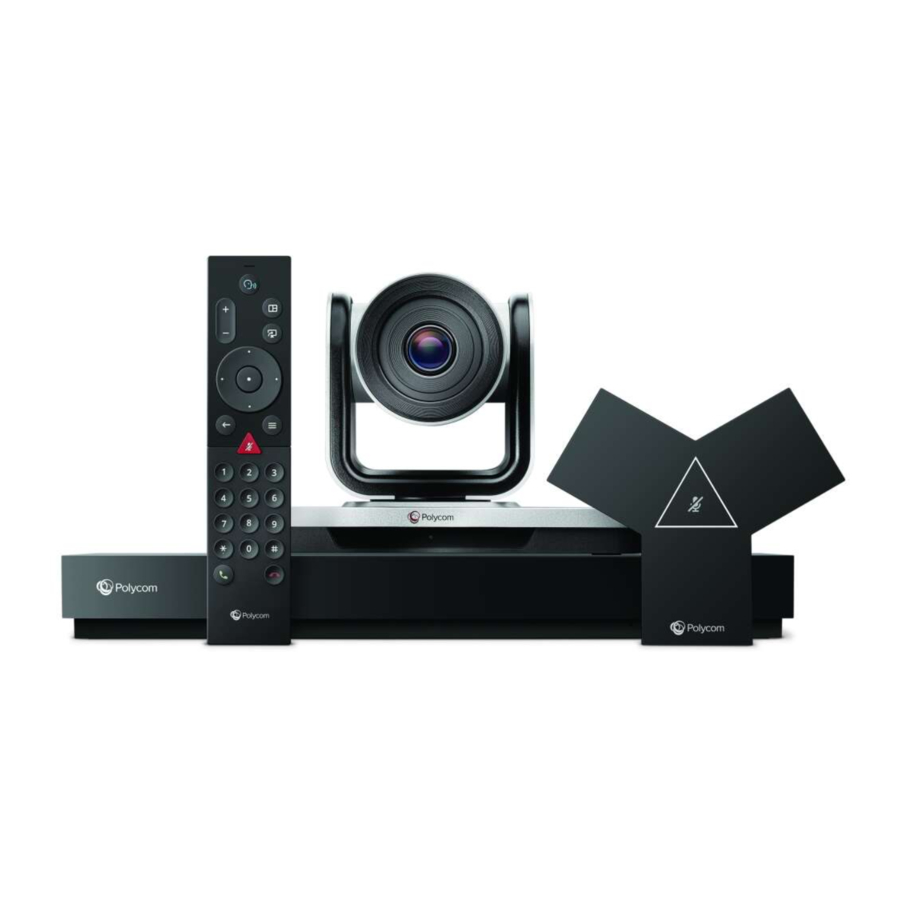
Page 9: Overview Of Poly G7500, Studio X50, And Studio X30 Hardware
Use the following figures and tables to understand hardware features available on your system. Poly G7500 Hardware The following figure displays the hardware features on the Poly Studio X30 system. The table lists each feature numbered in the figure. Poly G7500 Feature Descriptions... -
Page 10: Poly Studio X50 And Studio X30 Privacy Cover
Speaker Mono audio output Poly Studio X50 and Studio X30 Privacy Cover The Poly Studio X50 and Studio X30 systems provide a physical cover that you can place over the camera lense to protect your privacy. Navigating the G7500 System The G7500 system has icons and user screens to help you navigate and understand important information about your system. - Page 11 Getting Started Home Screen Number Description System information bar, shows system information such as date/time and system name. Task buttons, opens screens for placing calls, sharing content, or creating a blackboard. Menu, opens navigation menus to access features. Local camera view. Home Screen Elements Some of the following interactive and read-only elements might not display on your system depending on the system configuration.
- Page 12 Getting Started Element Description Security code Displays after you attempt a content sharing connection. Use the four-digit code to set up wireless connections through the Polycom Content App or an AirPlay- or a Miracast-certified device. IP address IP address, SIP, H.323, and secondary network configured for your system. Current time Local time zone.
-
Page 13: Content Screen
Getting Started Content Screen The Content screen is where you share and annotate content in your meetings. Content Screen Number Description Camera views of call participants. System information bar, shows system information such as system name and time. Content toolbar, provides tools to annotate and work with content. Content management functions. -
Page 14: Wake The System
Wake the System After a period of no activity, the system enters sleep mode (if configured by your administrator). You can wake it using a touch monitor, Poly Touch 8, or remote control. Procedure » Do one of the following: ▪... -
Page 15: Features For Mobility-Impaired Users
Getting Started Accessibility Feature Description Auto-answering You can enable the system to auto-answer calls. Mute auto-answered calls You can configure the system to mute auto-answered calls. Ringtones An audible tone plays for incoming calls. Join and leave tones The system plays a tone when someone joins or leaves a conference call. -
Page 16: Calling
Calling Topics: ▪ Placing Calls ▪ Calling Contacts ▪ Calling Favorite Contacts ▪ Joining Meetings from the Calendar There are several ways to initiate calls on the system. You can place a call by entering your contact’s name or number, choosing a contact in the directory, or calling a favorite or recent contact. You can place calls using the following methods: ▪... -
Page 17: Answer A Call
Calling Answer a Call The way the system handles incoming calls depends on how your administrator configured it. The system either answers the call automatically or prompts you to answer manually. Procedure » If you receive an incoming call notification, select Answer. Ignore a Call If the system doesn’t answer incoming calls automatically, you can choose to ignore the call rather than answer it. -
Page 18: Calling Contacts
Calling Calling Contacts You can access and call contacts, recent contacts, and frequent contacts on your system. If configured by your administrator, contacts display on the Place a Call screen. Contact cards can display the following information: ▪ Contact name ▪... -
Page 19: Calling Favorite Contacts
Calling Calling Favorite Contacts To quickly access a short list of contacts you call most often, create favorites. Favorites display in your Contacts list and in the Favorites list. A star icon is added to the left of the contact’s name, providing you an easy way to identify and call favorites. Favorite a Contact Create favorites to display contacts that you call the most often. -
Page 20: Meeting Cards
Calling Meeting Cards If configured, meeting cards display on the Home screen. You can access meeting cards to view meeting details. The following meeting card and scheduling information display: ▪ All-day meetings display as the first meeting card. ▪ For meetings scheduled later in the day, a “Free until [time/day]” message displays, followed by upcoming meeting cards in the time and date order they’re scheduled. -
Page 21: Join A Password-Protected Meeting
Calling Join a Password-Protected Meeting Some meetings may require a password to join. Make sure that you have the password for password-protected meetings before you join. If you don’t have a meeting password and a message prompts you for one, contact the meeting organizer for the password. -
Page 22: Sharing Content
Sharing Content Topics: ▪ Sharing Content from a Computer or Device ▪ Sharing Content on a Blackboard or Whiteboard ▪ End a Content Session ▪ End a Call with Active Content Sharing To enhance the collaboration experience, you can share documents, graphics, videos, and blackboards or whiteboards with other participants. -
Page 23: Share Content Using An Hdmi Connection
Sharing Content 2. From the list of available devices, select the name of your G7500 system. 3. Begin casting from your AirPlay- or Miracast-certified device. For casting information for your device, refer to the product documentation. 4. If prompted, enter the security code shown on the Home screen. -
Page 24: Take A Snapshot Of Your Content
Sharing Content Take a Snapshot of Your Content You can take a picture of your current content. Then you can annotate on the snapshot or download it using the Polycom Content App. A limited number of snapshots are available. A prompt notifies you when you have reached the snapshot limit. - Page 25 Sharing Content If you keep content, the content session continues. 3. When you are ready to stop content, select Menu > End Session > End Session.
-
Page 26: Cameras
Cameras Topics: ▪ Adjust a Near-Site Camera ▪ Adjust a Far-Site Camera ▪ Turn Your Camera On or Off ▪ Turn Camera Tracking On or Off ▪ Using Camera Presets You can control cameras, depending upon the camera type, in the following ways: ▪... -
Page 27: Turn Your Camera On Or Off
Cameras Turn Your Camera On or Off You can turn your camera on to show local video or turn your camera off to hide your local video. Procedure 1. Select Menu > Camera 2. Select Camera On or Camera Off Turn Camera Tracking On or Off Cameras with tracking automatically focus on the current speaker, removing the need to manually adjust the camera. -
Page 28: Select A Preset
Cameras ▪ On the remote control, press a number to select a preset. Select a Preset Using previously created camera presets, you can quickly move the camera to a desired position in a call. Procedure 1. Select Menu > Camera 2. -
Page 29: Settings
Settings Topics: ▪ Video Adjustments ▪ Audio Adjustments Before or during calls, you can adjust video and audio settings, including adjusting the volume, turning off the camera, and changing the video layout. Video Adjustments You can manage video and certain user interface settings. Change the Participant Layout During a call, you can change from the current layout to another layout better suited for the meeting. -
Page 30: Unmute Your Microphones
Settings Unmute Your Microphones When your audio is muted and you’re ready to speak in a call, unmute your microphones. Procedure » Do one of the following: ▪ On your remote control, press Mute ▪ On the screen, select Menu >... -
Page 31: Troubleshooting
Troubleshooting Topics: ▪ View Content Help Tips ▪ View Blackboard Help Tips This section includes information related to troubleshooting issues with your system. You can also find information on pairing your remote, configuring your monitors, and where to find help tips. View Content Help Tips Content help tips provide information on how to stream content using HDMI, the Polycom Content App, or an Airplay- or a Miracast-certified device.
Need help?
Do you have a question about the G7500 and is the answer not in the manual?
Questions and answers