Unify OpenScape CP700 User Manual
Hide thumbs
Also See for OpenScape CP700:
- User manual (256 pages) ,
- User manual hfa (219 pages) ,
- Installation and quick reference manual (25 pages)

Subscribe to Our Youtube Channel
Related Manuals for Unify OpenScape CP700


Summary of Contents for Unify OpenScape CP700
- Page 1 OpenScape Desk Phone CP700 OpenScape Key Module 600 OpenScape Business User Guide HFA A31003-C1000-U127-1-7619...
- Page 2 Provide feedback to further optimize this document to edoku@atos.net. As reseller please address further presales related questions to the responsible presales organization at Unify or at your distributor. For specific technical inquiries you may use the support knowledgebase, raise - if a software support contract is in place - a ticket via our partner portal or contact your distributor.
-
Page 3: Important Notes
EU applies should be disposed of separately from the municipal waste stream in ap- propriate collection systems. Information concerning the proper disposal of your Unify product in the business-to- business market segment is available from your local sales representative in Unify or partner sales. -
Page 4: Software Update
• Clean the telephone with a soft cloth moistened with water. Online documentation This document along with additional information is available online at: http://www.unify.com/ Support. Technical notes, current information about firmware updates, frequently asked questions, and lots more can be found on the Internet at: http://wiki.unify.com/. -
Page 5: Table Of Contents
Table of Contents Important Notes ........3 Symbol . - Page 6 ............... . 34 Operating your OpenScape Desk Phone CP700/CP700X .
- Page 7 Rejecting/accepting second calls (call waiting) ........91 Activating/deactivating call waiting.
- Page 8 Activating and deactivating Bluetooth ......... 152 Changing the Bluetooth name of your OpenScape CP700 ......152 Managing Bluetooth devices .
- Page 9 Forwarding calls for lines ........... . . 167 Switch calls directly to executive.
- Page 10 Door opener ............. . . 203 Receiving a call from the door phone .
-
Page 11: General Information
General information About this manual This document contains general descriptions of the technical options, which may not always be available in individual cases. The required features must therefore be individually defined in the terms of the contract. If a particular function on your phone is not available to you as described, this may be due to one of the following reasons: •... -
Page 12: Icons Used In The Manual
Icons used in the manual Tips Refers to a setting established via the web-interface. Indicates additional important information in relation to handling. ñ Indicates required intervention by the administrator. Displays for describing operation Selected action Original illustration on display Step-by-step illustration in the User Guide A dark background is not used in the step-by-step illustration in order to ensure legibility in the User Guide. -
Page 13: Action Not Selected
Action not selected Illustration on display Step-by-step illustration in the User Guide If an action is not selected, it is shown right-aligned in a light color. The associ- Reject call ated Softkey is also shown. The action can be executed by pressing the softkey without the action being selected. -
Page 14: Programmable Keys
Confirm the selected conversation with the Softkey to establish the connection « Daniel Bernoull or with the key to open the context menu. Information displayed for a non-selected conversation Conversations are displayed in a light color if they are not selected. This descrip- Andre-Marie Ampere 11:22 tion is only used if it aids understanding. - Page 15 Programmable Keys in the menu Favorites Press the main menu, if needed. Open using the Softkey. Favorites Page 1 Q Select the required page with Softkey. Favorites 1/2 An unused function key in the Favorites menu. An example being with the Function key assigned to the Call waiting function. Call waiting...
-
Page 16: Service
Service The service department can help you only if you experience problems or defects with the phone itself. Should you have any questions regarding operation, your specialist retail- er or network administrator will be glad to assist you. For queries regard- ing connection of the telephone, please contact your network provider. -
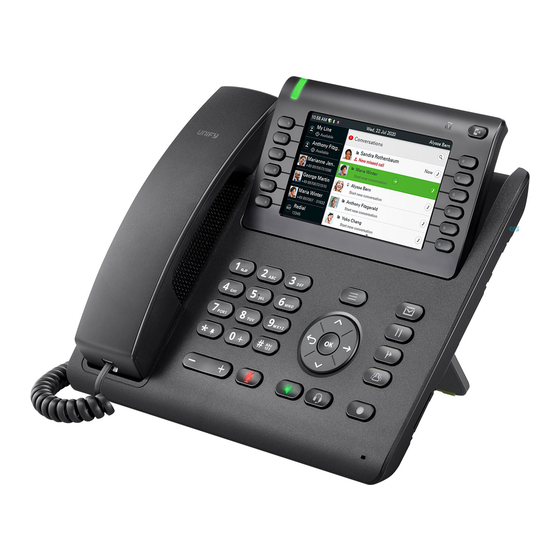
Page 17: Getting To Know The Openscape Desk Phone Cp700/Cp700X17
Getting to know the OpenScape Desk Phone CP700/CP700X The following sections describe the most frequently used controls and displays. The User Interface of Your Telephone Handset - Use it for handset calls Graphic display - allows intuitive operation of the phone page 26 ... - Page 18 MWI key - Message waiting indicator; it also provides access to the voicemail system Hold key - puts current call on hold Transfer key - puts a call on hold and gives you dial tone to call another party Conference key - establishes a conferences call Redial key - activates a function configured by your administrator Programmable keys - keys to which you can assign functions or phone numbers...
-
Page 19: Ports On The Underside Of The Phone
Ports on the underside of the phone Power supply unit (if needed) Network switch (if needed) Country-specific cable Key module Headset Hand- Service interface Properties of your OpenScape Desk Phone CP700/CP700X Display type 5" color graphic display, 800x480 pixels. Illuminated display Full-duplex speakerphone function Headset Bluetooth 5.0... -
Page 20: Using Network Ports More Efficiently
Using network ports more efficiently The OpenScape Desk Phone CP700/CP700X has a Gigabit Ethernet switch. This means that you can also connect a PC with a Gigabit LAN port to the LAN directly via the phone. The option for connecting the telephone and PC must first be activated on the telephone by your administrator. Network switch OpenScape Desk Phone CP700/CP700X Using this connection option saves one network port for each switch used and requires shorter... -
Page 21: Keys
Keys Softkeys Function when key is pressed Activates the function shown next to the key on the display or opens an additional menu. Used in the Favourites menu as a Function key page 62. If there is no description next to the key, the key is not active. Audio controls Audio keys Function when key is pressed... -
Page 22: Fixed Function Keys
Fixed Function keys You can switch to the relevant application using these keys. Function when key is pressed Switches between the current screen and Main menu page 26. Switches to Presence and back page 27. Â Provides access to the voicemail system Ä... -
Page 23: Dialpad
Dialpad Numeric input If you press a dialpad key when the phone is in idle mode, an input field opens automatically for entering single-digit numbers. You can only enter the numbers 0 to 9 as well as the characters * and # via the dialpad in 123 mode (indicated at the left-hand margin of the input field). - Page 24 Complete your input: Press the Softkey for to complete your input. Character overview (depends on the current language setting) 1x 2x 3x 4x 5x 6x 7x 8x 9x 10x 11x 12x 13x 14x 15x 16x 17x ï & ä ö ß...
-
Page 25: Permanently Displayed Programmable Keys
Permanently displayed programmable keys Function when key is pressed Activates the function shown next to the key on the display or dials a phone. If there is no description next to the key, the key has not been programmed. Long press activates key programming. -
Page 26: Different Display Interfaces
Different display interfaces Your OpenScape Desk Phone CP700 is fitted with a color/greyscale graphic display page 19, in which different contents are displayed depending on the particular situation. Conversations The conversations list is called from the main menu with the Conversations option and is a collec- tion of contact data and data from the call log. -
Page 27: Presence
@ Main menu Favourites Conversations Service/Settings Forwarding on Service menu CFNR on User settings CFSS on Administrator settings Presence If the access is configured as UC user on your phone (ask administrator) and you are logged on to this server page 219, you will see for example on the right side of the status bar the presence ... - Page 28 • At Home • DND In the submenus of the options you can choose from different values for the duration page 89. Personal Presence via the phone is temporarily suspended with call forwarding or do not disturb. If UC is not set up, you get a menu for variable call forwarding with the options: Variable: All calls Variable: External Calls Variable: Internal calls.
-
Page 29: Status Bar
Status bar The always visible status bar at the top of the screen displays the current time, phone status, pres- ence status, and the phone number or name. When the phone is idle, the status bar displays also the current date. The current date interchang- es with Bluetooth sensor reading information, if a Bluetooth Temperature sensor has been paired with the phone. - Page 30 Icon Meaning Indicates the battery level of the connected Bluetooth device, when the device has a call Indicates a Bluetooth temperature sensor reading Indicates a Bluetooth humidity sensor reading The Mobility function is activated and the mobility logon is complete Mobility data synchronization is in progress Indicates that a mobile user is logged on to the telephone The Phone lock is activated...
- Page 31 Icon Meaning Indicates a secured Wi-Fi connection with good signal strength Indicates a secured Wi-Fi connection with fair signal strength Indicates a secured Wi-Fi connection with poor signal strength Indicates a Wi-Fi connection with no signal...
-
Page 32: Context-Dependent Displays
Context-dependent displays Depending on the situation, the graphic display on your OpenScape Desk Phone CP700/CP700X shows different content, to which you can respond intuitively. Action with Softkey Press the top softkey to start an alphanumeric search. Use the Softkey to dial the respective subscriber. €... -
Page 33: Action Via Dialpad
Action via dialpad Press any key on the dialpad to start dialing a phone number with automatic phone number search. Softkeys As soon as you enter the first digits, an input field opens for selecting the phone number and you will be shown conversations that match the input to date in the corresponding positions. - Page 34 Choose an option such as "Send message" from the main menu, open it in the Notification area of the "Feature dialog" with the input prompt "Message to:." Enter the number of the target subscriber here, Select the desired option.
- Page 35 And send the info to the target subscriber.
-
Page 36: Operating Your Openscape Desk Phone Cp700/Cp700X
Operating your OpenScape Desk Phone CP700/CP700X The following descriptions provide an overview of how to operate your phone. Before looking at the functions and settings, you should set up the User password to protect your phone against unauthorized use page 183. ... -
Page 37: Conversations
Conversations A conversation represents one contact. The call history of a contact is displayed in the respective conversation. If a contact is not involved in a call, then the conversation is empty. New conversa- tions are created or updated for: •... -
Page 38: Opening Details Of A Conversation Or Conducting A Call
Opening details of a conversation or conducting a call « You can open a selected conversation using the navigation key or start a call using the softkey or the navigation key . You start a call using the softkey if the conversation has not been selected. -
Page 39: Creating Or Editing Conversations
Creating or editing conversations Conversations are created based on dialed or received calls. New contacts are synchronized with the phone when connected to Exchange. When you search for a subscriber using LDAP page 46, this contact is transferred to conversations. ... - Page 40 Press the Softkey for to access edit mode. You can complete the following fields for a contact: • Last name: Last name of a contact. • First name: First name of a contact. • Work 1: First work phone number. If only one phone number is available, it is stated here. •...
- Page 41 Delete the digits using the key and enter the last name. Press the Softkey in the input field to complete the input for this field. € μ Use the key to switch, for example, to "First name" and enter the first name here if appropriate.
- Page 42 Save the contact data. You can add missing entries subsequently. The following information is shown on the display, for example, the next time you call this contact: These inputs or changes to existing information are stored locally in the phone.
-
Page 43: Create A New Contact/Conversation From Scratch
Create a new contact/conversation from scratch You can create a new contact from the conversation list with no previous history. Navigate to the Conversations screen which can be found at the idle screen. μ « Select the header row of the Conversation list by using the key and then the Navigator key can be used to access the Conversation List options. - Page 44 € μ New contact form can be now updated. Use the key to switch, for example, to "First name" and enter the first name here if needed. Save the contact data after entering the contact information.
-
Page 45: Searching For Conversations Or Contacts
Searching for conversations or contacts There are several ways to search for conversations or contacts. If you know the telephone number, you can: lift the handset or press the speaker key or press the headset key and begin entering the digits. To search in your conversations list, open an alphanumeric input field by pressing the Softkey for or choose a purely numeric input field for the search by entering a digit. - Page 46 Search for names (alphanumeric search string) • LDAP was not configured by your administrator: The phone now searches in the local conversation list for 'Am' and thus finds all the conversations that contain the name 'am', for example 'Ampere' or even 'Samara'. The hits are listed chronologically.
- Page 47 Using special characters to control the search Additionally, you can use comma (,) and a hash (#) to control the search. A single comma (,) is used to separate the last name from the first name. A hash (#) is used to indicate that we are looking for an exact match.
-
Page 48: Filtering Conversations
Filtering conversations When you want to filter conversations, it is possible to do so from the List options screen. Initially, the filter is non-applied, which means it is set to "Show all calls (All)" and will display all conversa- tion list entries of any call type. Use the "Filter"... -
Page 50: Display The History Of A Conversation
Display the history of a conversation The current history of a conversation is shown directly in the conversation list. The histories of oth- er calls can be viewed under Details or also directly with the History option during a call. «... - Page 51 The extra line is highlighted and shows the Forwarding party number in the configured format next to the ž icon.
-
Page 52: Deleting Conversations
Deleting conversations If you misdial, for example, or cancel dialing prematurely, an entry will still be created in the con- versations list. You can delete this entry again immediately. Entries for incoming calls that you n longer need or entries from V-Cards can also be removed from the list. «... -
Page 53: Marking All Conversations As Read
Marking all conversations as read You are able to mark all new missed calls in Conversation List as read in a single action. Conver- sation List options provides you with a functionality that will mark all new missed calls as read. This means: •... -
Page 55: Telephony Interface
Telephony interface Telephony view Incoming call Your phone rings and the Notification LED flashes. In addition to the "classic" telephone features, additional information and functions are offered on the display: Notification LED flashes Status bar Select a function using the Softkey No function Incoming call in multicall scenarios It is possible to have many incoming calls at the same time. - Page 56 All other incoming calls including the one presented on Incoming call screen are the Status bar and in Conversations. If the Alerting screen is ignored, phone returns to the currently active call or shows another incom- ing call screen. You can still answer an ignored call waiting call either when the ongoing call ends or by selecting the ignored call waiting from the list.
- Page 57 When conducting a call Notification LED lights permanently Select a function using the Softkey No function...
- Page 58 Switching to a different menu during a call You can use the key while on a call to switch to the Conversations menu. Returning to the call view Indicates an active call Use the key to open the main menu and from there, for example, change the Brightness of the display in the Settings.
-
Page 59: Programmable Keys
Programmable keys Programmable keys are available to you in the left panel of the display and in the Favourites menu. or on an optionally connected OpenScape Key Module 600 page 59. Programmable keys in the left panel The OpenScape Desk Phone CP700/CP700X comes with 6 illuminated, free programmable keys permanently displayed in the left panel. - Page 60 Press the Softkey “Change key”. Press the Softkey for “Calls”. Use the€ key to select one of the available features, in our example “Call waiting”. Confirm with the Softkey.
- Page 61 If you prefer not to change the standard label (“Accept call”), simply finish with "Exit." The Function key is now configured and can be used.
-
Page 62: Programmable Keys In The Favourites Menu
Programmable keys in the Favourites menu You can use the Favourites menu to access 6 more programmable keys, to which you can assign functions and phone numbers. You can program preferred functions that are not offered in menus. It makes sense to assign the “Shift key” functionality to a key to reach the second level of the fa- vorites. - Page 63 Press the second Softkey continuously to populate the first function key on page 2: Press the third Softkey to “Assign telephony function”. Press the Softkey “Change key”.
- Page 64 Press the Softkey for “More features”. Use the€ key to select one of the available features, in our example “Shift key”. Confirm with the Softkey. Select if the key will affect other layers.
- Page 65 If you prefer not to change the standard "Shift key" label, simply finish with "Exit." When you navigate to the Favourites option of the main menu screen, you can see that the func- tion key is now configured and can be used.
-
Page 66: Programmable Keys On The Openscape Key Module 600
Programmable keys on the OpenScape Key Module 600 The OpenScape Key Module 600 has 12 keys to which you can assign functions or numbers at two levels. As such the first level can be assigned with frequently used functions and the second level can only be assigned with RNR keys. -
Page 67: User Settings
User settings Use the key to open the main menu and then switch to the settings. The menu consists of a configuration area for system, local user, and local administrator settings. - Page 68 The first time you open the user settings you have to enter the User password page 183. ...
-
Page 69: User Settings
User settings Menu You can adjust local settings for your OpenScape Desk Phone CP700/CP700X using the "User settings" menu. The menu structure consists of several levels. You can also configure all settings via the web interface of your OpenScape Desk Phone CP700/CP700X page 226. - Page 70 Press the Softkey for Q to save your new setting. Parameters You can set values in some submenus. Press the Softkey for K to open the setting.
- Page 71 Press the Softkey for example on “Echoing”. The setting is changed and you return to the previous menu. Exit the menu.
- Page 72 Level You can use menus with levels to adjust the volume or brightness, for example. An example of display brightness is given here. Switch to the telephone settings menu and open the display menu with the Softkey. Open the menu for the brightness setting...
- Page 73 " Adjust the brightness to the desired level. Use the key to do this. The display is adjusted im- mediately. Complete the setting by pressing the Softkey for Save your new settings.
-
Page 74: Administration
Administration You can access the administration area via the "Admin" function and by entering the administration password. Refer to the administration manual for your phone for more detailed information on this topic. During a software update, the phone must not be disconnected from the power supply unit, the LAN line or the phone line. -
Page 75: Setting Up The Phone
Setting up the phone Display Display adjustment You can tilt the display unit. Adjust the display unit so that you can clearly read the screen. Display brightness You can customize the display brightness according to your current lighting con- ditions. You can also configure this setting via the Web interface page 226 ... -
Page 76: Select Language For Display User Guidance
Select language for display user guidance Change language for user guidance if needed. Press the Main Menu key, if needed. Open using the Softkey. Service/Settings Open using the Softkey. Service Menu € Select "More features" and confirm. More features € Select "Select language"... -
Page 77: Energy Saving Mode
Energy saving mode Select the inactivity time after which the OpenScape Desk Phone CP700/ CP700X should automatically dim or turn off the backlight. You can select the following time combinations for backlight dim / switch off: • 1 min/5 mins •... -
Page 78: Contrast For The Openscape Key Module 600
Contrast for the OpenScape Key Module 600 If you have connected an OpenScape Key Module 600, you can adjust the key label contrast to suit your ambient lighting. You can also configure this setting via the Web interface page 226 ... -
Page 79: Brightness For The Openscape Key Module 600
Brightness for the OpenScape Key Module 600 When you have connected a OpenScape Key Module 600, you can adjust the key label brightness to suit your ambient lighting. You can also configure this setting via the Web interface page 226. ... -
Page 80: Screensaver
Screensaver Activate a screensaver for the phone’s idle state. You can also configure the screensaver settings via the Web interface page 226. Activate the screensaver Prerequisite: Your administrator has uploaded images to the OpenScape Desk Phone CP700/CP700X or you have uploaded your own images.. Press the Main Menu key, if needed. -
Page 81: Automatic Screensaver Activation
Automatic screensaver activation Select how long OpenScape Desk Phone CP700/CP700X should be idle before the screensaver automatically activates. You can choose from the following settings: • 0 minutes (deactivated) • 1 minute (default) • 5 minutes • 10 minutes • 20 minutes •... -
Page 82: Set The Fade Time For The Screensaver
Set the fade time for the screensaver Set the intervals at which the screensaver images change here. The following fade times are possible: • 5 seconds • 10 seconds • 20 seconds • 30 seconds • 60 seconds Press the Main Menu key, if needed. Open using the Softkey. -
Page 83: Return To Main Menu After Timeout
Return to Main menu after timeout You can choose between screensaver or menu screen that the phone will switch to after a period of idle state has passed. The timer for this idle period will be the same as the existing screensaver timer page 82. -
Page 84: Audio
Audio Change connection volumes Change the following settings: • Handset volume • Speaker volume • Headset volume • Call loudspeaker volume You can also adjust volume settings from the user menu page 214. " Set volume louder or quieter. Press the key until you reach the desired volume. Adjust ringer volume in call or while idle You can also adjust volume settings from the user menu page 214. -
Page 85: Deactivate The Ringer
Deactivate the ringer If you do not want to be disturbed by the phone ringing for an incoming call, you can switch the ringer off. Deactivating Hold down the key until the "Ringer off" icon appears. Ringer off Activating Hold down the key until the "Ringer off" icon goes out. Ringer on Mute active ringer You can mute the active ringer for an incoming call and only for that call. -
Page 86: Room Character
Room character To ensure that the other party can hear you properly in speakerphone mode, you can adjust the phone to the room acoustics by choosing one of the following room character conditions: • Normal • Echoing • Muffled You can also configure this setting via the Web interface page 226. -
Page 87: Ringer
Ringer Select your preferred ringer from the available audio files. If no individual audio files are available, the "Pattern" ringer is preset. To upload your own files in ".mp3" or ".wav" format, please consult your administrator. You can also configure this setting via the Web interface page 226. -
Page 88: Setting Headset Port Use
Setting headset port use You can also configure this setting via the Web interface page 226. Press the Main Menu key, if needed. Open using the Softkey. Service/Settings Open using the Softkey $ User settings if needed Enter and confirm the User password. Open using the Softkey Audio Open using the Softkey. -
Page 89: Presence
Presence Presence status Once you have used the Out-of-Office/Call forwarding key to call up the Presence menu page 27, you can set your current Presence status. You can choose from the following options and set the duration: “ • Office –... -
Page 90: Switch Off Away Status
Example Meeting Set your absence duration for a Meeting: Press the Out-of-Office/Call forwarding key. Open using the Softkey. ” ä Meeting Press the Softkey to select 1 hour, for example. You will receive a confirmation 1 hour ä like the following: Presence changed to Mee- ting until 6 Nov, 16:45 The setting is displayed. -
Page 91: Call Settings
Call settings Rejecting/accepting second calls (call waiting) If configured (ask relevant technician), you can reject/accept automatic call wait- ing signaling for a second call page 125 during a telephone conversation. Press the Main Menu key, if needed. Open using the Softkey. Service/Settings Open using the Softkey. -
Page 92: Set Up Speed-Dial Keys
Set up speed-dial keys From keys you can set-up and save 10 speed dial numbers. Press the Main Menu key, if needed. Open using the Softkey. Service/Settings Open using the Softkey. Service Menu Confirm. Destinations Confirm the option shown Change Speed Dial Press key. -
Page 93: Switch Night Answer On And Off
Switch night answer on and off In night answer mode, for example, during lunch breaks or after office hours, all external calls are forwarded to a particular internal telephone (night station). The night station can be defined by the relevant service engineer (= standard night answer) or by you (= temporary night answer). -
Page 94: Programming Function Keys
Programming function keys You can assign a series of functions for the phone to programmable Function keys on the device or on the OpenScape Key Module 600 to suit your require- ments. The CP700 comes with 6 illuminated, free programmable keys permanently dis- played on the left panel of the display and additionally 6 keys in the Favorites menu, all of which can be programmed on two separate levels. -
Page 95: Overview Of Functions
Confirm. The key is programmed. Release key You can also change the standard key label € Select "Key label" Confirm. Key label Confirm. Change Change text. Confirm to save input. Save Finishing the procedure Confirm to leave edit. Exit Overview of functions The functions are classified under the following menus: •... - Page 96 Participant not on the phone. Participant on the phone or do-not-disturb enabled. ¤ Flashes quickly – I am in a call, please accept. £ Flashes slowly – another participant is on a call and has not yet accepted. Call keys, general call keys, Line key, MULAP key, Assign call number: No call on relevant line.
-
Page 97: Set Procedure Key
Following functions saved to keys have no LED function: Call number (external), Procedure key, Tracing a call, Fast access, Release, Management function, Central code lock, Send message, Call waiting, Toggle/ connect, Conference, Speaker call, Reconnect, Ln, Line queuing, Activate line, Temporary Phone, Override, Park a call, Pickup - directed, Call pickup in pickup group, Account code, Show call charges, Paging, Answering, Appointment, Door opener, DTMF dialing, Signal key, Audio baby monitor, Internal consultati-... -
Page 98: Selected Dialing Key Configuration
Call number of phone to be called 12345 phone number to be dialed. Confirm to save input. Save Confirm to end the process. Exit If you have mistyped: Select and confirm. All entered digits will be deleted. Previous Re-enter the value and save the result. Select the saved procedure with a keystroke. -
Page 99: Setting Up Dialing Keys With Contact Data From An Existing Local Conversation
Setting up dialing keys with contact data from an existing local conversation You can assign phone numbers to selected dialling keys, forwarding keys and deflect keys using the contact data from an existing conversation. It is also pos- sible to copy the contact name and use it as a key label, but only with selected dialling keys. - Page 100 To select the default phone number of a contact use the Softkey next to it. +903122925112 +445137245784 +903122879930 +61413708490 A conversation may have more than one phone numbers for its contact. To be able to select a phone number other than the default, highlighte the conversation and press the -button.
- Page 101 You will be redirected back to the Edit selected dialing screen where the Number now shows the default number or the chosen number of the contact and the La- bel shows the contact’s name. To edit these fields, highlight either Number or Label and press the Softkey next to them.
-
Page 102: Deleting Key Programming
Deleting key programming ¬ If necessary, switch to another level Hold down the Function key in the left panel or on a connected OpenScape Key Release Module 600 that is to be deleted until the key programming menu is displayed. Press the Main Menu key, if needed. -
Page 103: Local Features
Local features How to program a local feature Example: "Door opener" set up Hold down the Function key in the left panel or on a connected OpenScape Key Module 600 to which a function is to be assigned, until the programming prompt is displayed. - Page 104 € Select "Delete local feature" Confirm. The key indicating the local feature is deleted. Delete local feature...
-
Page 105: Making Calls
Making calls To better understand the steps described here, it is recommended that you read the introductory chapter "”Getting to know the OpenScape Desk Pho- ne CP700/CP700X” Page 17". Receiving a call The call number or name of caller will be shown on the display. Answering a call via the handset The phone rings. -
Page 106: Taking Calls For Colleagues
Taking calls for colleagues You hear another telephone ringing. Via a permanently displayed programmable key in the left panel or from a connected OpenScape Key Module 600 Prerequisite: The Call pickup key is configured in the left panel or on a connect- ed OpenScape Key Module 600. -
Page 107: Spoken Via Loudspeaker
€ Select "Pickup - directed". Confirm. Pickup - directed Select and confirm the participant whose call you want to accept. Party Confirm the option shown Enter station no. Enter the call number for ringing telephone. You take the call. Spoken via loudspeaker You are being spoken to directly by a colleague over speakerphone. -
Page 108: Switch Microphone On/Off
Switch microphone on/off To prevent the other party from listening in while you consult with someone in your office, for example, you can temporarily switch off the handset microphone or the handsfree microphone (see page 17) Ending a call É... -
Page 109: Dialing/Calls
Dialing/Calls You make a call by entering the phone number of the relevant party using the dial pad or by searching for this party in the permanent Conversations list. Con- versations include: • Dialed and received calls • Participants from Circuit •... -
Page 110: Dialing With Connected Headset
Your system can be programmed so that before you call an internal num- ber you must press the "Internal" key. As such, when you call an external number you do not have to enter an external code ( simplified dialing is switched on; ask relevant Administra- tor). -
Page 111: Dialing From Conversations
Dialing from conversations The conversations list is displayed on the screen. If the contact you want is not visible, then select with μ€ or search by entering the phone number or name. Confirm the selected contact with the Softkey. The phone number is dialed. Georg Simon Ohm If visible, confirm immediately with the Softkey for the contact. -
Page 112: Calling Back A Missed Call
Via a permanently displayed programmable key in the left panel - Redial Press the Function key. From a connected OpenScape Key Module 600 Redial Press the Function key. Via Favorites Press the Main Menu key, if needed. Open using the Softkey. Favorites €... -
Page 113: Dialing With Central Speed Dial Numbers
Dialing with central speed dial numbers Prerequisite: You know the central speed dial numbers (ask your relevant Ad- ministrator). © Enter and confirm mode *7 for "Use speed dialing" . Press the Main Menu key, if needed. Open using the Softkey. Service/Settings Open with the Softkey. -
Page 114: Speaking To Colleagues Directly Via Loudspeaker
Speaking to colleagues directly via loudspeaker You can speak to an internal party directly using the loudspeaker on their tele- phone. Press the Main Menu key, if needed. Open using the Softkey. Service/Settings Open with the Softkey. Service Menu Open with the Softkey. Calls €... - Page 115 Enter code directly. The display will show codes with relevant text. Select and confirm. Enter message text Enter text (maximum 24 characters) page 23. if needed Delete last letter. Switch between upper-case and lower-case letters. Insert space. Confirm. Send On system phones without display, impulse or tone dial telephones, sent text messages are saved as callback requests.
-
Page 116: Leaving An Advisory Message
Viewing the date/ time a message of a message Confirm. Time/Date sent Call sender Confirm. Call sender Deleting a received message Confirm. Delete Switching to next message Confirm if more messages are available. Next Leaving an advisory message You can leave an advisory messages on your phone’s screen for internal callers who want to reach you in your absence. -
Page 117: Deleting Advisory Messages
Deleting advisory messages Press the Main Menu key, if needed. € Select "Advisory msg. off". Confirm. Advisory msg. off Assign phone number (not for U.S.) If configured (ask relevant Administrator), you can assign a specific number (di- al-up number) to your telephone line before dialing an external number. The as- signed number then appears on the called party's screen. -
Page 118: Forwarding Calls
Forwarding calls Use variable call forwarding You can immediately forward internal and/or external calls to your lines to differ- ent internal or external telephones (destinations) (external destinations are also possible if the system is configured accordingly). If call forwarding is activated, a special dial tone sounds when the handset is lifted. - Page 119 Activating call forwarding with key The advantage of a specific key for call forwarding is that you do not have to re- enter a phone number every time. The programmed key already contains a des- tination. You can therefore set up several keys with different forwarding destina- tions.
-
Page 120: Use Cfnr
Switching off call forwarding via the forwarding menu Open the Forwarding menu. Confirm. Call forwarding is switched off and the destination is deleted. ¢ 0123456 Variable: All calls Confirm. Call forwarding is switched off and the destination is deleted. ¢ Variable: External calls 0123456 Confirm. - Page 121 Select and confirm to return to the idle state and to not turn off call forwarding. Exit If call forwarding is activated after a certain period of time, the "CFNR on" appears on the display for a short time after the handset has been re- placed.
-
Page 122: Using Callback
Using callback You can request a callback if the individual called is busy or if nobody answers. This also applies to external calls via switching centers. This will save you from repeatedly attempting to call someone. You receive a callback •... - Page 123 End query Confirm Delete Ë Press key. É Press key. LED goes out.
-
Page 124: During The Call
During the call Switching to speakerphone mode Prerequisite: You are conducting a call via the handset. Press and hold the key, hang up the handset, and then release the key and con- tinue the call. US mode If the country setting is set to US (ask relevant Administrator), you do not need to press the loudspeaker key when you hang up the phone. -
Page 125: Using Second Call (Call Waiting)
Using second call (call waiting) You are still available to other callers, even when you are on another call. A warning tone and the new caller's phone number and name, if available, ap- pears on the display to indicate the waiting call. You can ignore or accept the second call. -
Page 126: Call Second Individual (Request)
Call second individual (request) You can call a second party while a call is in progress. The first individual is placed on hold. Confirm. Consultation Ï Calling a second participant Enter the phone number of the desired participants. Select one from the conversations list. Back to the first participant, second participant does not answer: Confirm. -
Page 127: Parking A Call
Parking a call You can park up to 10 internal and/or external calls. You can resume the parked calls on another telephone. In this way, you can continue a call on another phone. Prerequisite: You are conducting a call. Press the Function key in the left panel or on a connected OpenScape Key Mod- Park a call ule 600, if such a key has been configured. - Page 128 If visible, press the Softkey of the Function keys . ˜ Park a call Press the Main Menu key, if needed. Open using the Softkey. Service/Settings Open with softkey. Service Menu Confirm. Calls € Select "Retrieve call". Confirm. Retrieve call Enter the parking position number you have noted.
-
Page 129: Call Holding
Call holding You can place a call partner on hold. They will hear music on hold. Ä Press the Hold key. You can now perform a consultation call or hang up. Recall If you have hung up, a recall occurs after a set time. Confirm recalling the parties. -
Page 130: Start A Conference
Start a conference You can initiate a conference by calling the "Start conference" function in the context menu of either the active or held call. Talk to up to seven other call partners at the same time during a conference call. These can be external or internal participants. - Page 131 Connect call partner to a conference Prerequisite: You are on a consultation call ( page 126). Confirm. Ð Conference Á Press the fixed Conference key. Press the Function key in the left panel or on a connected OpenScape Key Mod- Conference ule 600, if such a key has been configured.
-
Page 132: Carry Out Dmtf-Suffix/Dial Tone
Carry out DMTF-suffix/dial tone For controlling devices, such as answering machines or automatic information systems, you can send out DTMF signals (Dual Tone Multi- Frequency). Press the Main Menu key, if needed. Open using the Softkey. Service/Settings Open with the Softkey. Service Menu Open with the Softkey. -
Page 133: Importing Contacts Via Wbm
Importing contacts via WBM You can import your contacts into your phone through WBM interface (for more information, see ”Web interface” Page 226). The contact file can be exported from Outlook or OSM. See the products documentation for instructions on how to export contacts from an Outlook client or OSM. - Page 134 4. The progress and outcome of the import will be indicated to you – A completion message is displayed when the "Press to see import results" button is pressed – A successful import will be indicated by a "Import completed" text mes- sage below the panel on the page –...
-
Page 135: Using Bluetooth
OpenScape Desk Phone CP700/CP700X (of- ten smartphones, but not headsets). The NFC transmitter on the OpenScape CP700 is located in the top right area of the display, to the left of the Presence key and below the "N" logo. -
Page 136: Using A Bluetooth Headset
Using a Bluetooth headset You can connect a Bluetooth headset to your OpenScape CP700, which is ap- proved for use with the OpenScape CP700. Ask your administrator about ap- proved headset types. Connecting the Bluetooth headset Prerequisite: The Bluetooth function on your OpenScape CP700 is activated page 152. -
Page 137: Testing A Bluetooth Headset
Connecting a Bluetooth headset to OpenScape CP700 The Bluetooth headset must now be connected to the OpenScape CP700. € Select the Bluetooth headset in the list. Confirm with the Softkey to connect. You will receive a corresponding confirma- ¦ _ ? Headset -Ž... -
Page 138: Transferring Contacts
The Bluetooth function on your OpenScape CP700 allows you to transfer con- tacts in vCard format (file extension: vcf) from other Bluetooth devices to your OpenScape CP700 and save them in the Conversations list. You can also send entries from the Conversations list as vCards to other Bluetooth-enabled devic-... -
Page 139: Sending A Vcard
Sending a vCard Sending to a paired device Prerequisite: The receiving device is included in the list of paired devices, Blue- tooth is activated on the device and can receive vCards. μ€ Select the required contact from the Conversations menu. The selected contact is highlighted. -
Page 140: Using A Bluetooth Conference Phone
Using a Bluetooth conference phone You can connect a Bluetooth conference phone to your OpenScape CP700, which is approved for use with the OpenScape CP700. Ask your administrator about approved conference devices. Connecting a Bluetooth conference phone Below is an example of connecting and operating a conference phone. -
Page 141: Testing The Bluetooth Conference Phone
Connect/disconnect the conference device with OpenScape CP700 The conference phone must still be connected to the OpenScape CP700. If you want to subsequently use the conference phone at another location, for exam- ple, you should first disconnect it from the OpenScape CP700. -
Page 142: Using A Bluetooth Device
Using a Bluetooth device You can control calls on the HFAG (hands-free audio gateway, e.g. mobile de- vice) from your OpenScape CP700 phone via Bluetooth. Once your mobile device is connected to CP700 through the Bluetooth, you can see the mobile’s battery level on the top of your CP700 main menu screen. -
Page 143: Outgoing Hfag Call
The “Pull audio” button reroutes the audio stream from HFAG back to Open- Scape CP700. The “Move to mobile” button reroutes the audio stream from OpenScape CP700 to the HFAG. Call is removed from the CP phone. For more information about how to proceed during a call, see ”During the call”... -
Page 144: Hfag Call States In Main Menu Screen
– NO ANSWER – DELAYED – BLACKLISTED Outgoing Call Ringing HFAG call states in Main Menu Screen Incoming HFAG call in the Main menu screen The icon with the Bluetooth rune index indicates incoming HFAG call. -
Page 145: Hfag Call States In Conversations Screen
Connected HFAG call in the Main menu screen The icon with the Bluetooth rune index indicates connected HFAG call. HFAG call states in Conversations Screen Connected HFAG calls are displayed in the conversation list. The HFAG call is distinguished from native calls by a special call state icon under the user name or number. -
Page 146: Anonymous Mode
Anonymous mode As a User, you are able to configure “Hide mobiles data”. In this mode, no celler information will be presented, only presence and state of the call. All Bluetooth calls are logged to Anonymous conversation. -
Page 147: Using Bluetooth Keyboard
Using Bluetooth keyboard Bluetooth keyboard can be paired with phone in User settings section under "Paired devices". After successful pairing keyboard appears in the paired devic- es list. There can be only one Keyboard device connected at the same time. Special "keyboard"... -
Page 148: Keyboard Pairing Modes
Keyboard pairing modes Keyboard initiates pairing and sets the pairing mode. The pairing mode differs depending on the keyboard type and manufacturer. There are three possible pairing modes supported: • Simple pairing (passkey entry) - if keyboard initiates "simple pairing", PIN is generated by keyboard and CP700 shows this PIN on display and waits until the number is typed on the keyboard. -
Page 149: Using Bluetooth "Remote Button
By pressing the Remote button, you can trigger certain action (e.g. under the Function keys or on OpenScape Key Module 600) configured by you on your OpenScape CP700. You can choose from the following keys: • Function keys • Key Module keys Please note that the shifted level function of an Function keys cannot be select- Using the Configuration option leads to the Configuration Menu for that device. - Page 150 Selecting the "Remote button" menu above leads to the screen that allows this Bluetooth Remote button device (called Selfie) to be configured. The Function keys s are identified by their key label in the “Select key” screen. Selecting the "Select key" menu above leads to the screen that allows the Func- tion keys for this Bluetooth Remote button device to be configured.
-
Page 151: Trigger On Reconnect
Only a Function keys with a function configured can be selected to be triggered by the Bluetooth Remote button click. All unallocated keys are hidden. Function keys from any attached Key Module are potentially available to be se- lected. No shifted level keys can be selected. The “Configure remote button”... -
Page 152: Bluetooth Settings
226. By factory default, the Bluetooth name is: OpenScape CP700 BF:4B:7C. If you are currently in the Bluetooth configuration, then the phone is visible. If you exit the menu, it will be hidden again after a short time. -
Page 153: Managing Bluetooth Devices
• Connecting or disconnecting paired Bluetooth devices • Removing single Bluetooth devices from the list • Renaming Bluetooth devices in the list The OpenScape CP700 is visible for other Bluetooth devices in the vicinity when you are in this menu. Adding Bluetooth devices... - Page 154 A pairing PIN is requested Enter pairing PIN... Enter the pairing PIN and confirm with the Softkey. The Bluetooth device is paired and added to the list. Your OpenScape CP700 is now "paired" with the Bluetooth device, but not yet connected page 154. ...
- Page 155 Open using the Softkey. $ Bluetooth Open using the Softkey. Paired devices You receive a message that the OpenScape CP700 is now visible for other Bluetooth devices while you are in this menu. ¢_ Paired devices are displayed. ? Headset -Šš...
- Page 156 Enter and confirm the User password. Open using the Softkey. $ Bluetooth Open using the Softkey. Paired devices You receive a message that the OpenScape CP700 is now visible for other Bluetooth devices while you are in this menu. Ž Paired devices are displayed. ¦_ †...
- Page 157 Deleting a Bluetooth device from the list You can delete a single Bluetooth device from the list, for example, if it will no longer be in the vicinity for an indefinite period. Press the Main Menu key, if needed. Open using the Softkey. Service/Settings Open using the Softkey.
-
Page 158: Blacklist For Bluetooth Devices
Blacklist for Bluetooth devices The blacklist contains the Bluetooth devices for which a connection setup at- tempt should be rejected by the OpenScape CP700. The connection will only be allowed if the setup attempt comes from the OpenScape CP700. Adding Bluetooth devices Press the Main Menu key, if needed. -
Page 159: Removing A Bluetooth Device From The Blacklist
Removing a Bluetooth device from the blacklist Press the Main Menu key, if needed. Open using the Softkey. Service/Settings Open using the Softkey. $ User settings if needed Enter and confirm the User password. Open using the Softkey. $ Bluetooth Open using the Softkey. - Page 160 Set up connection for telephone beacon to a server € Select input for URI Current address is displayed. Open using the Softkey. https://unify.com K ¾ The predefined HTTPS address appears. https://unify.com Change to the desired address and conclude your input with the Softkey.
-
Page 161: Making Calls With Multiple Lines
Making calls with multiple lines When configured (ask relevant Administrator), you can belong to a team of members with multiple lines: team or executive/secretary groups. Line/trunk keys (MULAP keys) page 162 are available on your phone. Trunks A distinction is made here between primary, secondary, and phantom lines. Each of these line types can be used on a private or shared basis page 161. -
Page 162: Line/Trunk Keys
Line/trunk keys On a Multi-Line phone the freely programmable keys function as line/trunk keys. Every key configured as a "line key" (key marking: MULAP X a.k.a Multi-Line Ap- pearance) corresponds to a line. As a team member, you yourself can assign the following functions to keys: page 94: ... -
Page 163: Hold A Call On A Line/Trunk Key And Then Accept Again
Hold a call on a line/trunk key and then accept again Prerequisite: You are conducting a call via one of your group's lines. Holding Ä Press the Hold key. if needed Replace the handset. Press the Function key for Release, if it is set up. Release As required per configuration (ask relevant Administrator), so that other team members can also accept the call on hold. -
Page 164: Mulap Privacy Release
MULAP privacy release If authorized (ask relevant Administrator), you can assign the "MULAP privacy released by:" function to a key on your phone page 94. Setting up a conference via the menu is no longer required in this case. Your team partner simply has to press the flashing line/trunk key for your line on his/ her phone and can then immediately take part in the conference. -
Page 165: Direct Station Selection Keys
Direct station selection keys Each team member has a DDS key for every other team member. As a result, each team member is directly accessible to other team members by the simple press of a key. Unlike a name key, a DSS key signals to you the status of the other extension via the LED. -
Page 166: Directly Call Team Members
Directly call team members Press the DSS key. Ì Party B ¤ If the desired team member is on the phone, the DSS key on your phone lights Ì Party B up. In this case you can still call if second calling (call waiting) is permitted to team members. -
Page 167: Forwarding Calls For Lines
Forwarding calls for lines You can immediately forward internal and/or external calls to your lines to differ- ent internal or external phones (destinations). If you activate call forwarding for a line, this shall apply to all line keys of your group for this line. - Page 168 Deactivate call forwarding Press the Main Menu key, if needed. Open using the Softkey. Service/Settings Open with the Softkey. Service Menu Open with the Softkey. Destinations € Select "Frwrdng. MULAP off". Confirm. Frwrdng. MULAP off Press the required line key. MULAP X ¤...
-
Page 169: Switch Calls Directly To Executive
Switch calls directly to executive All calls for the executive are usually only acoustically signaled in the secretary office. You can set the acoustic signaling so that the calls are only acoustically signaled on the main phone or on an assigned second phone. Requirement: On your phone there is a key assigned with the "Ring transfer executive/secretary"... - Page 170 Confirm. Call transfer off Press the required line key. MULAP X Enter the desired line/trunk number.
-
Page 171: Group Calls / Hunt Group
Group calls / hunt group If configured (ask relevant Administrator), your connection is part of a team. The team consists of internal phone connections that can make use of particular functions. Group call on/off If your phone is connected to a system network via LAN, pay attention to specific features page 209! ... - Page 172 € Select "Join group". Confirm. Join group Press key. Hunt group Press key. ¤ Hunt group In the Notification area of the display you can see if a selected group is active or inactive. If an "X" appears between the group/line number (e.g. 301) and the group name, 301 X Group names the call is active for this group/line.
-
Page 173: Accepting Calls For A Colleague In The Team
Accepting calls for a colleague in the team You can pick up calls for phones within a team (Call pickup group; ask relevant Administrator), on your phone; also during a call. In contrast to the direct station select function, you do not need any configured direct station select (DSS) to do this, see Page 165. - Page 174 Confirm to, for example, delete the currently displayed party from the ringing Delete group. Confirm to select another party. Exit If your phone is connected to a ringing group, you can see the phone num- ber or name of the initiator on the display (top row) and that of the caller (bottom row).
-
Page 175: Calls On Universal Call Distribution (Ucd)
Calls on Universal Call Distribution (UCD) If configured (ask relevant Administrator), you will belong to a group of members (agents) to whom calls will be assigned. An incoming call is always delivered to the agent who has been idle the longest. Login/logout at beginning/end of use Press the Main Menu key, if needed. - Page 176 Requesting/activating post-processing time If you want to follow-up on your last call without being disturbed, you can re- quest/activate a post-processing time. Your phone is removed from the call dis- tribution for a set amount of time, or until you log back in. Press the Main Menu key, if needed.
- Page 177 Display the number of waiting calls Press the Main Menu key, if needed. Open using the Softkey. Service/Settings Open with softkey. Service Menu Open with softkey. Destinations € Select "Universal Call Distribution". Open with softkey Universal Call Distribution Confirm. Calls in queue...
-
Page 178: Private Sphere/Security
Private sphere/security Activating/deactivating idle function If you do not wish to take calls, you can activate idle mode. Calls are only dis- played via one call symbol and on the display. Press the Main Menu key, if needed. € Select "Ringer cutoff on" Confirm. -
Page 179: Caller Id Suppression
Caller ID suppression You can stop your phone number or name from appearing on the display of those you phone externally. This remains active until you reverse it. Activating Press the Main Menu key, if needed. € Select "Suppress call ID" Confirm. -
Page 180: Security
Security Protecting the phone from misuse You can stop unauthorized parties from using certain functions on your phone while you are away. E.g. the dialing of external phone numbers and access to your mailbox can be prevented. Ask your Administrator which functions are locked. -
Page 181: Locking A Different Phone To Prevent Misuse
Locking a different phone to prevent misuse If configured (ask relevant Administrator), you can lock other phones against un- authorized use and then unlock them. If the phone user has locked his/her phone and forgotten his/her personal lock code, you can unlock the phone using this function. Press the Main Menu key, if needed. -
Page 182: Saving Personal Lock Code
Saving personal lock code For the functions • Locking the phone to prevent misuse page 180 • Using a different phone in the same way as your own page 191 in order to assign, you must enter a personal code (PIN) which you can define yourself. -
Page 183: User Password
User password Your User password protects your user settings. You can also use the User password to fully lock your telephone page 185. The administrator may have configured the following settings: • The password is deactivated: You do not have the option of configuring user settings. - Page 184 Open using the Softkey Confirm password © The input field is displayed. ****** Re-enter the new password and conclude your input with the Softkey. Save your input. The new password is now valid. Deactivating the password prompt You can deactivate the phone's password prompt if a password has already been configured.
-
Page 185: Locking The Phone
Save your input. The password is now deactivated. Locking the phone To protect the phone against unauthorized access, you can lock the phone so that nobody can make calls or change settings without knowing the User pass- word. You can only lock the phone if you set a User password page 183. -
Page 186: Other Settings And Functions
Other settings and functions Connection costs Display connection costs for your phone (not for U.S.) For the current call: If the costs are to be displayed continuously during an outgoing call, this ñ function must be requested from the relevant Administrator of the net- work operator. -
Page 187: Query Connection Costs For Another Phone
Query connection costs for another phone (not for U.S.) If configured (ask relevant Administrator), you can also display the fee-based calls from other phones and print these too. Prerequisite: You have programmed a key with the "Check costs" function page 94. ... -
Page 188: Calling With Call Charge Assessment
Calling with call charge assessment You can assign external calls to certain projects. Prerequisite: The relevant Administrator has set account codes for you. Press the Main Menu key, if needed. Open using the Softkey. Service/Settings Open with the Softkey. Service Menu €... -
Page 189: Appointment Function
Appointment function You can arrange for the communications system to remind you of an appoint- ment page 190. For this to happen, you need to save the desired times of the calls. This is possible for a period of up to 24 hours in advance or for a daily re- peating appointment. -
Page 190: Using Timed Reminders
Using timed reminders Prerequisite: You have saved an appointment page 189. The saved time ar- rives. The phone rings. The appointment time is displayed. Reminder at 12:30 pm É Press key twice. Lift the handset and put it back down. If you do not accept the arranged call, this will be repeated five times be- fore the appointment is deleted. -
Page 191: Using A Different Phone For A Call In The Same Way As Your Own
Using a different phone for a call in the same way as your own Your phone can be temporarily used by others for an existing call, as if it where his/her own. Press the Main Menu key, if needed. Open using the Softkey. Service/Settings Open with the Softkey. -
Page 192: Using A Mobile Connection To A Different Phone
You can configure a mobile connection that your relevant technician has set up for you on a OpenScape CP700 prepared for it on the system. The original con- nection to the "guest phone" is deactivated. The mobile connection remains available for as long as you are logged into the "guest phone". -
Page 193: Logging On To The "Guest Phone
Logging on to the "guest phone" Log on to mobile connection to "guest phone". The phone thereby behaves like your own as regards cost allocation, key programming, call forwarding etc. Prerequisite: A mobile connection with your own number and a pass- ñ... -
Page 194: Transfer Connection To Next Phone
Transfer connection to next phone If you want to transfer your connection from the first "guest phone" to a second "guest phone", log in to the second "guest phone" as normal (see page 193). If you log in to another phone with your PIN number, without first logging out of the other phone, logout will take place automatically. -
Page 195: Incoming Fax Message/Message On The Answering Machine
Incoming fax message/message on the answering machine If a fax or answering machine is connected to your system, and you have as- signed the "Fax details" function to a free key page 94, this key lights up when a fax or message arrives. Switching signaling off ¤... -
Page 196: Activating Functions For Another Phone
Activating functions for another phone If configured (ask relevant Administrator), you can activate or deactivate the fol- lowing functions for other phones (assoc. Services): • DND on/DND off, Code 97/#97 page 178 • Forwarding on, Code 13/#1 page 118 ... -
Page 197: Using System Functions Externally Disa (Direct Inward System Access)
Using system functions externally DISA (Direct Inward System Access) If configured (ask relevant Administrator), you can establish an outgoing exter- nal connection via your OpenScape Business both externally and as an internal party. Otherwise the following functions of your system can be activated and de- activated: •... -
Page 198: Controlling Connected Computers/Programs/Phone Information Service
Controlling connected computers/programs/ phone information service If configured (ask relevant Administrator), you can control, for example, hotel services or information systems with the computer connected to your telephone or its programs. Prerequisite: You have established a connection. Press the Main Menu key, if needed. €... -
Page 199: Searching For People (Not For U.s.)
Searching for people (not for U.S.) If radio paging equipment (RPE) is switched on in your system (ask relevant Ad- ministrator), you can search for people via your pocket receiver. The pocket re- ceiver signals the call request to the sought-after person. The sought-after per- son can go to the nearest phone and answer. -
Page 200: Watching A Video Stream Through A Camera
Watching a video stream through a camera You can open a video stream by using a camera e.g. from the door phone and watch a real-time video on your OpenScape Desk Phone CP700/CP700X phone device, when the administrator has configured your device. This enables you to monitor your place. - Page 201 If you have used a Function key in the Favorites menu: Press the Main Menu key, if needed. Open using the Softkey. Favorites Select the desired page (1 to 2). Page 1 Favorites (1/2) Camera 1 Press the Softkey that corresponds to the camera you want to activate. The video turns on and you can see the following screen: To deactivate the video, click the Softkey next to the camera icon.
- Page 202 LED displays for camera keys Meaning LED off: the camera is in idle mode. ¤ LED lights green: Video stream active ¤ LED lights orange: In progress. LED lights red: Failure, contact your administrator if the problem per- ¤ sists.
-
Page 203: Door Opener
Door opener Activating the Door opener Prerequisite: Door opener has been enabled by your administrator. At first you have to set up a programmable key to open the door. See also information in page 103 on how to set up a local feature. ... -
Page 204: Receiving A Call From The Door Phone
If the service engineer has set up a door phone and your administrator has con- figured it, you can speak to the visitors and activate the door opener from your OpenScape CP700 phone. When someone rings the door bell, you will receive an incoming call from the... - Page 205 Speak with a visitor over the door terminal Prerequisite: Your OpenScape CP700 phone is called from the door phone. Lift the handset. You are connected to the door phone immediately...
- Page 206 Open a video stream before answering a door phone call Prerequisite: Your OpenScape CP700 phone is called from the door phone. The door opener and the direct video has been configured by the administrator. The administrator has disabled automatic video for your door opener.
- Page 207 When you answer the call, your OpenScape CP700 screen changes as follows: Press the Softkey next to the video icon to turn the video off. Alternatively press the Function key you have configured for the camera. See also information in page 197.
- Page 208 Press with the Softkey to activate the video. You will be navigated to the follow- ing screen: Press the Softkey next to the video icon to turn the video off. Alternatively press the Function key you have configured for the camera. See also information in page 197.
-
Page 209: Special Functions With Networking
Special functions with networking If the phone is integrated into an environment in which several OpenScape Busi- ness are connected in the one network, you will carry out calls via the network. If this is the case, you must take note of the specific features of some functions. These are described below. -
Page 210: Tracing Call Forwarding
Tracing call forwarding You can activate/deactivate call forwarding page 118 for your phone from oth- er phones in the network. Press the Main Menu key, if needed. € Select DISA intern. Confirm with the Softkey. The Functions dialog opens DISA intern Enter the (DISA) phone number of your OpenScape Business. -
Page 211: Using Night Service
Using night service If authorized (ask relevant Administrator), you can also set phones on other OpenScape Business systems as night destinations. Press the Main Menu key, if needed. € Select DISA intern. Confirm with the Softkey. The Functions dialog opens DISA intern Enter the (DISA) phone number for the OpenScape Business to which the night destination phone is connected. -
Page 212: Ringing Group
Ringing group You can also have calls to your handset signaled on external phones or on phones in other OpenScape Business systems page 173. Saving/displaying/deleting phone for group ringing Press the Main Menu key, if needed. Open using the Softkey. Service/Settings Open with the Softkey. -
Page 213: Releasing The Door
Releasing the door If configured (ask relevant Administrator), you can also activate the door release page 203 from other OpenScape Business systems. Press the Main Menu key, if needed. € Select DISA intern. Confirm with the Softkey. The Functions dialog opens DISA intern Enter the (DISA) phone number for the OpenScape Business to which the night destination phone is connected. -
Page 214: Local Phone Settings
Local phone settings Audio settings Volumes Set the volume here, for instance, for the loudspeaker, handset, or headset. You can preset different volumes for the following microphones and signals in ten levels: • Loudspeaker • Ringer • Handset • Headset •... -
Page 215: Set Local Ringers
Set local ringers Select and configure call type The ringer mode "Local ringers" is set. Not all of the following types have to be used: • 1: Internal • 2: External • 3: Buzz • 4: Rollover • 5: Simple alert •... -
Page 216: Ringer Mode
Ringer mode With both Ringer mode options • HiPath • Local ringer determine who generates the ringer on the phone. With the "HiPath" setting the system emits the ringer type and the related ringtone, which you can adjust later page 214. ... -
Page 217: Secure Call Alert
Secure call alert You can also configure this setting via the Web interface page 226. Press the Main Menu key, if needed. Open using the Softkey Service/Settings Open using the Softkey. $ User settings if needed Enter and confirm the User password. Open using the Softkey. -
Page 218: Setting Up Exchange Access
Setting up Exchange access To use your Exchange account in conversations you must enter the server ad- dress and your access details. You can also configure this setting via the Web interface page 226. Press the Main Menu key, if needed. Open using the Softkey Service/Settings $ User settings... -
Page 219: Configuring The Connection To Uc
Configuring the connection to UC To use the Presence settings page 89, you must be logged in to the UC serv- You can also configure this setting via the Web interface page 226. Press the Main Menu key, if needed. Open using the Softkey. -
Page 220: Openscape Uc Voicemail
Activate with the Softkey. Allow UC Journal ¦ Deactivate with the Softkey. Allow UC Journal ¢ OpenScape UC Voicemail Prerequisite: UC mode is configured page 219, and „Allow UC Journal“ is enabled page 219. When the OpenScape UC Voicemail is activated, the UC server provides all nec- essary data, including voice streams when playing messages. - Page 221 The selected new voice message will be displayed with different options. Select the desired option, e.g. „Play message“. The Voice message playback screen appears. You can stop the message during playing.
- Page 222 Error messages • The UC Presence ( page 27) must be in “Office” state, otherwise playing voice message is not allowed by UC Suite. CallMe state also does not allow to play the voice message. In this case when “Play message” command is selected, the display will stay in the Voice Message screen and show a standard error toast notification with the following text: "Not possible.
-
Page 223: Displaying Network Information
Displaying network information This information overview in the User settings area of the Service/Settings menu provides you with information about the IP address or name of the phone and the HTML address of the web interface. It also provides real-time data about the network activity of the phone. - Page 224 € Scroll Phone address: Name or number of telephone. Web address: HTTP address of the web interface. This address is specified in the address line of the Internet browser and is used to call up the web interface of the phone in the browser. IPV4 Address: Display of the IP address or name that was assigned to the phone in the network.
-
Page 225: Resetting User Data
Resetting user data All personal settings changed via the telephone menu or the web interface can be reset to factory settings. Some images for the screensaver will be deleted or deleted default images will be restored. Some ringer files will be deleted or deleted default ringer files will be re- stored. -
Page 226: Web Interface
Web interface General You can configure a number of settings for your phone via the web interface. Communication oc- curs via a secure HTTPS connection. Access to the web interface must be activated by your ad- ministrator. Launching the web interface For more information on the IP address, the web interface address, and how to connect the telephone to the network, refer to the section entitled "Network information"... -
Page 227: User Pages
User pages All entries under the user menu on the web interface can also be found under the user menu on the telephone page 67. You will be prompted to configure a user password the first time you call up the web interface page 182. - Page 228 – Pattern melody – Pattern sequence – Special 1 – Ringer sound – Pattern melody – Pattern sequence – Special 2 – Ringer sound – Pattern melody – Pattern sequence – Special 3 – Ringer sound – Pattern melody – Pattern sequence –...
- Page 229 – No reply – Favourites / recently used – Direct destination – Fixed forwarding allowed – Favourites / recently used – Direct destination – Forward external calls allowed – Favourites / recently used – Direct destination – Forward internal calls allowed –...
- Page 230 – Backlight dim – Backlight off File transfer V page 80 – Slideshow images – Ringtones – Contacts transfer Diagnostic information...
-
Page 231: Fixing Problems
Fixing problems Responding to error messages on the display Possible causes: Incorrect input Number is not correct. Possible response: Enter correct number. Possible cause: No authorization Locked function attempted. Possible response: Apply for authorization to execute function from executive. Possible cause: Currently not possible Dialing a non-existent number. -
Page 232: Contact Partner In Case Of Problems
Possible 2nd cause: If "Clear LED support" shows in menu: You have tried to save a number without LED-display or an external number us- ing a key that already has an internal number with LED-display. Possible response: Confirm "Clear LED support" to save the call number. The existing internal num- ber remains on the other level without LED-display. -
Page 233: Local User Menu
Local user menu Opening the user menu on the phone Select and confirm the User settings menu option. You are prompted to enter the User password. Confirm your input with the key. The user menu options are available. User menu display Most of the settings that are configured from the User settings menu can also be accessed via the web interface page 229. - Page 234 – Ringer sound – Pattern melody – Pattern sequence – 9: Special 3 – Name Special 3 – Ringer sound – Pattern melody – Pattern sequence – 10:Attention – Name Attention – Ringer sound – Pattern melody – Pattern sequence –...
- Page 235 Bluetooth – Enabled page 152 Configuration – Outgoing calls ¢ – Block dialing page 118 – Autodial delay (s) – Call forwarding page 217 ¦ – Variable: All calls ¦ – Variable: External calls ¦ – Variable: Internal calls –...
-
Page 236: Key Terms
Key terms pick up in the team ..........166 pick up, directed ..........106 pick up, group ............. 173 retrieve parked call ..........127 transfer ............126, 166 Call charge assignment ......... 188 Accept arranged call ..........190 Call duration ............186 Account language .......... - Page 237 Internal / external ..........109 Group call ............171, 209 with handset on hook .......... 109 with redial ............111 with speed dialing ..........113 with the selected dialing key ....... 111 Handsfree answerback .......... 107 Dialog ............... 34 Authorize ............. 107 Dialpad ..............
- Page 238 delete/display ............114 Programming free keys ..........94 receive ..............115 Sending ............... 114 Microphone ............108 Missed calls ............112 Radio paging system RPS ......161, 199 Mobile phone calls ..........191 Receiving a call ............105 Mobile phone number, guest phone ...... 192 Redial ..............
- Page 239 In the team ............163 programming a key ........97, 105 Tone dialing ............132 User support ............16 Trace call forwarding ..........210 Using a mini switch ..........20 Transfer (call) ..........126, 166 Using network ports more efficiently ......20 UC ................
-
Page 240: Functions And Codes In Overview (Alphabetical)
Functions and codes in overview (alphabetical) The following table shows all possible functions, as shown on the display. When configured (ask your service personnel), you can initiate the functions in the direct dialog (select + confirm), via the service menu (select + confirm or code) or via keys configured as function keys.. - Page 241 ... in the ... via the direct Service menu Functions ... with Dialog page 67 Displays μ€ μ€ Code Handsfree answerback on Handsfree answerback off # 96 DISA Internal DISA Discreet calling Shift (Shift) Telephone test Tracing a call Temporary phone Group calls on Group calls off...
- Page 242 ... in the ... via the direct Service menu Functions ... with Dialog page 67 Displays μ€ μ€ Code Parking a call Retrieve call Paging Report (not for U.S.A) Project code Consultation Return to held call end and back Transfer/Accept Callback View/delete callbacks...
- Page 243 ... in the ... via the direct Service menu Functions ... with Dialog page 67 Displays μ€ μ€ Code Call pickup, directed Call pickup in pickup group Picking up a call Forwarding on 1=all calls 2=only external calls 3=only internal calls Forwarding off CFNR on CFNR off...
Need help?
Do you have a question about the OpenScape CP700 and is the answer not in the manual?
Questions and answers