Table of Contents
Advertisement
Colorful Technology Website:
http://www.colorful.cn
Thanks for purchasing Colorful series motherboard. This series of motherboards provides excellent performance and quality
assurance.
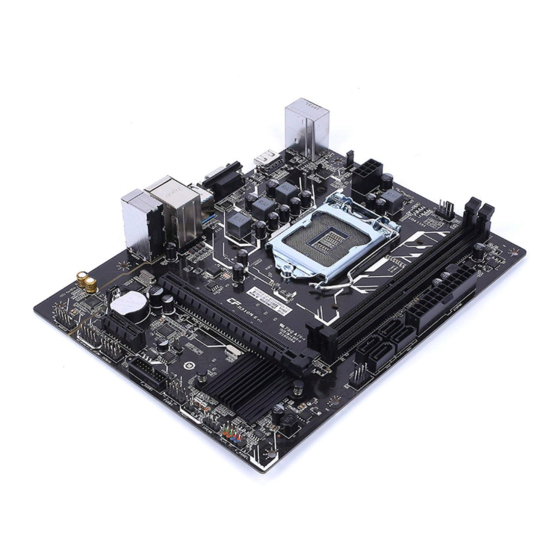
H310M-M.2 PLUS V20 motherboard based on Intel H310 Chipset, support Intel LGA1151 Coffee Lake-S processors, support dual
channel DDR4 2133/2400/2666MHz memory, support PCI-E 3.0 standard.
The motherboard provides 1*HDMI port,1*VGA port,2*DDR4 memory slots,3*SATA3.0 ports,6*USB2.0&4*USB3.0 ports(including
the headers),onboard 6-CH audio chipset,onboard 1000M LAN chipset, it's a Cost-effective motherboard !
The motherboard provides 1*PCI Express3.0 x16 slot,1*PCI Express x1 slot,1*M.2 slot,it had good extensibility !
1.1.Packing Contents
1* Colorful H310M-M.2 PLUS V20 motherboard
2* SATA cables
1* Driver/Utility CD
1* User's Guide
1* I/O shield
1.2.MOTHERBOARD SPEC
CPU
·support Intel LGA1151 Coffee Lake-S processors
Chipset
·Intel H310
Main
·Dual-Channel DDR4 2133/2400/2666MHz support
Memory
·Offer 2 DIMM slots
·1*PCI Express 3.0 x16 slot
Slots
·1*PCI Express x1 slo
·1*M.2 slot ( support PCI-e x2 and SATA SSD)
Storage
·3*SATA3.0 port
·4*USB3.0+6*USB2.0(including the headers)
USB
·1*PS2 Mouse / Keyboard port
·1*LAN(RJ45) port
·4*USB 2.0 ports
Rear IO
·2*USB 3.0 ports
Connector
·6-Channel Audio I/O
·1*VGA port
·1*HDMI port
H310M-M.2 PLUS V20
·1*24-pin ATX Power connector
·1* 8-pin ATX 12V Power connector
·1*Front panel audio connector ( F_AUDIO)
·1*System panel connector ( F_PANEL)
·1*USB2.0 header ( FUSB1)
·1*USB3.0 header ( F_SUSB1)
·1*PC speaker connector ( SPEAK)
Other
Connectors
·1*COM header ( JCOM)
·1*CMOS jumper ( CLR_CMOS)
·2*FANs headers ( CPU_FAN, SYS_FAN)
·1*DEBUG header ( DEBUG)
·1*ME header ( ME)
·2*M.2 switchers ( JM2-1,JM2-2)
·1*The power off charging jumper(JKB),
set whether the USB ports can be charged in the power
off state. Only the PS2+USB ports on the back panel can
support the shutdown charging function.
High
·Onboard 6-channel High Definition audio chipset
Definition
·Support 3D surround sound
Audio
Onboard
·Onboard 1000M LAN
LAN
·Provides 10/100/1000Mb Ethernet
Advertisement
Table of Contents

Related Manuals for Colorful H310M-M.2 PLUS V20


Summary of Contents for Colorful H310M-M.2 PLUS V20
- Page 1 Thanks for purchasing Colorful series motherboard. This series of motherboards provides excellent performance and quality assurance. H310M-M.2 PLUS V20 motherboard based on Intel H310 Chipset, support Intel LGA1151 Coffee Lake-S processors, support dual channel DDR4 2133/2400/2666MHz memory, support PCI-E 3.0 standard.
- Page 2 1.3.Motherboard Layout 1、 PS2 Mouse / Keyboard and USB2.0 ports 2、 Connect to HDMI monitor 3、 Connect to VGA monitor 4、 Connect to USB3.0 devices 5、 Connect to USB2.0 devices and LAN 6、 Audio devices 7、 The power off charging jumper (Only the PS2+USB ports on the back panel can support the shutdown charging function) 8、...
- Page 3 2.1.Safety Instructions To reduce the risk of fire, electric shock, and injury, always follow basic safety precautions. Remember to remove power from your computer by disconnecting the AC main source before removing or installing any equip- ment from/to the computer chassis. 2.2.Preparing the Motherboard The motherboard shipped in the box does not contain a CPU or memory.
- Page 4 The CPU fits in only one correct orientation. DO NOT force the CPU into the socket to prevent bending the connectors on the socket and damaging the CPU! 2.3.Installing Memory DIMMs Your new motherboard has 2 slots for DDR4 memory. They support dual channel DDR4 memory technology. There must be at least one memory bank populated to ensure normal operation.
- Page 5 2.5.Installing the I/O Shield The motherboard kit comes with an I/O shield that is used to block radio frequency transmissions, protects internal compo- nents from dust and foreign objects, and promotes correct airflow within the chassis. Before installing the motherboard, install the I/O shield from the inside of the chassis. Press the I/O shield into place and make sure it fits securely.
- Page 6 2.7.2.Serial ATA 3.0 6Gb/s connectors (7-pin) These connectors connect to Serial ATA 3.0 6Gb/s hard disk drives and optical drives via Serial ATA 3.0 6Gb/s signal cables. 2.7.3.USB 3.0 connectors This connector is for USB 3.0 devices. 2.7.4.USB2.0 connectors These connectors are for USB 2.0 ports. Connect the USB module cable to any of these connectors, then install the module to a slot opening at the back of the system chassis.
- Page 7 2.7.5.System panel connector This connector supports several chassis-mounted functions. Short circuit these two pins to power on Short circuit these two pins to restart 2.7.6.PCI Express3.0 x16 and PCI Express x1 slots The PCI Express x1 slots that are designed to accommodate less bandwidth-intensive cards, such as a modem or LAN card. The x1 slot provides 250 MB/sec bandwidth.
- Page 8 2.7.8.Front panel audio connector This connector is for a chassis-mounted front panel audio I/O module that supports either High Definition Audio or AC`97 audio standard. Connect one end of the front panel audio I/O module cable to this connector. 2.7.9.Clear CMOS Jumper: CLR_CMOS There is a CMOS RAM on board that has a power supply from external battery to keep the system configuration data.
- Page 9 2.7.10.COM header:JCOM 2.7.11.Debug header:DEBUG This COM header is for COM serial devices This Debug header is for Debug serial devices. 2.7.12.M.2 slot The motherboard has one M.2 slot,support PCI-e x2 and SATA SSD,support 2242/2260/2280 size SSD. There are two sets of switchers on the motherboard (silk-screen is JM2-1 and JM2-2), which are used to switch SATA and PCI-e X2 SSD.
- Page 10 Only the PS2+USB ports on the back panel can support the shutdown charging function.You can open this function by shorting 1-2pin.(Note: the white silk-screen "1" on the PCB is the first needle of jumper.) 2.7.14.Back Panel IO Connector <Backboard of H310M-M.2 PLUS V20> Parts PS/2 Mouse or Keyboard Connector This connector is for a PS/2 mouse or Keyboard.
- Page 11 3.BIOS setup Entering BIOS Setup Power on the computer and the system will start the Power On Self Test (POST)process. When the message below appears on the screen, press <DEL> key to enter BIOS: Press F1 to Run Setup Press F2 to Load default values and continue Boot Option Priorities(how to install operating system)...
- Page 12 4.Copyright Notice Copyright This motherboard manual belongs to Colorful Technology and Development CO, LTD. No one is permitted to copy, change, or translate without our written permission. Disclaimer The products name we mentioned in this manual is only for identifying, all of the brands belong to other company.
Need help?
Do you have a question about the H310M-M.2 PLUS V20 and is the answer not in the manual?
Questions and answers