Advertisement
Quick Links
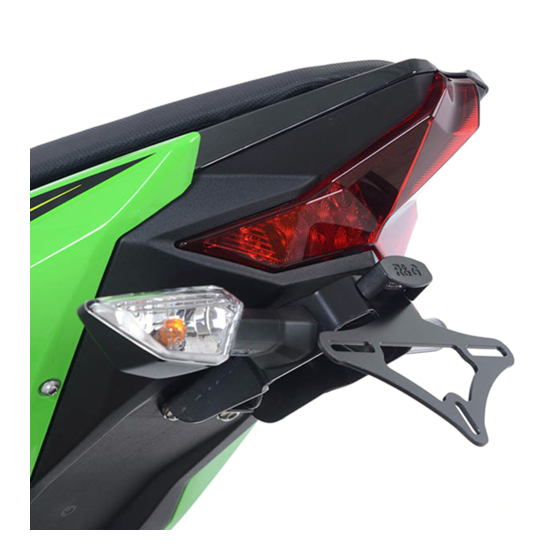
FITTING INSTRUCTIONS FOR LP0245BK LICENCE PLATE BRACKET
KAWASAKI NINJA 400 2018 (FOR USE WITH STANDARD AND R&G MINI
Page | 1
THIS KIT CONTAINS THE ITEMS PICTURED AND LABELLED BELOW.
DO NOT PROCEED UNTIL YOU ARE SURE ALL PARTS ARE PRESENT.
Please note that the way the kit is packed does not necessarily represent the way of
T
HE PARTS SHOWN MAY BE REPRESENTATIVE ONLY
Digital copies of these instructions are available to download from
Please note that in cases where kits are packed with rubber washers holding the components
Unit 1, Shelley's Lane, East Worldham, Alton, Hampshire, GU34 3AQ
Tel: +44 (0)1420 89007 Fax: +44 (0)1420 87301
INDICATORS (8mm))
mounting to the bike
GENERAL TORQUE SETTINGS
M4 BOLT = 8Nm
M5 BOLT = 12Nm
M6 BOLT = 15Nm
M8 BOLT = 20Nm
M10 BOLT = 40Nm
onto the bolt – the rubber washers should be thrown away!
TOOLS REQUIRED
•
Set of metric Allen keys to include 3, 4 and 5mm A/F sizes.
•
Socket set to include 8, 12 and 13mm A/F socket and wrench.
•
•
Electrical pliers/crimps.
•
Small amount of super glue.
R&G Racing
(
FOR CLARITY OF INSTRUCTIONS ONLY
www.rg-racing.com
Phillips driver.
www.rg-racing.com
Email:
1
LP0245
)
info@rg-racing.com
Advertisement

Related Manuals for R&G LP0245BK


Summary of Contents for R&G LP0245BK
- Page 1 LP0245 FITTING INSTRUCTIONS FOR LP0245BK LICENCE PLATE BRACKET KAWASAKI NINJA 400 2018 (FOR USE WITH STANDARD AND R&G MINI INDICATORS (8mm)) Page | 1 THIS KIT CONTAINS THE ITEMS PICTURED AND LABELLED BELOW. DO NOT PROCEED UNTIL YOU ARE SURE ALL PARTS ARE PRESENT.
- Page 2 LP0245 Page | 2 LEGEND ITEM 1 = LICENCE PLATE BRACKET (TB0245) (x1). ITEM 2 = M8 x 25mm LONG BUTTON HEAD BOLTS (x4). ITEM 3 = M8 NYLOC NUTS (x4). ITEM 4 = M8 WASHER (x8). ITEM 5 = CABLE TIES (x2). ITEM 6 = MINI INDICATOR ADAPTORS (I0039) (x4).
- Page 3 LP0245 Page | 3 Picture 1 Picture 2 Picture 3 Picture 4 Picture 5 Picture 6 R&G Racing Unit 1, Shelley’s Lane, East Worldham, Alton, Hampshire, GU34 3AQ Tel: +44 (0)1420 89007 Fax: +44 (0)1420 87301 www.rg-racing.com Email: info@rg-racing.com...
- Page 4 LP0245 Page | 4 Picture 7 Picture 8 Picture 9 Picture 10 Picture 11 Picture 12 R&G Racing Unit 1, Shelley’s Lane, East Worldham, Alton, Hampshire, GU34 3AQ Tel: +44 (0)1420 89007 Fax: +44 (0)1420 87301 www.rg-racing.com Email: info@rg-racing.com...
- Page 5 LP0245 Page | 5 Picture 13 Picture 14 Picture 15 Picture 16 Picture 17 Picture 18 R&G Racing Unit 1, Shelley’s Lane, East Worldham, Alton, Hampshire, GU34 3AQ Tel: +44 (0)1420 89007 Fax: +44 (0)1420 87301 www.rg-racing.com Email: info@rg-racing.com...
- Page 6 LP0245 Page | 6 Picture 19 Picture 20 Picture 21 Picture 22 Picture 23 Picture 24 R&G Racing Unit 1, Shelley’s Lane, East Worldham, Alton, Hampshire, GU34 3AQ Tel: +44 (0)1420 89007 Fax: +44 (0)1420 87301 www.rg-racing.com Email: info@rg-racing.com...
-
Page 7: Fitting Instructions
LP0245 FITTING INSTRUCTIONS • To fit the R&G tail tidy, first remove the seat using the key as shown in picture 1. • Remove the two ‘R’ clips indicated in picture 2 and remove the two pins indicated in picture •... - Page 8 LP0245 • Route the wiring as original and reconnect the licence plate illuminator and indicators to the original plug sockets. • If using led mini indicators, you will have to use a resistor on each indicator (R and G product codeRGR0001) to achieve the correct flash rate. It is a good idea the connect the indicators to the main loom using the supplied connectors (item 8) at this stage, if Page | 8 illumination fails please swap the bullet connection around.
-
Page 9: Outils Requis
LP0245 NOTICE DE MONTAGE LP0245BK SUPPORT DE PLAQUE KAWASAKI NINJA 400 2018 (POUR CLIGNOTANTS STANDARD ET MINI CLIGNOTANTS R&G (8mm)) Page | 9 Le kit contient les articles exposés ci-dessous, vérifier que toutes les pièces soient présentes avant de procéder au montage. - Page 10 LP0245 Page | 10 LÉGENDE ARTICLE 1 = SUPPORT DE PLAQUE (TB0245) (x1). ARTICLE 2 = M8 x 25mm BOULONS (x4). ARTICLE 3 = M8 ÉCROUS (x4). ARTICLE 4 = M8 RONDELLE (x8). ARTICLE 5 = COLLIERS DE SERRAGE (x2). ARTICLE 6 = ADAPTATEURS DE MINI CLIGNOTANTS (I0039) (x4).
-
Page 11: Notice De Montage
LP0245 ARTICLE 9 = ASSEMBLAGE FEU DE PLAQUE (LA0002) (x1). ARTICLE 10 = 200mm LONGUEUR DE MANCHON THERMO RÉTRACTABLE (x3). ARTICLE 11 = REFLECTEUR (REFL 1) (x1). ARTICLE 12 = CLIPS CABLE (x4). ARTICLE 13 = CONNECTEUR FEU DE PLAQUE (CON0007) (x1). Page | 11 NOTICE DE MONTAGE •... - Page 12 LP0245 le fil. Il est judicieux de reconnecter le faisceau de câbles en utilisant le connecteur fourni (article 13) pour vérifier le fonctionnement (SI l’éclairage échoue, tournez les connecteurs). • Serrer le fil au support de plaque, en utilisant les clips fournis et colliers de serrage (articles 5 et 12).
- Page 13 LP0245 been modified or used or maintained otherwise than in accordance with R&G’s or manufacturer’s instructions and good engineering practice or if the defect arises from accident or neglect. Other than identified above and subject to R&G not limiting its liability for causing death and personal injury, it shall not be liable for indirect or consequential loss and otherwise its liability shall be limited to the amounts paid by the Buyer for the Products or the fitting or service concerned.
- Page 14 LP0245 MONTAGEANLEITUNG FÜR LP0245BK KENNZEICHENHALTER KAWASAKI NINJA 400 2018 (VERWENDUNG MIT STANDARDBLINKER UND R&G MINIBLINKER (8mm)) Page | 14 ALLE GELIEFERTEN TEILE SIND UNTEN ABGEBILDET UND GEKENNZEICHNET. BEVOR SIE MIT DER MONTAGE BEGINNEN, ÜBERPRÜFEN SIE SORGFÄLTIG, DASS ALLE TEILE VORHANDEN SIND.
-
Page 15: Sie Benötigen Folgendes Werkzeug
LP0245 SIE BENÖTIGEN FOLGENDES WERKZEUG • Satz Inbusschlüssel inkl. 3, 4 & 5mm Inbusschlüssel • Steckschlüsselsatz inkl. 8, 12 and 13mm Steckschlüssel • Kreuzschlitzschraubendreher • Elektroniker Zange Page | 15 • etwas Sekundenkleber LIEFERUMFANG ARTIKEL 1 = KENNZEICHENHALTER (TB0245) (x1) ARTIKEL 2 = M8 x 25mm INBUSSCHRAUBEN (x4) ARTIKEL 3 = M8 SELBSTSICHERNDE MUTTER (x4) ARTIKEL 4 = M8 UNTERLEGSCHEIBEN (x8) - Page 16 LP0245 ARTIKEL 5 = KABELBINDER (x2) ARTIKEL 6 = BLINKER ADAPTER AUS SILIKON (I0039) (x4) ARTIKEL 7 = ABDECKUNGEN FÜR DIE MUTTER (BLINKER) AUS SILIKON (IWC0002) (x2) ARTIKEL 8 = VERBINDUNGEN FÜR DIE MINIBLINKER (CON0032) (x2) ARTIKEL 9 = KENNZEICHENBELEUCHTUNG (LA0002) (x1) ARTIKEL 10 = 200mm SCHRUMPFSCHLAUCH (x3) Page | 16 ARTIKEL 11 = RÜCKSTRAHLER (REFL 1) (x1)
- Page 17 LP0245 Schrumpfschlauch (Artikel 10) am Kabel anbringen. Es empfiehlt sich nun, die Kennzeichenbeleuchtung mittels der mitgelieferten Verbindung (Artikel 13) mit dem Kabelbaum zu verbinden. Falls die Beleuchtung nicht funktionieren sollte, tauschen Sie die Kabelverbinder untereinander. • Verwenden Sie die mitgelieferten Clips und Kabelbinder (Artikel 5 und 12), um die Page | 17 Kabel für den Kennzeichenhalter ordentlich zu verstauen.
Need help?
Do you have a question about the LP0245BK and is the answer not in the manual?
Questions and answers