Table of Contents
Advertisement
Available languages
Available languages
Quick Links
Page 1 of 24
FITTING INSTRUCTIONS FOR LP0293BK LICENCE PLATE BRACKET
YAMAHA XTZ 700 (TENERE) 2019- FITTED WITH PANNIER RACK
(FOR USE WITH STANDARD AND R&G MINI INDICATORS (8mm))
T
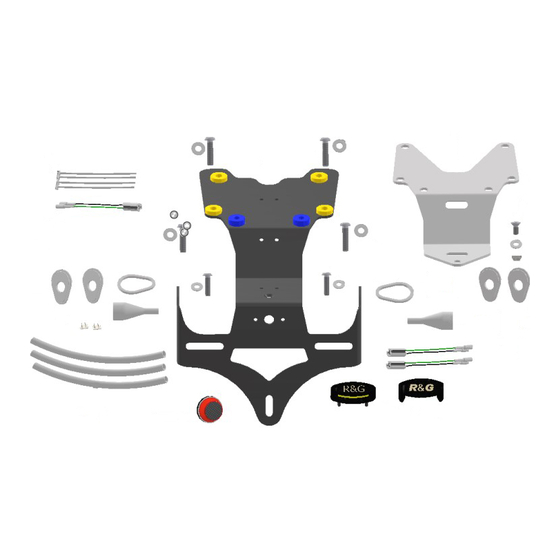
HIS KIT CONTAINS THE ITEMS PICTURED AND LABELLED OVER PAGE
S
IF IN ANY DOUBT WHEN FITTING OUR PRODUCTS, CONSULT ONE OF OUR DEALERS OR
P
LEASE NOTE THAT THE WAY THE KIT IS PACKED DOES NOT NECESSARILY REPRESENT THE WAY OF
I
N THE EVENT OF RUBBER WASHERS BEING USED TO HOLD COMPONENTS ONTO BOLTS
DIGITAL COPIES OF THESE INSTRUCTIONS ARE AVAILABLE FROM:
Unit 1, Shelley's Lane, East Worldham, Alton, Hampshire, GU34 3AQ
Tel: +44 (0)1420 89007 Fax: +44 (0)1420 87301
OME PARTS MAY BE SHOWN FOR CLARITY OF INSTRUCTIONS ONLY
D
O NOT PROCEED UNTIL YOU ARE SURE ALL PARTS ARE PRESENT
P
LEASE READ ALL INSTRUCTIONS BEFORE PROCEEDING
HAVE FITTED BY A QUALIFIED TECHNICIAN.
MOUNTING TO THE BIKE
THESE RUBBER WASHERS CAN BE THROWN AWAY
WWW.RG-RACING.COM
.
R&G
www.rg-racing.com
LP0293
.
.
.
.
,
.
Email:
info@rg-racing.com
Advertisement
Table of Contents

Related Manuals for R&G LP0293


Summary of Contents for R&G LP0293
- Page 1 Page 1 of 24 LP0293 FITTING INSTRUCTIONS FOR LP0293BK LICENCE PLATE BRACKET YAMAHA XTZ 700 (TENERE) 2019- FITTED WITH PANNIER RACK (FOR USE WITH STANDARD AND R&G MINI INDICATORS (8mm)) HIS KIT CONTAINS THE ITEMS PICTURED AND LABELLED OVER PAGE...
-
Page 2: Tools Required
Page 2 of 24 LP0293 TOOLS REQUIRED GENERAL TORQUE SETTINGS • M4 BOLT = 8Nm Set of metric Allen keys to include 3, 4 & 5mm A/F size. M5 BOLT = • 10mm spanners or socket and wrench. M6 BOLT = •... -
Page 3: Assembly Diagram
Page 3 of 24 LP0293 ASSEMBLY DIAGRAM PICTURE 1 PICTURE 2 R&G Unit 1, Shelley’s Lane, East Worldham, Alton, Hampshire, GU34 3AQ Tel: +44 (0)1420 89007 Fax: +44 (0)1420 87301 www.rg-racing.com Email: info@rg-racing.com... - Page 4 Page 4 of 24 LP0293 PICTURE 3 PICTURE 4 PICTURE 5 PICTURE 6 PICTURE 7 PICTURE 8 R&G Unit 1, Shelley’s Lane, East Worldham, Alton, Hampshire, GU34 3AQ Tel: +44 (0)1420 89007 Fax: +44 (0)1420 87301 www.rg-racing.com Email: info@rg-racing.com...
- Page 5 Page 5 of 24 LP0293 PICTURE 9 PICTURE 10 PICTURE 11 PICTURE 12 PICTURE 13 PICTURE 14 R&G Unit 1, Shelley’s Lane, East Worldham, Alton, Hampshire, GU34 3AQ Tel: +44 (0)1420 89007 Fax: +44 (0)1420 87301 www.rg-racing.com Email: info@rg-racing.com...
- Page 6 Page 6 of 24 LP0293 PICTURE 15 PICTURE 16 PICTURE 17 PICTURE 18 PICTURE 19 PICTURE 20 R&G Unit 1, Shelley’s Lane, East Worldham, Alton, Hampshire, GU34 3AQ Tel: +44 (0)1420 89007 Fax: +44 (0)1420 87301 www.rg-racing.com Email: info@rg-racing.com...
- Page 7 Page 7 of 24 LP0293 PICTURE 21 PICTURE 22 PICTURE 23 PICTURE 24 PICTURE 25 PICTURE 26 R&G Unit 1, Shelley’s Lane, East Worldham, Alton, Hampshire, GU34 3AQ Tel: +44 (0)1420 89007 Fax: +44 (0)1420 87301 www.rg-racing.com Email: info@rg-racing.com...
- Page 8 Page 8 of 24 LP0293 PICTURE 27 PICTURE 28 PICTURE 29 PICTURE 30 PICTURE 31 PICTURE 32 R&G Unit 1, Shelley’s Lane, East Worldham, Alton, Hampshire, GU34 3AQ Tel: +44 (0)1420 89007 Fax: +44 (0)1420 87301 www.rg-racing.com Email: info@rg-racing.com...
-
Page 9: Fitting Instructions
Page 9 of 24 LP0293 FITTING INSTRUCTIONS • Remove the panniers and luggage rack (the method will vary depending on the manufacturer). • Remove the passenger seat using the key as arrowed in picture 1. • Remove the two bolts arrowed in picture 2 and remove the rider’s seat. - Page 10 Page 10 of 24 LP0293 To continue • Feed the wires of the new R&G licence plate illuminator (item 14) through the central hole in the new licence plate bracket (item 1) as shown in pictures 29 and 30. •...
- Page 11 Page 11 of 24 LP0293 • Reconnect the rear light plug socket, connect the licence plate illuminator using the supplied connector (item 18), reconnect the indicators (if using mini’s use the supplied connectors (items 13) as original to the wiring loom.
- Page 12 Page 12 of 24 LP0293 NOTICE DE MONTAGE POUR LP0293BK SUPPORT DE PLAQUE YAMAHA XTZ 700 (TENERE) 2019- AVEC PORTE BAGAGE (POUR MINI CLIGNOTANTS R&G (8mm) ET CLIGNOTANTS STANDARDS) E KIT CONTIENT LES ARTICLES EXPOSES CI DESSOUS VERIFIER QUE TOUTES LES PIECES SOIENT PRESENTES AVANT DE PROCEDER AU MONTAGE A FAÇON DONT LE KIT EST EMBALLE NE CORRESPOND PAS FORCEMENT A LA FAÇON DE MONTER LES PIECES SUR LA MOTO...
-
Page 13: Outils Requis
Page 13 of 24 LP0293 OUTILS REQUIS VALEURS DE SERRAGE • M4 BOULON = 8Nm Clés Allen 3, 4 & 5mm. M5 BOULON = • Clé à cliquet + douille 10mm M6 BOULON = • Clés Torx T30 et T40 M8 BOULON = 20Nm •... - Page 14 Page 14 of 24 LP0293 LEGENDE ARTICLE NO. DESCRIPTION QTÉ ARTICLE 1 SUPPORT DE PLAQUE (TB0293 WITH SPACERS) ARTICLE 2 M6 x 30mm BOULONS ARTICLE 3 M6 RONDELLES ARTICLE 4 M5 x 25mm BOULONS ARTICLE 5 M5 RONDELLES (STANDARD) ARTICLE 6...
- Page 15 Page 15 of 24 LP0293 SCHÉMA R&G Unit 1, Shelley’s Lane, East Worldham, Alton, Hampshire, GU34 3AQ Tel: +44 (0)1420 89007 Fax: +44 (0)1420 87301 www.rg-racing.com Email: info@rg-racing.com...
-
Page 16: Notice De Montage
Page 16 of 24 LP0293 NOTICE DE MONTAGE • Retirez les sacoches et le porte-bagages (la méthode varie selon le fabricant). • Enlevez le siège du passager en utilisant la clé comme indiqué sur la photo 1. • Retirez les deux boulons marqués d’une flèche sur la photo 2 et retirez la selle du pilote. - Page 17 Page 17 of 24 LP0293 doucement jusqu'à ce que le thermo rétractable se contracte sur le câblage et cache-écrou / fil sur les photos 28. Suite • Faites passer les fils du nouveau feu de plaque d'immatriculation R&G (article 14) dans le trou central du nouveau support de plaque d'immatriculation (article 1), comme indiqué...
- Page 18 Page 18 of 24 LP0293 • Rebranchez la prise du feu arrière, connectez le feu de plaque d’immatriculation à l’aide du connecteur fourni (article 18), rebranchez les clignotants (si vous utilisez un mini-connecteur, utilisez les connecteurs fournis (articles 13) comme à l’origine avec le faisceau de câblage.
- Page 19 Page 19 of 24 LP0293 MONTAGEANLEITUNG FÜR LP0293BK KENNZEICHENHALTER YAMAHA XTZ 700 (TENERE) 2019- MIT GEPÄCKTASCHENHALTERN MONTIERT (VERWENDUNG MIT STANDARD- UND R&G MINIBLINKER (8mm)) EILE SIND UNTEN ABGEBILDET UND GEKENNZEICHNET IE ABGEBILDETEN EILE DIENEN LEDIGLICH ZUR RKLÄRUNG Ü BERPRÜFEN IE ZUERST...
-
Page 20: Sie Benötigen Folgendes Werkzeug
Page 20 of 24 LP0293 SIE BENÖTIGEN FOLGENDES WERKZEUG: ALLGEM. ANZUGSDREHMOMENT: • M4 SCHRAUBE = 8Nm Satz Inbusschlüssel inkl. 3, 4 & 5mm M5 SCHRAUBE = • 10mm Schraubenschlüssel oder Steckschlüssel M6 SCHRAUBE = • Satz Torx-Schlüssel oder Torx-Einsatze inkl. T30 und T40 M8 SCHRAUBE = 20Nm •... - Page 21 Page 21 of 24 LP0293 ZEICHNUNG ZUSAMMENBAU MONTAGEANLEITUNG • Entfernen Sie die Gepäcktaschenhalter und den Gepäckträger (entsprechend der Anleitung des Herstellers). • Entfernen Sie den Soziussitz (der Schlüssel wird benötigt) wie in Abbildung 1 abgebildet. • Entfernen Sie die zwei Schrauben, die in Abbildung 2 gekennzeichnet sind und entfernen Sie den Fahrersitz.
- Page 22 Page 22 of 24 LP0293 • Die Sitzverkleidung vorsichtig teilen und in die angezeigte Richtung schieben, um die Sitzverkleidung zu entfernen (siehe Abbildung 12). • Entfernen Sie die vier Steckverbinder, die in Abbildung 13 gekennzeichnet sind. • Entfernen Sie die zwei Muttern (siehe Abbildung 14).
- Page 23 Page 23 of 24 LP0293 • Die Halterung für den Kennzeichenhalter (Artikel 6) unter dem Kennzeichenhalter (Artikel 1) positionieren wie unten abgebildet und mit der Schraube, Mutter und Unterlegscheibe (Artikel 7, 8 und 9) sichern. • Stellen Sie sicher, dass die Kabel und Kabelabdeckungen mit den mitgelieferten Clips und Kabelbindern (Artikel 17 und 19) ordentlich verstaut sind wie in Abbildung 32 abgebildet.
- Page 24 Page 24 of 24 LP0293 GERINGES RISIKO, DASS DAS KENNZEICHEN AN DAS HINTERRAD STOSSEN KANN. ES LIEGT IN IHRER VERANTWORTUNG DIES ZU ÜBERPRÜFEN UND, WENN NOTWENDIG, VORZUBEUGENDE MASSNAHMEN ZU ERGREIFEN. DIE NICHTBEACHTUNG DIESES SICHERHEITSHINWEIS KANN ZU SCHWEREN VERLETZUNGEN FÜHREN. •...
Need help?
Do you have a question about the LP0293 and is the answer not in the manual?
Questions and answers