Advertisement
Available languages
Available languages
Quick Links
1
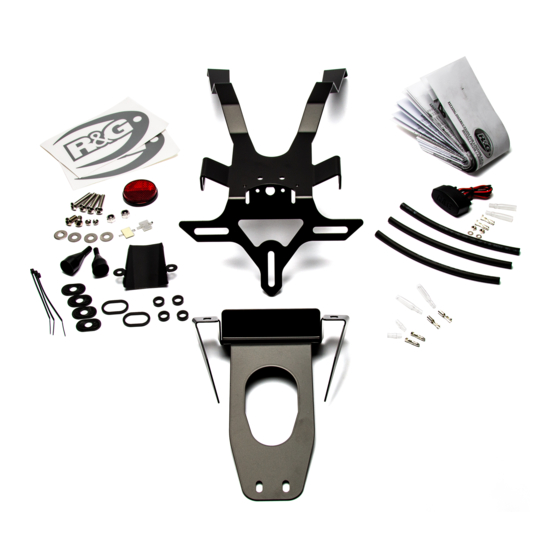
FITTING INSTRUCTIONS FOR LP0252BK LICENCE PLATE BRACKET
THIS KIT CONTAINS THE ITEMS PICTURED AND LABELLED BELOW.
DO NOT PROCEED UNTIL YOU ARE SURE ALL PARTS ARE PRESENT.
Please note that the way the kit is packed does not necessarily represent the way of mounting to the
T
HE PARTS SHOWN MAY BE REPRESENTATIVE ONLY
Digital copies of these instructions are available to download from
Unit 1, Shelley's Lane, East Worldham, Alton, Hampshire, GU34 3AQ
Tel: +44 (0)1420 89007 Fax: +44 (0)1420 87301
HONDA CB125R + CB300R 18-
bike.
TOOLS REQUIRED
•
Set of metric Allen keys
•
Set of metric sockets and wrench
•
Cable cutters.
•
Torque wrench to 40Nm
MAXIMUM TORQUE SETTINGS
•
M4 Bolt = 8 Nm
•
M5 Bolt = 12 Nm
•
M6 Bolt = 15 Nm
•
M8 Bolt = 20 Nm
R&G
www.rg-racing.com
(
FOR CLARITY OF INSTRUCTIONS ONLY
www.rg-racing.com
Email:
info@rg-racing.com
LP0252BK
).
Advertisement

Related Manuals for R&G LP0252BK


Summary of Contents for R&G LP0252BK
- Page 1 LP0252BK FITTING INSTRUCTIONS FOR LP0252BK LICENCE PLATE BRACKET HONDA CB125R + CB300R 18- THIS KIT CONTAINS THE ITEMS PICTURED AND LABELLED BELOW. DO NOT PROCEED UNTIL YOU ARE SURE ALL PARTS ARE PRESENT. Please note that the way the kit is packed does not necessarily represent the way of mounting to the bike.
- Page 2 LP0252BK R&G Unit 1, Shelley’s Lane, East Worldham, Alton, Hampshire, GU34 3AQ Tel: +44 (0)1420 89007 Fax: +44 (0)1420 87301 www.rg-racing.com Email: info@rg-racing.com...
- Page 3 LP0252BK LEGEND 1) 1 x TB0252BK Part 1 MAIN BRACKET ISSUE 1 STAINLESS STEEL 2) 1 x TB0252BK Part 2 ISSUE 1 COVER PLATE STAINLESS STEEL 3) 1 x TB0224BK Part 2 ISSUE 3 COVER PLATE ALUMINIUM 4) 1 x LA0002 No PLATE LIGHT ASSEMBLY...
- Page 4 LP0252BK PICTURE 1 PICTURE 2 PICTURE 3 PICTURE 4 PICTURE 5 PICTURE 6 R&G Unit 1, Shelley’s Lane, East Worldham, Alton, Hampshire, GU34 3AQ Tel: +44 (0)1420 89007 Fax: +44 (0)1420 87301 www.rg-racing.com Email: info@rg-racing.com...
- Page 5 LP0252BK PICTURE 7 PICTURE 8 PICTURE 9 PICTURE 10 PICTURE 11 PICTURE 12 R&G Unit 1, Shelley’s Lane, East Worldham, Alton, Hampshire, GU34 3AQ Tel: +44 (0)1420 89007 Fax: +44 (0)1420 87301 www.rg-racing.com Email: info@rg-racing.com...
- Page 6 LP0252BK PICTURE 13 PICTURE 14 PICTURE 15 PICTURE 16 PICTURE 17 PICTURE 18 R&G Unit 1, Shelley’s Lane, East Worldham, Alton, Hampshire, GU34 3AQ Tel: +44 (0)1420 89007 Fax: +44 (0)1420 87301 www.rg-racing.com Email: info@rg-racing.com...
- Page 7 LP0252BK PICTURE 19 PICTURE 20 PICTURE 22 PICTURE 23 PICTURE 24 PICTURE 25 R&G Unit 1, Shelley’s Lane, East Worldham, Alton, Hampshire, GU34 3AQ Tel: +44 (0)1420 89007 Fax: +44 (0)1420 87301 www.rg-racing.com Email: info@rg-racing.com...
-
Page 8: Fitting Instructions
LP0252BK FITTING INSTRUCTIONS • To fit the R&G tail tidy, remove the seat using the key as shown in picture 1. • Remove the Main seat by removing the two securing bolts fastening the seat to the frame. CB300R Models •... - Page 9 LP0252BK • Assemble the mini indicator by sliding one of the adaptors over the indicator wires with the boss facing away from the indicator. • Thread the indicator wire through the tail tidy mount until the adaptor boss sits snugly inside the mount.
- Page 10 LP0252BK If using R&G mini indicators • Route the indicator wires • Using the bullet connectors: Left indicator YELLOW to OEM ORANGE Left indicator BLACK to OEM GREEN/WHITE Right Indicator YELLOW to OEM BLUE Right Indicator BLACK to OEM GREEN/WHITE Please note if using R&G mini indicators you may require 2 x sets of RGR0002 indicator resistors (sold...
-
Page 11: Outils Requis
LP0252BK NOTICE DE MONTAGE POUR LP0252BK SUPPORT DE PLAQUE HONDA CB125R + CB300R 18- Le kit contient les articles exposés ci-dessous, vérifier que toutes les pièces soient présentes avant de procéder au montage. La façon dont le kit est emballé ne correspond pas forcément à la façon de monter les pièces sur la moto. - Page 12 LP0252BK R&G Unit 1, Shelley’s Lane, East Worldham, Alton, Hampshire, GU34 3AQ Tel: +44 (0)1420 89007 Fax: +44 (0)1420 87301 www.rg-racing.com Email: info@rg-racing.com...
-
Page 13: Notice De Montage
LP0252BK LÉGENDE 19) 1 x TB0252BK Partie 1 SUPPORT PRINCIPAL - VERSION 1 ACIER INOXYDABLE 20) 1 x TB0252BK Partie 2 VERSION 1 PLAQUE EN ACIER INOXYDABLE 21) 1 x TB0224BK Partie 2 VERSION 3 PLAQUE EN ALUMINIUM 22) 1 x LA0002 No ASSEMBLAGE DE FEU DE PLAQUE... - Page 14 LP0252BK Unité de support de plaque désassemblé • L’unité de support contient un sous faisceau pour les clignotants et le feu de plaque d’origine. Durant le réassemblage, il devra être retire selon les étapes suivantes. • Enlever les 4 vis et le boulon central au bas de l’unité, voir photos 8 et 9.
- Page 15 LP0252BK • Attacher la plaque de support sur le support de plaque en utilisant les 2 boulons m5 et écrous (articles 8 et 9) dans les 2 fentes les plus reculées, voir image 20. Ne pas trop serrer pour le moment.
- Page 16 LP0252BK • Remonter la plaque d’immatriculation (cette opération peut nécessiter un perçage). • IMPORTANT : Si vous installez une grosse plaque, il y a un risque que la plaque entre en contact avec la roue arrière en cas de choc sur la route (bosse, grosse charge etc..).
-
Page 17: Sie Benötigen Folgendes Werkzeug
LP0252BK MONTAGEANLEITUNG FÜR LP0252BK KENNZEICHENHALTER HONDA CB125R + CB300R 18- ALLE KIT-TEILE SIND UNTEN ABGEBILDET UND GEKENNZEICHNET. BEVOR SIE MIT DER MONTAGE BEGINNEN, ÜBERPRÜFEN SIE, DASS ALLE TEILE VORHANDEN SIND. Hinweis: Die Verpackung der Teile stellt nicht die Reihenfolge der Montage dar. - Page 18 LP0252BK R&G Unit 1, Shelley’s Lane, East Worldham, Alton, Hampshire, GU34 3AQ Tel: +44 (0)1420 89007 Fax: +44 (0)1420 87301 www.rg-racing.com Email: info@rg-racing.com...
- Page 19 LP0252BK LIEFERUMFANG 37) 1 x TB0252BK Teil 1 KENNZEICHENHALTER VERSION 1 ROSTFREIER STAHL 38) 1 x TB0252BK Teil 2 VERSION 1 ABDECKPLATTE ROSTFREIER STAHL 39) 1 x TB0224BK Teil 2 VERSION 3 ABDECKPLATTE – ALUMINIUM 40) 1 x LA0002 KENNZEICHENBELEUCHTUNG...
- Page 20 LP0252BK • Lösen Sie die vier Inbusschrauben an der Unterseite des Hecks - den Kennzeichenhalter dabei stützen. • Den Kennzeichenhalter vorsichtig entfernen und die Kabel durch die Öffnung an der linken Seite des Heckteils führen. Abbau des Kennzeichenhalters • Im Heckteil befindet sich einen Kabelstrang für die Blinker und die Kennzeichenbeleuchtung, der während des Wiederzusammenbaus wie folgt entfernt werden muss:...
- Page 21 LP0252BK • Den übrigen Schrumpfschlauch an den Kabeln für die Kennzeichenbeleuchtung montieren. • Montieren Sie die Kennzeichenbeleuchtung (Artikel 4) am Kennzeichenhalter (Artikel 1) wie in Abbildung 17 abgebildet. • Die Kennzeichenbeleuchtung mit einem 6mm Schraubenschlüssel an der Montagelasche befestigen – siehe Abbildung 18.
- Page 22 LP0252BK Hinweis: Wenn Sie R&G LED-Miniblinker verwenden, benötigen Sie eventuell 2 Sätze RGR0002 Widerstände (separat erhältlich), um die richtige Blitzgeschwindigkeit zu bekommen. • Verbinden Sie den Kabelstrang mit dem Originalverbinder wie ursprünglich wieder. • Überprüfen Sie die Funktion der Beleuchtung (falls die Beleuchtung nicht funktionieren sollte, tauschen Sie die Kabelverbinder untereinander).
Need help?
Do you have a question about the LP0252BK and is the answer not in the manual?
Questions and answers