Advertisement
Quick Links
Before you begin using the device, please check the version you got and ensure that the
following items are included in the shipped box:
Mainframe Accessories :
M3x5 screw x 4
Back cover x 1
Rope x 1
Ejection Pin
Wall-mounting Accessories:
M4x30 screw x 2
ST4x20 screw x 4
Mic
ST1.7x4 screw x 2
Cable Locking Plate x 1
Allen Wrench x 1
x
1
Name pad
M3x10.5 screw
Screw fixing seat x 4
R26B
Silicon rubber sealing ring x 1
Rubber Plug x 3(S,M,L)
R26B
x
5
x
1
Wall-mounting screw x 6
Wall-mounting bracket
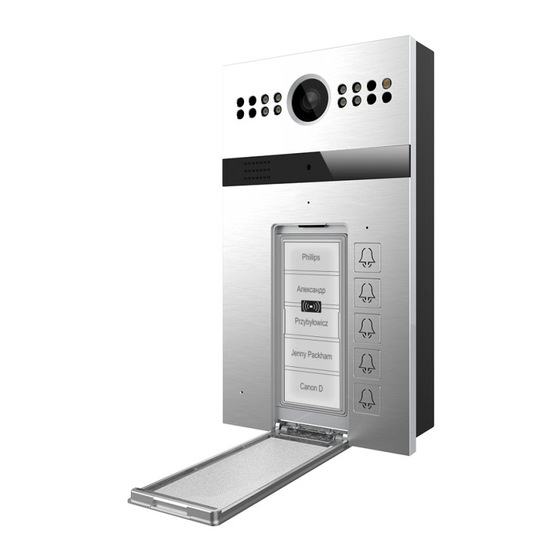
Photosensitive sensor
Infrared LED
Camera
Infrared sensor
Speaker
Pin hole
Status LED
Call button
RF card reader
Name pad
Name pad cover
R26B
x
1
x
1
Advertisement

Subscribe to Our Youtube Channel
Related Manuals for Akuvox R26B


Summary of Contents for Akuvox R26B
- Page 1 R26B Before you begin using the device, please check the version you got and ensure that the following items are included in the shipped box: Mainframe Accessories : M3x5 screw x 4 ST1.7x4 screw x 2 Silicon rubber sealing ring x 1...
- Page 2 R26B Installa Step 1: Bracket/Box Installa Wall Moun With 86 embedded box in the wall Fix the wall-mounting bracket on Mark the four holes of the Take down the M4x30 screws and embedded box with two M4x30 wall-mounting bracket on the wall.
- Page 3 R26B Step 2: Back cover Installa For convenient wiring, hang R26B Fix six wall-mounting six screws in the back of R26B. on the wall-mounting bracket with rope. Then insert the silicon rubber sealing ring into the groove. Fix the back cover with four Make cables go through the back M3x5 screws.
- Page 4 R26B Change the Button Label Insert the ejection pin into the pin hole to Take out the name pad and fill in the information eject the name pad cover. you want. Press the name pad cover back in place to lock it.
- Page 5 R26B IP Announcement 1. While R26B starts up normally, hold the top call button for several seconds after the LED light turns blue, voice system will enter IP announcement mode. 2. In announcement mode, the IP address will be announced periodically.
- Page 6 R26B Notice Information Akuvox R26B firmware contains third-party open source software under the terms of the GNU General Public License(GPL). Akuvox is committed to meeting the requirements of the GNU General Public License (GPL) and will make all required source code available.
Need help?
Do you have a question about the R26B and is the answer not in the manual?
Questions and answers