Egholm 2100 Operator's Manual
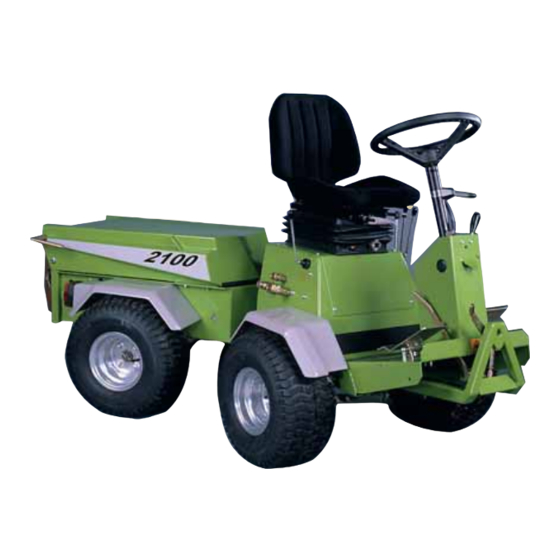
Basic unit
Hide thumbs
Also See for 2100:
- Operator's manual (28 pages) ,
- Operator's manual (20 pages) ,
- Operator's manual (16 pages)
Table of Contents
Advertisement
Quick Links
Advertisement
Table of Contents

Related Manuals for Egholm 2100


Summary of Contents for Egholm 2100
- Page 1 OPERATORS MANUAL Egholm 2100 Basic Unit...
- Page 2 Reservations: It is the Egholm policy to make continued improvements. We therefore reserve the right to alter the specifications and the equipment of the machine at any time. We make reservations for errors and omissions in this manual.
-
Page 3: Table Of Contents
CONTENTS 1. General information Page: Safety..........Technical data. -
Page 4: General Information
1.1 Safety Keep a safe distance to the articulation point Turn the steering wheel carefully Egholm 2100 is an articulated machine and has a very sensitive steering. Machine left side Avoid acid burns and battery explosions Batteries contain acid, which can cause severe burns, and fumes that can explode. - Page 5 1. GENERAL INFORMATION Beware of pinch points Make sure to keep hands and fingers clear of pinch points. A-Frame Avoid getting your fingers caught in the A-frame. Exhaust pipe The exhaust pipe becomes very hot when the machine is running. Avoid contact. Fan belt Make sure to keep fingers clear of ventilating fan and fan belt.
-
Page 6: Technical Data
Height: 1.210 mm Height with cab: 1.935 mm Height with suction unit without cabin: 1.750 mm Weight: Side view Own weight Egholm 2100: 485 kg Max. allowable load for: Platform: 100 kg Machine complete with trailer: 1.300 kg Trailer unbraked: 1.300 kg... - Page 7 77/311 88 dB(A) Note: Turning radius The specifications are subject to change without prior notice. Turning radius The Egholm has a turning radius of only 1.5 m. Type plate: The type plate is placed on the front chassis right side. Type plate...
-
Page 8: Control Panel
1. GENERAL INFORMATION 1.3 Control Panel Horn (in front of the steering wheel) Low fuel light indicator Ignition key Illuminates at a remaining fuel level of 5 l = approx. Switch for electric tap 1½ operating hours. The Oil pressure light light indicator is only active when the engine is turned indicator... -
Page 9: Control Levers And Pedals
1. GENERAL INFORMATION 1.5 Control levers and pedals Machine left side Lever A: Raising and lowering of A-frame: Pos. 1 (upwards): Raises the A-frame. Pos. 0 (neutral): Locks the A-frame in a given position. Pos. 3 (downwards):Lowers the A-frame. Lever B: Activates the hydraulic couplings B1 and B2 - for Levers Coupling... - Page 10 1. GENERAL INFORMATION Control levers and pedals Throttle hand lever Parking brake Driving pedal Brake pedal Throttle hand lever Set the throttle hand lever in ¼ throttle position before starting the engine. Control levers Parking brake Engaging the parking brake: Fully depress the brake pedal before pushing the parking brake forwards.
-
Page 11: Detachable Platform
1. GENERAL INFORMATION Towing handle Use the towing handle for moving the machine manually. When the towing handle is u u n n l l o o c c k k e e d d , the machine can be moved without starting the engine. Leave the towing handle in horizontal position to unlock. -
Page 12: Drivers Seat
Pull the oil cooler screen slantingly downwards to dismount. Adjustment of the driver’s seat Mounting A) Fit the upper edge of the oil cooler screen under the edge of the Egholm 2100. B) Push the oil cooler screen into place. Fitting the oil cooler screen... -
Page 13: Instructions For Use
2. INSTRUCTIONS FOR USE 2.1 Daily check before start-up Before performing the daily check open the bonnet: A) Dismount the platform (refer to paragraph 1.6). B) Remove the radiator screen (refer to paragraph 3.2). C) Press the lock knob (1) down and open the lock fittings (2) to unlock the bonnet. - Page 14 2. INSTRUCTIONS FOR USE Check the diesel oil Tank capacity 20 l. The light indicator illuminates at a remaining fuel level of 5 l = approx. 1½ operating hours. The light indicator is only active when the engine is turned on. Diesel Indicator light for diesel oil Check the coolant...
-
Page 15: Start-Up, Driving, And Stopping
2. INSTRUCTIONS FOR USE 2.2 Starting, driving and stop- Left side ping The following conditions must be fulfilled before the engine can be started: A) The control levers A, B, C and D must be in position "0". B) The towing handle must be locked - refer to Lever A, B, C page 11. - Page 16 2. INSTRUCTIONS FOR USE Stopping the Egholm 2100 Left side A) Leave the control levers A, B, C and D in position "0". B) Close the throttle and let the engine idle. C) Fully depress the brake pedal (1) and push the parking brake (2) forwards - refer to page 13.
-
Page 17: Service And Maintenance
3. SERVICE AND MAINTENANCE 3.1 Daily maintenance The daily maintenance of the Egholm 2100 is plain and simple but important. Three things are to be done on a daily basis: Cleaning the radiator, the oil cooler and the air filter. -
Page 18: Service And Maintenance Chart
3. SERVICE AND MAINTENANCE 3.2 Service- and maintenance chart Service Hour Daily 50 125 200 275 350 425 500 575 650 725 Engine oil Inspec. Change Hydraulic oil Inspec. Change Air filter 1) Inspec. Change Cooling water 2) Inspec. Change Fan belt 3) Inspec. - Page 19 3. SERVICE AND MAINTENANCE Hour 800 875 950 1025 1100 1175 1250 1325 1400 1475 1550 1625 1700 1775 1850 1925 2000 5. More frequent maintenance is required when working in severe conditions. 6. More frequent maintenance is required when working in severe conditions. 7.
-
Page 20: Lubrication
3. SERVICE AND MAINTENANCE 3.3 Lubrication Lubrication nipples: Lubricate the two lubrication nipples after every 15 hours of operation with one or two blobs of good quality grease. The lubrication nipples can be found on the backside of the A-frame. Cables and movable parts Lubricate with a few drops of oil after every 15 hours of Lubrication nipples... -
Page 21: Hydraulic System
. . Top up hydraulic oil A) Park the Egholm 2100 on level ground. B) Turn off the engine. -
Page 22: Engine Maintenance
3. SERVICE AND MAINTENANCE Hydraulic oil filter A) Remove the oil filter (under the Egholm 2100) to drain the tank. B) Lubricate the sealing surface with oil. C) Install new oil filter. D) Fill the tank with approx. 15 l of Texaco Rando HDZ 46 oil. - Page 23 3. SERVICE AND MAINTENANCE Engine oil change Change the engine oil after the first 50 hours of opera- tion. Oil change is done easier when the engine is hot. A) Unscrew the plug on the bottom of your oil pan to drain the oil.
-
Page 24: Fuel
3. SERVICE AND MAINTENANCE 3.6 Fuel Warning! A A l l w w a a y y s s s s t t o o p p t t h h e e e e n n g g i i n n e e b b e e f f o o r r e e f f i i l l l l i i n n g g t t h h e e f f u u e e l l t t a a n n k k . - Page 25 3. SERVICE AND MAINTENANCE Bleeding the fuel system Bleeding the fuel system is necessary if any of the following have occurred: A) Replacing fuel filter. B) After repairing or replacing any fuel hose. C) Running out of fuel. Bleeding the fuel system/the injection pump: A) Loosen the air bleed screw on the fuel pump and Fuel filter...
-
Page 26: Radiator
3. SERVICE AND MAINTENANCE 3.7 Radiator Warning! R R e e m m o o v v i i n n g g t t h h e e r r a a d d i i a a t t o o r r c c a a p p o o n n a a h h o o t t e e n n g g i i n n e e c c a a n n c c a a u u s s e e t t h h e e h h o o t t c c o o o o l l a a n n t t t t o o s s p p r r a a y y o o u u t t , , s s e e r r i i o o u u s s l l y y s s c c a a l l d d i i n n g g y y o o u u . - Page 27 3. SERVICE AND MAINTENANCE Radiator hose replacement Replace the radiator hoses and hose clips every two years, or sooner if they show any sign of leakage. For further information please refer to the engine instruction manual, page 16. Precautions against overheating Turn off the engine I I M M M M E E D D I I A A T T E E L L Y Y if the radiator light indicator illuminates and identify the cause.
-
Page 28: Air Filter
3.8 Air filter Air filter cleaning: A) Open the vacuum valve every day to remove any large particles of dust and dirt, if the Egholm 2100 is operated in dusty conditions. B) Lift the air filter housing 2-3 cm. C) Turn the air filter housing. -
Page 29: Fan Belt
3. SERVICE AND MAINTENANCE 3.10 Fan belt Too loose a fan belt leads to overheating and insufficient charging of the battery. A) Check the belt tension by pressing the middle of the fan belt with your finger. A properly tensioned fan belt should deflect 7-9 mm (at a pressure of 10 kgf). -
Page 30: Conditions Of Warranty
The warranty period for the construction parts and the manufacture of this Egholm 2100 unit is Machines with illegible serial number. 12 months from the date of purchase. -
Page 31: Conditions Of Complaint
* Egholm@Egholm.dk 3.14 Disposal When - many years from now - your Egholm product comes to the end of its working life, it should be disposed of in a responsible manner and conform with the relevant disposal regulations. 1. Drain all fluids from the Egholm 2100: A. -
Page 32: Eu Declaration Of Conformity
3. SERVICE AND MAINTENANCE 3.15 Declaration of conformity Egholm Maskiner A/S hereby declares that: The machine: Egholm 2100 with the serial number: Year: has been manufactured in conformity with the Council directive (71/221/EEC, 89/392/EEC, 74/150/EEC, 82/890/EEC, 77/311/EEC of 14 June 1989 on the approximation of the laws of the... - Page 33 NOTES...
- Page 34 NOTES...
- Page 35 NOTES...
- Page 36 Egholm Maskiner A/S . Transportvej 27 . DK - 7620 Lemvig Tlf.: +45 97 81 12 05 . Fax +45 97 81 12 10...
Need help?
Do you have a question about the 2100 and is the answer not in the manual?
Questions and answers