Table of Contents
Advertisement
Quick Links
Manual CT300
INSTALLATION OPERATION MAINTENANCE
Serial No.: ------------------------------------------------------
Installation date: -------------------------------------------------
THIS MANUAL MUST BE KEPT ONBOARD AT ALL TIMES
Via Philips 5, 20900 Monza (MI), Italy
Tel. +39 039 200 1973-936 - Fax +39 039 2004299
www.max-power.com
CT300
With electronic thruster control
E-mail:contact@max-power.com
Last update:December 2013
Advertisement
Table of Contents

Related Manuals for MAX power CT300


Summary of Contents for MAX power CT300
- Page 1 Last update:December 2013 Manual CT300 CT300 With electronic thruster control INSTALLATION OPERATION MAINTENANCE Serial No.: ------------------------------------------------------ Installation date: ------------------------------------------------- THIS MANUAL MUST BE KEPT ONBOARD AT ALL TIMES Via Philips 5, 20900 Monza (MI), Italy Tel. +39 039 200 1973-936 - Fax +39 039 2004299 www.max-power.com...
-
Page 2: Table Of Contents
Last update:December 2013 Manual CT300 Contents Section Title Page General installation guidelines Tunnel Motor support and drive leg Electric Motor Propellers Protection grids Electrical installation Main power fuse Batteries Electronic control box Control panel and thruster control box functions Control panel installation... -
Page 3: General Installation Guidelines
Last update:December 2013 Manual CT300 1. GENERAL INSTALLATION GUIDELINES In order to install the thruster in the most efficient position, follow the instructions below: • The minimum acceptable tunnel position is 225mm below the waterline • The tunnel is ideall y positioned when the distance between the waterline and the top of the installed tunnel is 300mm •... -
Page 4: Tunnel
Last update:December 2013 Manual CT300 2. TUNNEL Once the final tunnel position has been determined and all dimensions have been checked, mark the centre-point of the tunnel on both sides of the hull and drill holes of 8 –10mm ∅ on either side. -
Page 5: Motor Support And Drive Leg
Manual CT300 Last update:December 2013 DO NOT LAMINATE THE AREA OF THE TUNNEL TO WHICH THE ELECTRICAL MOTOR SUPPORT WILL BE FIXED. 3. MOTOR SUPPORT AND DRIVE LEG The motor support and the drive leg must be centered in the tunnel. -
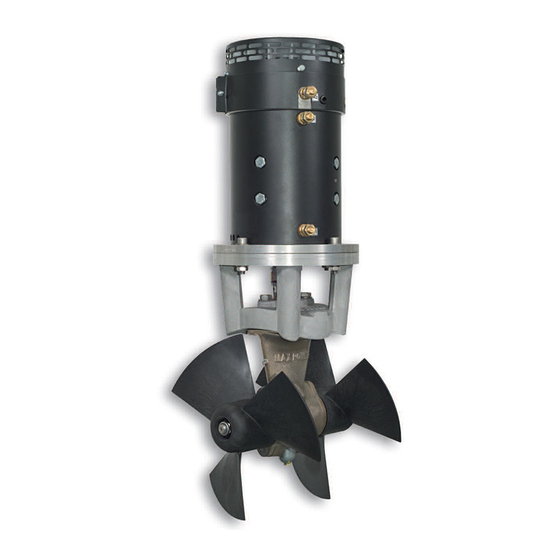
Page 6: Electric Motor
Last update:December 2013 Manual CT300 4. ELECTRIC MOTOR (12 / 24 volts) The upper coupling (motor side) is adjusted in the factory. Position the lower coupling on the drive leg shaft and push it down as far as it will go (lightly grease the shaft beforehand). -
Page 7: Main Power Fuse
These values are given as an indication, assuming that the batteries are charged at 100% and in charge, that is 25.4V. The performance data of the CT300 is measured with an approx. consumption of 980A and 22V at the motor’s connections. -
Page 8: Electronic Control Box
Max Power advises the use of an electric battery isolator ref. If an electric battery isolator is not used then simply seal-off the two grey wires coming out of the control box. -
Page 9: Control Panel Installation
Last update:December 2013 Manual CT300 12. CONTROL PANEL INSTALLATION Control panels should be protected from the natural elements while the thruster is not in use. Install the control panel(s) in easily accessible positions, without obstructing the main engine and/or steering controls. -
Page 10: Electrical Measurements
Last update:December 2013 Manual CT300 14. ELECTRICAL MEASUREMENTS In normal “usage” mode, i.e. thrusters running, boat in the water, with fully charged batteries under ongoing charge (alternator), electrical measurements should be made at the following points: At the batteries At the battery cut-off switch At the fuse At the electric motor’s connections... -
Page 11: Safety
Last update:December 2013 Manual CT300 17. SAFETY Switch off means to cut the power at both the DC equipment panel (control power supply) & the thruster battery isolator (thruster power supply) after having used the thruster. Under no circumstances should any flammable products be stored next to the electric components of the thruster. -
Page 12: Electrical Installation Diagram
Last update:December 2013 Manual CT300 19. ELECTRICAL INSTALLATION DIAGRAM www.max-power.com... -
Page 13: Power Cable Connections Diagram
Manual CT300 Last update:December 2013 20. POWER CABLE CONNECTIONS www.max-power.com... -
Page 14: Spare Parts Diagram
Last update:December 2013 Manual CT300 21. SPARE PARTS DIAGRAM www.max-power.com... -
Page 15: Spare Parts List
Last update:December 2013 Manual CT300 22. SPARE PARTS LIST N° Description Quantity Old Code New Code Electric Motor CT300 MP203000 312862 Motor Brushes MPOP3559 310382 Spring MPOP3520 310383 Screws MPOP4070 630496 Rondelles Coupling aluminium MP662000 633751 Coupling PG66 MP661000 633749... - Page 16 MPOP5311 312120 Relay and Control box assembly MP208055 315334 Relay 24 V MP203101/2 312922 Electronic Controller MPOP5701 315308 Metal leg CT300 MP208100 315388 Fuse holder T2 OPTI3091 35018 Fuse 400 A OPTI3145 35028 Extraction handle for T1 & T2 OPTI3118...
-
Page 17: Troubleshooting Guide
Check the connections are tightened correctly Check the power cables sections • (See p. 6 : Recommended cable sections) 24. WORLDWIDE DISTRIBUTION NETWORK To locate the nearest Max Power distributor, please consult the section "Worldwide Distribution" on our website: www.max-power.com www.max-power.com... - Page 18 The warranty as outlined above is only applicable to Max Power manufactured thrusters and optional equipment as used in marine pleasure industry. The supplier holds the exclusive right to test the product and...
Need help?
Do you have a question about the CT300 and is the answer not in the manual?
Questions and answers