Table of Contents
Advertisement
Quick Links
Advertisement
Table of Contents

Related Manuals for Campbell Wind Monitor Series


Summary of Contents for Campbell Wind Monitor Series
- Page 1 Revision: 12/2020 Copyright © 1984 – 2020 Campbell Scientific, Inc.
-
Page 2: Table Of Contents
Table of contents 1. Introduction 2. Precautions 3. Initial inspection 4. QuickStart 5. Overview 6. Specifications 7. Installation 7.1 Wiring 7.2 Programming 7.2.1 Wind speed 7.2.2 Wind direction 7.2.3 WindVector processing instruction 7.3 Siting 7.4 Assembly and mounting 7.4.1 Mounting the wind monitor to a crossarm 7.4.2 Mounting the wind monitor atop a tripod mast 8. -
Page 3: Introduction
(UV) degradation. However, this jacket will support combustion in air. It is rated as slow burning when tested according to U.L. 94 H.B. and will pass FMVSS302. Local fire codes may preclude its use inside buildings. Wind Monitor Series... -
Page 4: Initial Inspection
Wire color and functions of sensors purchased through Campbell Scientific may not correspond with the wire colors and functions given in the manufacturer’s manual. To ensure proper function, follow the wiring provided in Short Cut or in the Campbell Scientific manual. - Page 5 Wind Speed box and selecting one of the other options. 4. Click on the Wiring tab to see how the sensor is to be wired to the data logger. Click OK after wiring the sensor. 5. Repeat steps three and four for other sensors. Click Next. Wind Monitor Series...
- Page 6 9. If the sensor is connected to the data logger, check the output of the sensor in the data display in LoggerNet, RTDAQ, PC400, or PC200W to make sure it is making reasonable measurements. Wind Monitor Series...
-
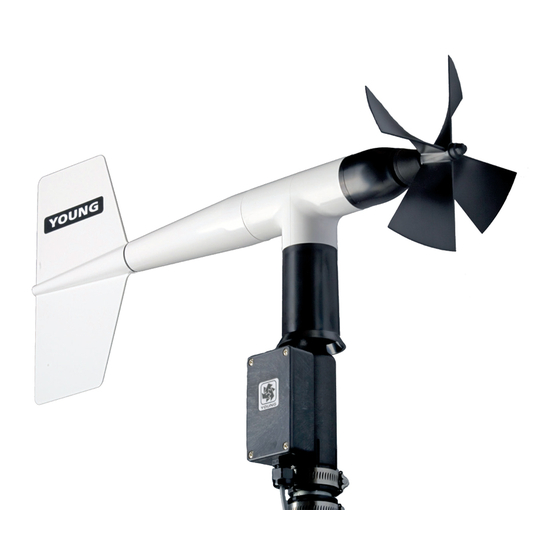
Page 7: Overview
The R.M. Young Instruction Manual includes additional information on the operating principles, installation, and maintenance of the sensor. The wind monitors are manufactured by R.M. Young and cabled by Campbell Scientific for use with our data loggers. Cable lengths for the wind monitors are specified when the sensors are ordered. -
Page 8: Specifications
(0.1024 m/s) / (scan (0.0980 m/s) / (scan rate in in seconds) or rate in sec.) or Resolution seconds) or (0.2192 mph) / (0.3726 mph) / (0.2290 mph) / (scan (scan rate in seconds) (scan rate in seconds) rate in sec.) Wind Monitor Series... - Page 9 7.4 m (24.3 ft) (16.1 ft) wavelength Undamped 4.4 m natural 7.2 m (23.6 ft) (14.4 ft) wavelength analog DC voltage from potentiometer—resistance 10 kΩ; linearity 0.25%; Output life expectancy 50 million revolutions Power switched excitation voltage supplied by data logger Wind Monitor Series...
-
Page 10: Installation
QuickStart (p. 2) for a Short Cut tutorial. 7.1 Wiring Connections to Campbell Scientific data loggers are given in Table 7-1 (p. 9). When Short Cut software is used to create the data logger program, the sensor is wired to the terminals shown in the wiring diagram created by Short Cut. -
Page 11: Programming
(p. 18). Programming basics and programming examples for Edlog data loggers are provided at www.campbellsci.com\old-manuals. 7.2.1 Wind speed PulseCount() Wind speed is measured by using the instruction. Syntax of the the PulseCount() instruction is: PulseCount (Dest, Reps, PChan, PConfig, POption, Mult, Offset) Wind Monitor Series... -
Page 12: Wind Direction
0.0: If WindDir < 0, then WindDir = 0.0. The excitation voltage, range codes, and multipliers for the different data logger types are listed Table 7-3 (p. 11). Wind direction measurement theory (p. 24) has additional information on the BRHalf() measurement instruction. Wind Monitor Series... -
Page 13: Windvector Processing Instruction
5/64 inch hex key wrench 1/2 inch open end wrench Compass and declination angle for the site (see Wind direction sensor orientation (p. 21)) Small screw driver provided with data logger UV resistant cable ties 6 to 10 inch torpedo level Wind Monitor Series... -
Page 14: Mounting The Wind Monitor To A Crossarm
(see the following figure). CAUTION: Must install the ferrite choke on the cable near the sensor to meet EMC compliance. FIGURE 7-1. Ferrite choke installed on cable Wind Monitor Series... - Page 15 10. Secure the cable to the crossarm and tripod or tower by using cable ties. FIGURE 7-2. CM220 Right Angle Mounting Kit mounted to a crossarm FIGURE 7-3. Wind monitor mounted to a crossarm by using 1- x 1-in. Nu-Rail Crossover Fitting Wind Monitor Series...
-
Page 16: Mounting The Wind Monitor Atop A Tripod Mast
The potentiometer has a life expectancy of fifty million revolutions. As it becomes worn, the element can produce noisy signals or become non-linear. Replace the potentiometer when the noise or non-linearity becomes unacceptable. The condition of the vertical shaft (vane) bearings can be checked by using R.M. Young Vane Torque Gauge. Wind Monitor Series... -
Page 17: Troubleshooting
NOTE: Campbell Scientific recommends factory replacement of the bearings and potentiometer. Refer to the Assistance page of this document for the procedure of acquiring a Returned Materials Authorization (RMA). Mechanically-adept users may choose to replace the bearings or potentiometer themselves. Instructions for replacing the bearings and potentiometer are given in R.M. -
Page 18: References
The State Climatologist, 1985: Publication of the American Association of State Climatologists: Height and Exposure Standards, for Sensors on Automated Weather Stations, vol. 9, No. 4. WMO, 1983: Guide to Meteorological Instruments and Methods of Observation, World Meteorological Organization, No. 8, 5th edition, Geneva, Switzerland. Wind Monitor Series... -
Page 19: Appendix A. Importing Short Cut Code Into Crbasic Editor
Block. This adds an apostrophe (') to the beginning of each of the highlighted lines, which instructs the data logger compiler to ignore those lines when compiling. The Comment Block feature is demonstrated at about 5:10 in the CRBasic | Features video Wind Monitor Series... -
Page 20: Appendix B. Example Programs
Table B-1: Wiring for example programs Color Wire Label CR1000X WS Signal Black WS Reference ⏚ ⏚ Green WD Signal SE 1 Blue WD Volt Excit VX 1 White WD Reference ⏚ ⏚ Clear Shield ⏚ ⏚ Wind Monitor Series... -
Page 21: Cr1000X Example Program
'Default Data Logger Battery Voltage measurement Batt_Volt: Battery (Batt_Volt) '05103 Wind Speed & Direction Sensor measurements WS_ms and WindDir: 'WS_ms PulseCount (WS_ms,1,P1,5,1,0.098,0) 'WindDir BrHalf (WindDir,1,mV5000,1,Vx1,1,2500,True,20000,60,355,0) WindDir>=360 OR WindDir<0 Then WindDir=0 'Call Data Tables and Store Data CallTable (Hour) NextScan EndProg Wind Monitor Series... -
Page 22: Cr6 Example Program
'Default Wiring Panel Temperature measurement 'PTemp_C' PanelTemp (PTemp_C,60) '05103 Wind Speed & Direction Sensor measurements 'WS_ms' and 'WindDir' 'WS_ms PulseCount (WS_ms,1,U4,5,1,0.098,0) 'WindDir BrHalf (WindDir,1,mV5000,U2,U1,1,2500,True,20000,60,355,0) Then WindDir>=360 OR WindDir<0 WindDir=0 'Call Data Tables and Store Data CallTable Hour NextScan EndProg Wind Monitor Series... -
Page 23: Appendix C. Wind Direction Sensor Orientation
3. Loosen the U-bolt on the CM220 or the set screws on the Nu-Rail that secure the base of the sensor to the crossarm. While holding the vane position, slowly rotate the sensor base until the data logger indicates 0 degrees. Tighten the set screws. Wind Monitor Series... - Page 24 FIGURE C-1. Magnetic declination for the contiguous United States (2015) FIGURE C-2. Declination angles east of true north are subtracted from 0 to get true north Wind Monitor Series...
- Page 25 FIGURE C-3. Declination angles west of true north are added to 0 to get true north Wind Monitor Series...
-
Page 26: Appendix D. Wind Direction Measurement Theory
Appendix D. Wind direction measurement theory It is not necessary to understand the concepts in this section for the general operation of the 05103 with a Campbell Scientific data logger. FIGURE D-1. 05103 potentiometer in a half bridge circuit BRHalf... - Page 27 See Product Details on the Ordering Information pages at www.campbellsci.com. Other manufacturer's products, that are resold by Campbell Scientific, are warranted only to the limits extended by the original manufacturer.
- Page 28 Campbell Scientific office serves your country. To obtain a Returned Materials Authorization or Repair Reference number, contact your CAMPBELL SCIENTIFIC regional office. Please write the issued number clearly on the outside of the shipping container and ship as directed.
- Page 29 Do not recharge, disassemble, heat above 100 °C (212 °F), solder directly to the cell, incinerate, or expose contents to water. Dispose of spent batteries properly. WHILE EVERY ATTEMPT IS MADE TO EMBODY THE HIGHEST DEGREE OF SAFETY IN ALL CAMPBELL SCIENTIFIC PRODUCTS, THE CUSTOMER ASSUMES ALL RISK FROM ANY INJURY RESULTING FROM IMPROPER INSTALLATION, USE, OR MAINTENANCE OF TRIPODS, TOWERS, OR...
- Page 30 Campbell Scientific regional offices Australia France Thailand Location: Garbutt, QLD Australia Location: Vincennes, France Location: Bangkok, Thailand Phone: 61.7.4401.7700 Phone: 0033.0.1.56.45.15.20 Phone: 66.2.719.3399 Email: info@campbellsci.com.au Email: info@campbellsci.fr Email: info@campbellsci.asia Website: www.campbellsci.com.au Website: www.campbellsci.fr Website: www.campbellsci.asia Brazil Germany Location: São Paulo, SP Brazil...
Need help?
Do you have a question about the Wind Monitor Series and is the answer not in the manual?
Questions and answers