Table of Contents
Advertisement
Quick Links
Advertisement
Table of Contents

Subscribe to Our Youtube Channel
Related Manuals for Campbell Weatherpak M


Summary of Contents for Campbell Weatherpak M
- Page 1 Product Manual 11/2020 Copyright © 2020 Campbell Scientific, Inc.
-
Page 2: Table Of Contents
Table of contents 1. System description 2. Siting and setup 2.1 Siting considerations 2.1.1 Compass accuracy 2.1.2 Proper wind measurement 2.1.3 Radio transmission 2.1.4 GPS operation 2.2 System assembly 2.2.1 INTERCEPT display connections 2.2.2 Connecting to a computer with USB to serial converter 2.2.3 Connecting to a computer with the Ethernet port 2.2.4 Tripod and WEATHERPAK M setup 3. - Page 3 5.2.2 Data receipt 5.2.3 Computer 5.3 Replacing tower batteries and fuse 5.3.1 Tower batteries 5.3.2 Tower fuse Appendix A. Vehicle mounting a WEATHERPAK M Appendix B. WEATHERPAK M USB connection and set up Appendix C. Important information for North American users Table of Contents - ii...
-
Page 4: System Description
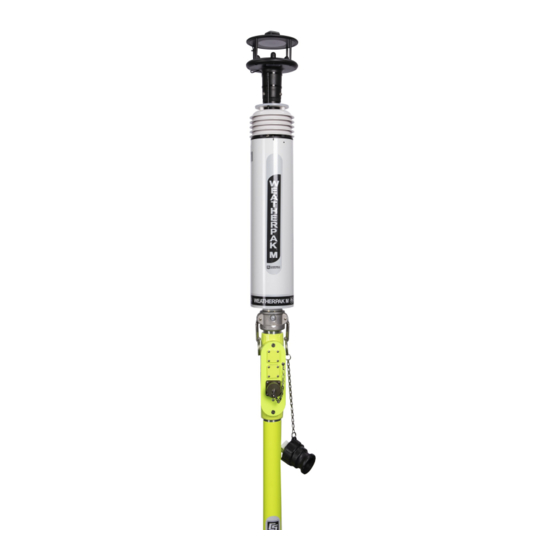
Atmospheric conditions are sampled every second and the system computes a 5-minute running average. Data is then transmitted every 30 seconds to the display and plume model. FIGURE 1-1. WEATHERPAK M with INTERCEPT Display WEATHERPAK is a registered trademark of Campbell Scientific. WEATHERPAK M... - Page 5 WEATHERPAK M. Please read all of the instructions before attempting to operate or troubleshoot the system. INTERCEPT is a registered trademark of Campbell Scientific. Both ALOHA and CAMEO are registered by National Oceanic and Atmospheric Administration (NOAA) U.S. Department of Commerce FEDERAL AGENCY UNITED STATES.
-
Page 6: Siting And Setup
WEATHERPAK M components: Ultrasonic wind sensor Barometer Air temperature and relative sensor INTERCEPT display Display power supply and power cable Receiver/display box Communications options: Wired serial—includes serial cable UHF radio—includes two UHF radios, narrow band antenna, and cables Spread spectrum radio—includes two spread spectrum radios, spread antenna, and cable Mounting options: Portable 3 meter quick-deploy tripod—includes tripod and carry case... -
Page 7: Proper Wind Measurement
2.1.2 Proper wind measurement Locate the WEATHERPAK M away from obstructions such as trees and buildings. The distance between wind sensors and the nearest obstruction should be ten times the height of the obstruction. 2.1.3 Radio transmission Deploy the WEATHERPAK M as close as safety permits to the hot zone. The WEATHERPAK M UHF radio has a range of 5 to 7 miles line-of-sight. - Page 8 1. Connect the external GPS and radio antennas to the appropriate connectors on the side of the INTERCEPT display (see FIGURE 2-1 (p. 5)). FIGURE 2-1. Side of INTERCEPT display 2. When outputting data to the CAMEO/ALOHA plume modeling software, connect the USB to serial data cable.
-
Page 9: Connecting To A Computer With Usb To Serial Converter
This method is to be employed only if the INTERCEPT display must be connected to a network. Please contact Campbell Scientific for further information. Refer to the Assistance page at the end of this document for the procedure of returning components to Campbell Scientific. WEATHERPAK M... -
Page 10: Tripod And Weatherpak M Setup
2.2.4 Tripod and WEATHERPAK M setup Assemble the tower in the following manner: 1. Insert and lock the legs onto the bottom section of the tower, forming the tower tripod base. 2. Align the slot on the WEATHERPAK M with the guide pin on the quick release and push straight in. - Page 11 3. Once the weather station is properly seated, press the arms of the cam lock down to assure a tight fit. The battery indicator light (on the tower junction box) should illuminate when the WEATHERPAK M is properly seated into the cam lock. 4.
- Page 12 FIGURE 2-4. Tower setup WEATHERPAK M...
-
Page 13: System Operation
3. System operation Once set up, the WEATHERPAK M automatically begins sampling weather conditions and transmits data to the INTERCEPT display every 30 seconds. The INTERCEPT display takes approximately 20 to 30 seconds to complete a startup routine. When this process is complete, the plume modeling software requires five minutes of data before a valid plume can be presented. -
Page 14: Weatherpak
FIGURE 3-1. Weather summary 3.2.2 WEATHERPAK The WEATHERPAK tab is where current values from the primary WEATHERPAK M system are displayed. Data from additional WEATHERPAK M systems are displayed in subsequent tabs, identified by the WEATHERPAK M ID. FIGURE 3-2. Current values from the primary WEATHERPAK M system WEATHERPAK M... -
Page 15: Display Theme
3.2.3 Display theme The display can be viewed in night or day theme. To change theme, click Display in the upper left corner. A pop-up window will appear. Choose the desired theme then click Submit. FIGURE 3-3. Display pop-up window WEATHERPAK M... -
Page 16: Help
3.2.4 Help Click the Help tab and select Contents to display the Help Contents. Navigate to any section to get instructions and explanations of the software. FIGURE 3-4. Help contents WEATHERPAK M... -
Page 17: Logs
3.2.5 Logs Click the Logs tab and select View Logs. The Log View pop-up will display system data logs. FIGURE 3-5. Logs 3.2.6 Graphs Click the Graphs tab and select WEATHERPAK to display the desired graph. FIGURE 3-6. Graphs WEATHERPAK M... -
Page 18: Maintenance
3.3 Maintenance 3.3.1 Maintenance Dashboard Select the Maintenance Dashboard tab to see a graphical display of the overall system status. Green lights indicate normal conditions. A red light indicates an alarm for that particular item. Click the icon for detailed information about the alarm. FIGURE 3-7. -
Page 19: Settings
The following shows of the steps taken to produce an ALOHA plume model on a computer. This section assumes the user is familiar with ALOHA and that the program is properly loaded onto the computer. Campbell Scientific recommends consulting the ALOHA website and/or a certified CAMEO/ALOHA instructor for training, program details, and limitations. - Page 20 2. Confirm that your Site Data information provided in the Text Summary window is correct. If required, use the SiteData drop-down menu to change data. 3. Go to SetUp > Chemical and select the appropriate chemical. 4. Select SetUp > Atmospheric > SAM Station to display series of dialog boxes that require user observations or assumptions.
- Page 21 8. (Optional) Select the Display menu to produce graphs for source strength and concentration. FIGURE 4-1. ALOHA window WEATHERPAK M...
- Page 22 9. Select the Sharing menu to plot the plume onto a MARPLOT (or other) map. As weather conditions change, the plume size and position will change on the map, shortly after the WEATHERPAK M provides updated data. NOTE: MARPLOT software requires that the ALOHA window overlay the map window for the map-plume to update automatically (FIGURE 4-2 (p.
-
Page 23: Aloha Data Line Interpretation
Most of these numbers also appear in the Processed SAM Data window in ALOHA. The differences are no labels and some additional numbers. In addition, this raw data is delivered in metric units (millibars, m/s, °C), whereas the processed data is converted to standard English units (inches, MPH, °F). -
Page 24: Maintenance
CAUTION: Taking the WEATHERPAK M or the INTERCEPT Display apart will void the warranty. If the following procedures do not solve the problem, contact Campbell Scientific (see Assistance). 5.2.1 WEATHERPAK M When completely assembled, the WEATHERPAK M system automatically powers up, locates True North, and begins sampling the atmospheric conditions;... -
Page 25: Data Receipt
AGC 3 fuse. If the fuse blows repeatedly, contact Campbell Scientific. See Replacing tower batteries and fuse (p. 23). If the INTERCEPT display does not illuminate shortly after the on/off button is pressed, check the following: Be sure the INTERCEPT Display is plugged in and turned on. Double check the power cord connections at the wall, power supply and bottom of the INTERCEPT Display. -
Page 26: Replacing Tower Batteries And Fuse
Error messages while running the plume model are coming from the plume modeling software. If you get an error message: Consult the CAMEO/ALOHA web site: www.epa.gov/cameo. Contact Campbell Scientific. Although not certified CAMEO/ALOHA trainers or representatives, we may be able to help. 5.3 Replacing tower batteries and fuse WARNING: Do not leave batteries in tower when storing or shipping tower assembly. -
Page 27: Tower Fuse
The red LED voltage indicator light on the tripod tower will remain illuminated when the battery voltage is higher than 10.7 VDC. View the precise battery voltage using the Weatherpak Status window on the INTERCEPT display. If monitoring multiple WEATHERPAK M stations, ensure that the status window for the appropriate WEATHERPAK M station is viewed by using the ALOHA plume model. -
Page 28: Appendix A. Vehicle Mounting A Weatherpak M
Any WEATHERPAK M can be vehicle mounted; typically, one of the following methods is used: 1. Campbell Scientific offers a professional, turnkey vehicle mounting solution for the WEATHERPAK M. We have modified a side mount telescopic pole (Model 530), provided by Fire Resources Corporation, Inc., a premier manufacturer of emergency lighting... - Page 29 2. Campbell Scientific also sells an accessory that allows the user to adapt the WEATHERPAK M to a mast of your choice. (See FIGURE A-2 (p. 26).) The WEATHERPAK M Vehicle Adapter is a cam lock Quick-Release with a male 1 1/2-inch NPT (national pipe thread) on the bottom and 25-foot cable.
-
Page 30: Appendix B. Weatherpak Musb Connection And Set Up
Appendix B. WEATHERPAK M USB connection and set up Depending upon the type of connection, when the WEATHERPAK M system is first connected to a computer, Windows® automatically establishes a communications link between the WEATHERPAK M INTERCEPT display and the computer, which allows data to pass to the plume model or other software. - Page 31 If errors appear on this window, verify the computer is receiving data. To do this, in ALOHA, go to SAM Options on the top menu bar and select Raw Data. A window displays a string of numbers similar to the following. The data line should refresh every 30 seconds (window blinks and overwrites the previous data string).
-
Page 32: Appendix C. Important Information For North American Users
Appendix C. Important information for North American users The following Note pertains to WEATHERPAK M stations using the wired serial communication option. NOTE: This equipment has been tested and found to comply with the limits for a Class A digital device, pursuant to part 15 of the FCC Rules. These limits are designed to provide reasonable protection against harmful interference when the equipment is operated in a commercial environment. - Page 33 Connect the equipment into an outlet on a circuit different from that to which the receiver is connected. Consult the dealer or an experienced radio/TV technician for help. WARNING: Changes or modifications to this device not expressly approved by Campbell Scientific could void the user’s authority to operate this equipment. WEATHERPAK M...
- Page 34 See Product Details on the Ordering Information pages at www.campbellsci.com. Other manufacturer's products, that are resold by Campbell Scientific, are warranted only to the limits extended by the original manufacturer.
- Page 35 Campbell Scientific office serves your country. To obtain a Returned Materials Authorization or Repair Reference number, contact your CAMPBELL SCIENTIFIC regional office. Please write the issued number clearly on the outside of the shipping container and ship as directed.
- Page 36 Do not recharge, disassemble, heat above 100 °C (212 °F), solder directly to the cell, incinerate, or expose contents to water. Dispose of spent batteries properly. WHILE EVERY ATTEMPT IS MADE TO EMBODY THE HIGHEST DEGREE OF SAFETY IN ALL CAMPBELL SCIENTIFIC PRODUCTS, THE CUSTOMER ASSUMES ALL RISK FROM ANY INJURY RESULTING FROM IMPROPER INSTALLATION, USE, OR MAINTENANCE OF TRIPODS, TOWERS, OR...
- Page 37 Campbell Scientific regional offices Australia France Thailand Location: Garbutt, QLD Australia Location: Vincennes, France Location: Bangkok, Thailand Phone: 61.7.4401.7700 Phone: 0033.0.1.56.45.15.20 Phone: 66.2.719.3399 Email: info@campbellsci.com.au Email: info@campbellsci.fr Email: info@campbellsci.asia Website: www.campbellsci.com.au Website: www.campbellsci.fr Website: www.campbellsci.asia Brazil Germany Location: São Paulo, SP Brazil...
Need help?
Do you have a question about the Weatherpak M and is the answer not in the manual?
Questions and answers