Table of Contents
Advertisement
Quick Links
Advertisement
Table of Contents
Troubleshooting

Related Manuals for Campbell WindSonic1


Summary of Contents for Campbell WindSonic1
- Page 1 02/2020 Copyright © 2014 – 2020 Campbell Scientific CSL I.D - 1335...
- Page 3 Quotations for repairs can be given on request. It is the policy of Campbell Scientific to protect the health of its employees and provide a safe working environment, in support of this policy a “Declaration of Hazardous Material and Decontamination”...
- Page 5 PLEASE READ FIRST About this manual Please note that this manual was originally produced by Campbell Scientific Inc. primarily for the North American market. Some spellings, weights and measures may reflect this origin. Some useful conversion factors: Area: 1 in...
- Page 7 • Periodically (at least yearly) check electrical ground connections. WHILE EVERY ATTEMPT IS MADE TO EMBODY THE HIGHEST DEGREE OF SAFETY IN ALL CAMPBELL SCIENTIFIC PRODUCTS, THE CUSTOMER ASSUMES ALL RISK FROM ANY INJURY RESULTING FROM IMPROPER INSTALLATION, USE, OR MAINTENANCE OF TRIPODS, TOWERS, OR ATTACHMENTS TO TRIPODS AND TOWERS...
- Page 9 7.3 Data logger-to-WindSonic1 wiring 7.4 SDM-SIO1A/SDM-SIO4A wiring 7.5 Data logger programming 7.5.1 WindSonic1 programming 8. Operation 8.1 Sensor configuration 8.2 Campbell Scientific factory default settings 8.3 Sensor output 8.4 Long cables 9. Maintenance and troubleshooting 9.1 Troubleshooting 9.2 Maintenance 10. Siting references Appendix A.
- Page 10 Appendix C. Updating an older program for the new WindSonic1 settings Appendix D. Using the CPI/RS-232 port ............. Table of Contents - ii...
- Page 11 It is not heated. The WindSonic1 is a precision instrument. Please handle it with care. If the WindSonic1 is to be installed at heights over 2 m (6 ft), be familiar with tower safety and follow safe tower climbing procedures.
-
Page 12: Initial Inspection
1. Open Short Cut and click Create New Program. 2. Double-click the data logger model. 3. In the Available Sensors and Devices box, type WindSonic1 or locate the sensor in the Sensors > Meteorological > Wind Speed & Direction folder. Double-click either WindSonic1 (RS-232 9.6K baud) or WindSonic1 (RS-232 38.4K baud);... - Page 13 4. Click on the Wiring tab to see how the sensor is to be wired to the data logger. Click OK after wiring the sensor. 5. Repeat steps 3 and 4 for other sensors. WindSonic1 Two-Dimensional Sonic Anemometer...
- Page 14 9. If the sensor is connected to the data logger, check the output of the sensor in the data display in LoggerNet, RTDAQ, PC400, or PC200W to make sure it is making reasonable measurements. WindSonic1 Two-Dimensional Sonic Anemometer...
-
Page 15: Specifications
The transducers bounce the ultrasonic signal from a hood, minimizing the effects of transducer shadowing and flow distortion. The WindSonic1 outputs data using the RS-232 interface. It connects to two C or U terminals or to the CPI/RS-232 port by using an RJ45 terminal block adapter. The WindSonic1 is also compatible with the SDM-SIO1A and SDM-SIO4A devices, which increase the number of serial sensors one data logger can measure. -
Page 16: Wind Direction
If it is necessary to mount the WindSonic1 on the roof of a building, the height of the sensor, above the roofline, should be at least 1.5 times the height of the building. See Siting references (p. -
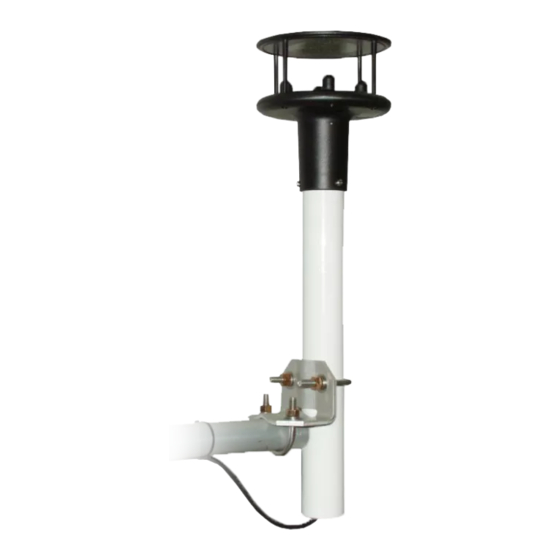
Page 17: Mount The Sensor
4. Attach the tubing to a crossarm using the CM220 Right Angle Mounting Kit (see FIGURE (p. 7)). 5. Mount the crossarm to the tripod or tower. 6. Orient the WindSonic1 so that the coloured North marker arrows point to True North (see Wind Direction Sensor Orientation FIGURE 7-1 (p. 7)). See (p. - Page 18 Two control or universal terminals are configured as a single communications (COMn) port. NOTE: The WindSonic1 can also connect to the CPI/RS-232 port on a CR6 or CR1000X by using an RJ45 terminal block adapter. Information about using this adapter is provided in Using the CPI/RS-232 port (p.
-
Page 19: Data Logger Programming
C (control terminal) or U terminal SDM data line configured for SDM data U and C terminals are automatically configured by the measurement instruction for Campbell Scientific CR6 data logger. 7.5 Data logger programming Short Cut is the best source for up-to-date programming code for Campbell Scientific data loggers. -
Page 20: Operation
8.4 Long cables 8.1 Sensor configuration To mimic a mechanical anemometer, the WindSonic1 output frequency must match the data logger scan frequency. The factory setting for the WindSonic1 is 1 Hz, which is 1 output per second. WindSonic1 Two-Dimensional Sonic Anemometer... - Page 21 The data output frequency of the WindSonic1 can be set to five discrete values (see Table 8-1 11)) using Gill’s computer support software and the RS-232 WindSonic to computer cable. Table 8-1: WindSonic1 output frequencies Output frequency (Hz) Seconds per output (s) 0.25...
-
Page 22: Sensor Output
Analogue wrap around 0 to 360 degrees Does not apply Minimum direction velocity CAUTION: WindSonic1 anemometers with the newer default settings will not work with older programs or Short Cut 3.0 or older. Refer to Updating an older program for the new WindSonic1 settings (p. -
Page 23: Maintenance And Troubleshooting
Line Feed (ASCII value 10) 8.4 Long cables Communications between the WindSonic1 and the data logger will most likely fail if its cable is extended beyond 15 m (50 ft). Digital data transfer eliminates offset errors due to cable lengths. -
Page 24: Troubleshooting
The data logger program can filter out data when the status code is not 00. If the WindSonic1 is not powered, not connected, is using the wrong COM port, or has missed a sample, the wind direction and speed measurement will be NaN. The program can filter out these values and report the number of good samples that were used in computing the online statistics. - Page 25 The State Climatologist, 1985: Publication of the American Association of State Climatologists: Height and Exposure Standards, for Sensors on Automated Weather Stations, vol. 9, No. 4. WMO, 1983: Guide to Meteorological Instruments and Methods of Observation, World Meteorological Organization, No. 8, 5th edition, Geneva, Switzerland. WindSonic1 Two-Dimensional Sonic Anemometer...
-
Page 27: Appendix A. Importing Short Cut Code Into Crbasic Editor
Block. This adds an apostrophe (') to the beginning of each of the highlighted lines, which instructs the data logger compiler to ignore those lines when compiling. The Comment Block feature is demonstrated at about 5:10 in the CRBasic | Features video WindSonic1 Two-Dimensional Sonic Anemometer... -
Page 29: Appendix B. Wind Direction Sensor
Appendix B. Wind Direction Sensor Orientation B.1 Determining True North and Sensor Orientation Orientation of the wind direction sensor is done after the datalogger has been programmed, and the location of True North has been determined. True North is usually found by reading a magnetic compass and applying the correction for magnetic declination;... - Page 30 Appendix B. Wind Direction Sensor Orientation Figure B-1. Magnetic Declination at 2012.5 (degrees relative to true north, positive is east) Figure B-2. Declination Angles East of True North Are Subtracted From 0 to Get True North...
- Page 31 Appendix B. Wind Direction Sensor Orientation Figure B-3. Declination Angles West of True North Are Added to 0 to Get True North...
- Page 32 Appendix B. Wind Direction Sensor Orientation This is a blank page.
-
Page 33: Appendix C. Updating An Older Program For The New Windsonic1 Settings
WindSonic1 settings In February 2013, the settings of the WindSonic1 were changed to improve operation in cold temperatures. The communication baud rate changed from 38,400 to 9600 bps, and the data output structure changed to the manufacturer’s default. - Page 34 = windsonic(1) wind_speed = (in_bytes_str,7,6) wind_speed = windsonic(2) diag = (in_bytes_str,16,2) diag = windsonic(4) checksum_flg = ( ( HexToDec (in_bytes_str,20,2))) EQV _ checksum_flg = ( ( HexToDec Right (in_bytes_str,2))) EQV _ CheckSum CheckSum (in_bytes_str,9,18)) ) (in_bytes_str,9, (in_bytes_str)-3)) ) WindSonic1 Two-Dimensional Sonic Anemometer...
- Page 35 Appendix D. Using the CPI/RS-232 port An RJ45 terminal block adapter allows the WindSonic1 to be connected to the CPI/RS-232 port on a CR6 or CR1000X. The CPI/RS-232 port is typically only used if control or universal terminals are not available.
- Page 36 Australia France Thailand Location: Garbutt, QLD Australia Location: Vincennes, France Location: Bangkok, Thailand Phone: 61.7.4401.7700 Phone: 0033.0.1.56.45.15.20 Phone: 66.2.719.3399 Email: info@campbellsci.com.au Email: info@campbellsci.fr Email: info@campbellsci.asia Website: www.campbellsci.com.au Website: www.campbellsci.fr Website: www.campbellsci.asia Brazil Germany Location: São Paulo, SP Brazil Location: Bremen, Germany Location: Shepshed, Loughborough, UK Phone:...
Need help?
Do you have a question about the WindSonic1 and is the answer not in the manual?
Questions and answers