Table of Contents
Advertisement
Quick Links
Advertisement
Table of Contents

Subscribe to Our Youtube Channel
Related Manuals for Gilson CENTRY 103


Summary of Contents for Gilson CENTRY 103
- Page 1 CENTRY 103 Minicentrifuge ™ User’s Guide...
-
Page 2: Table Of Contents
TABLE OF CONTENTS INTRODUCTION | 3 Ordering Information | 3 Specifications | 3 Description | 4 SAFETY AND USER PRECAUTIONS | 5 General Safety Precautions | 5 Rotor and Microtubes | 5 Batteries | 5 OPERATION | 6 Installing | 6 Connecting to the Power Source and Turning On | 6 Installing the Rotor | 7 Preparing the Microtubes | 8... -
Page 3: Introduction
It also enables a spin down of a drop of liquid from the walls of tubes. Equipped with robust and easy to change rotors, the CENTRY 103 Minicentrifuge can be used either with microtubes or tube-strips. The round rotor has a capacity of eight 1.5 mL or 2.0 mL microtubes, and the rectangular shaped rotor capacity is two lines of... -
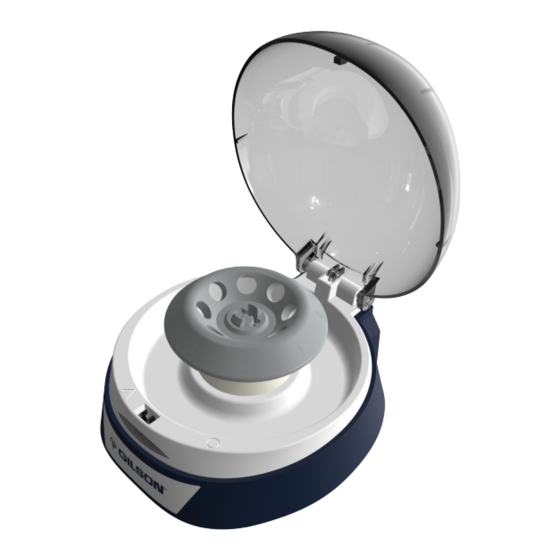
Page 4: Description
Description Figure 1 CENTRY 103 Minicentrifuge components Rotor for microtubes: 8 microtubes of 1.5 mL or 2.0 mL Chamber Rotor for tube–strips: 2 lines of 8 connected 0.2 mL microtubes Motor shaft boss AC adapter Power indicator light Input voltage: AC 100–240V, 50/60 Hz Type C (EU) Main power switch Type A (Japan/USA) -
Page 5: Safety And User Precautions
Read the User’s Guide carefully before operating the instrument and follow all safety norms. General Safety Precautions When the CENTRy 103 Minicentrifuge is not in use, ensure the power is switched off (position “O”). When the power is switched on (position “I”), the red, indicator light turns on. -
Page 6: Operation
Do not hold the CENTRy 103 Minicentrifuge by the rotor or the lid, which may damage the instrument. Installing ● Place the CENTRY 103 Minicentrifuge on a flat and level surface such as a laboratory bench. ● The location must be well-ventilated and free of direct sunlight. ●... -
Page 7: Installing The Rotor
Installing the Rotor NOTE Before the initial use, turn the rotor slowly by hand, five to six revolutions. Install the rotor onto the motor shaft boss Push down until it clicks. (Refer to Figure 2.) Make sure that the tabs of the boss are blocked inside the hole of the rotor. -
Page 8: Preparing The Microtubes
Preparing the Microtubes ● Prepare microtubes that are compatible with the rotor in use. Do not use the instrument to centrifuge explosive or flammable samples. It may cause fatal or serious accidents. The instrument does not provide adequate protection against explosion or ignition. Do not use the instrument to centrifuge infectious samples. -
Page 9: Maintenance
Cleaning and Disinfecting For cleaning the CENTRY 103 Minicentrifuge, wipe the unit with a soft cloth moistened with a neutral detergent. The unit can be disinfected with ethanol. Do not sterilize the rotors by autoclave or with UV, it could damage them. The rotors CAUTION can be disinfected with ethanol. -
Page 10: Troubleshooting
Return for Repair If any problem persists, please contact your local Gilson Service Center. Forced opening of the instrument invalidates any warranty claim. Enclose with the returned instrument a description of the issue that has occurred and specify how the instrument was used (duration, microtubes used, load of the rotor, etc.) -
Page 11: Spare Parts
SpARE pARTS Accessories DESCRIPTION PART NUMBER CENTRY 103 ROTOR 8 TUBES 1.5-2.0 mL F1077310 CENTRY 103 ROTOR 2 TUBE-STRIPS 8 X 0.2 mL F1077311 CENTRY 103 MOTOR SHAFT BOSS F1077312 CENTRY 103 AC ADAPTER WITH 5 PLUGS F1077313 CENTRY™ 103 MINICENTRIFUGE... -
Page 12: Declaration Of Conformity
Chapter 7 DECLARATION OF CONFORMITy Related Standards The CENTRY 103 Minicentrifuge conforms to the following safety standards: EU Directives ● Low voltage equipment: 2014/35/EU ● Electromagnetic compatibility: 2014/30/EU ● Restriction of hazardous substances: 2011/65/EU Standards for EU Safety requirements for electrical equipment for measurement, control, and laboratory use. -
Page 13: Warranty
Gilson is not responsible for consequential damages resulting from the misuse or bad cleaning or decontamination of this instrument. Should warranty service be required, repair or replacement will be provided by your local Gilson service center. Freight shipping the unit to Gilson will be the responsibility of the purchaser. - Page 14 LT801606/A | ©03/2019 Gilson, Inc. All rights reserved.
Need help?
Do you have a question about the CENTRY 103 and is the answer not in the manual?
Questions and answers