Table of Contents
Advertisement
Quick Links
Advertisement
Table of Contents

Related Manuals for Festo SOPA


Summary of Contents for Festo SOPA
- Page 1 SOPA Air gap sensor Manual 8118612 8118612 2020-04 [8118614]...
- Page 2 Translation of the original instructions Festo — SOPA — 2020-04...
-
Page 3: Table Of Contents
H-rail Mounting.......................20 6.3.2 Plate mounting....................... 20 6.3.3 Wall Mounting......................21 Use sensor module without control module..............21 Accessories........................22 Installation........................22 Pneumatic Installation....................22 Electrical installation....................23 7.2.1 PIN allocation and control module circuit diagrams..........23 Festo — SOPA — 2020-04... - Page 4 Status messages....................44 9.11.2 Diagnostic levels....................44 Operation and use......................45 10.1 Notes on operation......................45 10.2 Restoring Factory Settings (Restore)................45 10.3 Using the differential pressure regulator............... 46 Maintenance and Care....................46 Malfunctions........................ 46 12.1 Error messages......................46 Festo — SOPA — 2020-04...
- Page 5 12.2 Fault clearance......................47 Disassembly........................ 48 Disposal........................49 Technical data......................50 15.1 Technical data, general....................50 15.2 Diagrams........................54 15.3 Hole patterns........................ 56 Festo — SOPA — 2020-04...
-
Page 6: About This Document
Note that changes to the switching status (EDIT mode) become effective immediately. Intended Use The air gap sensor SOPA is intended for distance monitoring in a range of 20 … 200 μm. The distance measurement is performed using a non-contact pneumatic measuring process. This enables it to be used in harsh ambient conditions. -
Page 7: Further Information
UL248. The fuse shall be rated max. 3.3 A and be installed in the 30 V DC power supply to the device in order to limit the available current. Further information – Accessories è www.festo.com/catalogue. – Spare parts è www.festo.com/spareparts. Service Contact your regional Festo contact person if you have technical questions è www.festo.com. Festo — SOPA — 2020-04... -
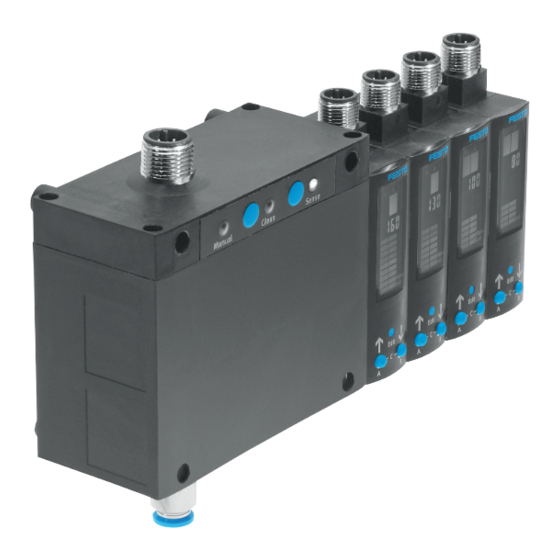
Page 8: Product Overview
4 Display 16 Manual LED (green) – ready indication for 5 Edit button manual override (SOPA-C..-H only) 6 B pushbutton 17 Clean pushbutton (blow-out air) (SOPA-C..-H only) 7 A pushbutton 18 Status LED (yellow) – clean (blow-out air) 8 Label holder... -
Page 9: Display Components
Switch-off delay for the numerical display [Analogue] Settings for analogue output [TeachIn] Teach mode active [Option] Options for spurious pulse suppression (Off, 1, 2) [Lock] Security code active (block to prevent unauthorised parameterisation) [Spec] Special menu (SPEC) active Festo — SOPA — 2020-04... - Page 10 The bar graph for InB is only active if the binary signal OutB is assigned to the switching output at Pin 2. 1) "A" flashes when IO-Link communication is active Tab. 2 Symbols on the display Festo — SOPA — 2020-04...
-
Page 11: Bar Graph On The Display
Basic status after the operating voltage is applied – Numerical and graphic display of distance-correlated values (bar graph) – Display of measured values for supply pressure (in bar) – Display of the signal statuses of the binary signals OutA, OutB, OutC Festo — SOPA — 2020-04... -
Page 12: Switching Outputs
(transfer of the current value as switching threshold) Tab. 4 Operating statuses 5.2.2 Switching outputs 5.2.2.1 Switching signals 1 Sensing variable 3 Binary signal 2 Input signal 4 Switching signal at sensor module plug Fig. 3 Binary signals and switching signals SOPA-...-2P/2N-... Festo — SOPA — 2020-04... -
Page 13: Switching Functions
The switching output OutC is permanently assigned to monitoring the supply pressure. The setting is made via the display and pushbuttons or via IO-Link (SOPA -...- PNLK -...). The binary signal at OutC acts as an enable signal for OutA and OutB. -
Page 14: Functional Principle
5.2.3 Functional Principle The system consists of two sub-components. The control module provides a compressed air prepara- tion that is adapted to the supply pressure of the sensor module, as well as the functionality for Festo — SOPA — 2020-04... -
Page 15: Analogue Output
è Tab. 7. The scaling of the analogue signal means that only a limited sensing range affects the entire stroke of the analogue output (zoom function). This zoom function can be used to improve the resolution of the analogue output. Festo — SOPA — 2020-04... -
Page 16: Filter
Object approaches the switching point: the red segments switch off one after the other. – Object has reached the switching point: all red segments are switched off, all green segments are – Object approaches the measuring nozzle: the green segments switch off one after the other. Festo — SOPA — 2020-04... -
Page 17: Assembly
(e.g. condensation) can enter the product and cause a mal- function or damage the product. • Prevent the entry of foreign matter and liquids through design measures, for example through a suitable configuration of the measuring nozzles. Festo — SOPA — 2020-04... - Page 18 2. Comply with permissible tube lengths between the sensor module and measuring nozzle . d Distance 30… 60 μm 1 Air duct (example) 2 Measuring nozzle Fig. 8 Recessed measuring nozzle 1 Air duct (example) 2 Measuring nozzle Fig. 9 Exhausting Festo — SOPA — 2020-04...
-
Page 19: Assembling Sensor Module With Control Module
(e.g. condensation) can enter the product and cause a mal- function or damage the product. • Prevent the entry of foreign matter and liquids through design measures, for example through a suitable configuration of the measuring nozzles. Festo — SOPA — 2020-04... -
Page 20: H-Rail Mounting
2. Press the H-rail mounting in the direction of the arrow until the mounting slide catches 2. 6.3.2 Plate mounting Fig. 13 Plate mounting 1. Prepare threaded holes M5 è 15.3 Hole patterns. 2. Guide screws through the sensor and tighten. Use washers. – Tightening torque: 0.6 Nm Festo — SOPA — 2020-04... -
Page 21: Wall Mounting
1 Connection for supply pressure Fig. 15 Attach the sensor modules 1. Mount the fitting (thread M7) to the supply pressure port. – Thread length: max. 5.5 mm 2. Seal the exposed connection with a blanking plug. – SW: 3 mm Festo — SOPA — 2020-04... -
Page 22: Accessories
LRLL-1/8-QS-6 Adapter plate for wall mounting SXE3-...-W... Blanking plug B-M7 Push-in fitting QSM-M7-6-I 1) Included in the scope of delivery for SOPA-...-W-... Tab. 9 SOPA accessories Installation Pneumatic Installation 1 Control module 2 Sensor module Fig. 16 Pneumatic Installation 1. Insert tubing into push-in fitting. -
Page 23: Electrical Installation
Tab. 10 Pin allocation for control module SOPA-C..-H-...-2P-... SOPA-C..-H-...-2N-... +24 V +24 V Sense Clean Sense Clean 1) in combination with PNLK sensor modules Tab. 11 Circuit diagrams for control module with manual override SOPA-C..-...-...-2P-... SOPA-C-...-2N-... Festo — SOPA — 2020-04... -
Page 24: Pin Allocation And Sensor Module Circuit Diagrams
Grey (GY) n.c = free (not connected) 1) When using the connecting cable from the accessories. Tab. 13 Pin allocation for sensor module SOPA-...-2P-M12-... SOPA-...-2N-M12-... +24 V +24 V Tab. 14 Circuit diagrams for sensor module Festo — SOPA — 2020-04... -
Page 25: Commissioning
3. At the end of the SHOW mode, the relevant minimum and maximum values are displayed. To reset the display of the minimum and maximum values, press the Edit button. Ä RUN mode is active. Festo — SOPA — 2020-04... - Page 26 Commissioning Fig. 17 Measured value indicator (SHOW mode) Legend Meaning Edit button A pushbutton, B pushbutton or A and B pushbutton Tab. 17 Legend for measured value indicator (RUN mode) Festo — SOPA — 2020-04...
-
Page 27: Menu Structure (Edit Mode)
Commissioning Menu structure (EDIT mode) Fig. 18 Menu structure (EDIT mode) Festo — SOPA — 2020-04... -
Page 28: Setting The Switching Characteristics Of The Binary Signals (Edit Mode)
7. Select the switching element function with the A or B pushbutton. 8. Press the Edit button to confirm the selection. Ä RUN mode is active. 9. Use a test run to check that the sensor switches as desired (switching point and hysteresis). Festo — SOPA — 2020-04... -
Page 29: Setting Analogue Output With
1. Select [Analogue] with the A or B pushbutton. 2. Press the Edit button to confirm the selection of the output. Ä [F.] flashes. 3. Set time constant for low-pass filter with the A or B pushbutton. Festo — SOPA — 2020-04... -
Page 30: Teaching The Switching Points (Teach Mode)
If measuring or exhaust air is switched on and off during operation, spurious pulses are generated (excessive fluctuations in supply pressure). Spurious pulses can be suppressed in the air gap sensor SOPA by adjusting the parameters [Options]. Requirement: EDIT mode is active. -
Page 31: Switch Off Display (Edit Mode)
2. Press the Edit button repeatedly until [P2-] flashes. 3. Select parameter with A or B pushbutton. – b = OutB = additional switching point for distance monitoring – c = OutC = supply pressure monitoring Festo — SOPA — 2020-04... -
Page 32: Setting The Allocation Of The Switching Output At Pin 4 (Edit Mode)
Ä The next adjustable parameter is shown. 8.12 Setting security code (EDIT mode) If you forget the security code, the SOPA must be reset to its factory settings è 10.2 Restoring Factory Settings (Restore). Requirement: EDIT mode is active. 1. Select the Special menu [Spec] with the A or B pushbutton. -
Page 33: Io-Link Interface Description
14 bit Min. cycle time 3 ms Data storage required 0.5 KB Vendor ID Device ID Tab. 21 Device ID values è Tab. 20 General IO-Link specification Device ID Order code SOPA-PNLK-VB SOPA-PNLK-A Tab. 21 Device ID values Festo — SOPA — 2020-04... -
Page 34: Identification Parameters
0x0017 Firmware Revision e.g. V26.4.17 0x0018 Application Specific 0x0019 Function Tag 0x001A Location Tag 0x2101 Part Number E.g. 8093816 1) R = read, R/W = read and write 2) Value defined by user Tab. 22 Identification parameters Festo — SOPA — 2020-04... -
Page 35: Io-Link Default Parameters
Bit no. Description Block parameter write access (no effect) Block data storage (no effect) Block local parameterisation (EDIT and TEACH mode) Block local user interface (SHOW, EDIT and TEACH mode) Tab. 24 Device access blocking Festo — SOPA — 2020-04... -
Page 36: Io-Link Default Commands
[Byte] 0x000D Profile Characterist- Array of UIn- teger16 Device Profile ID 0x0001: Smart UIn- Sensor Profile teger16 0x4000: Identifica- tion and Diagnosis Function Class ID 0x8001: Switching Sensor Channel Function Class ID 0x8004: Teach Chan- Festo — SOPA — 2020-04... - Page 37 Not used, default: 0 0x003D Switch point logic 0 - normally open UIn- (NO), standard teger8 1 - normally closed contact (NC) Switch point mode Not used, default: Hysteresis (HY) 3 ... 20, default: 5 UIn- teger16 Festo — SOPA — 2020-04...
- Page 38 1 – normally closed contact (NC) Switch point mode Not used, default: Hysteresis (HY) Not used, default: UIn- teger16 1) R = read, R/W = read and write, –= no access Tab. 26 Smart sensor profile parameters Festo — SOPA — 2020-04...
-
Page 39: Device-Specific Parameters
0 = Eco mode Mode) or numerical 1 = always off display (always 2 = always on, on/off or time to default switch off after last 3 = 1 min key actuation) 4 = 5 min Festo — SOPA — 2020-04... -
Page 40: Io-Link Teach-In
1) R = read, R/W = read and write, –= no access 2) only for SOPA-PNLK-VB 3) volatile (non-permanent) parameter Tab. 27 IO-Link teach-in Overview IO-Link teach-in is only available for OutA and OutB on this device, each with one value for the threshold value comparator. Festo — SOPA — 2020-04... - Page 41 Data type for teach commands All teach commands are in the format UInterger8. They must be sent with the index 0x0002 (Standard Command) subindex 0. For more information see IO-Link Smart Sensor Profile è 9.5 Smart sensor profile parameters. Festo — SOPA — 2020-04...
-
Page 42: Block Parameterisation
All parameters transmitted as a block will be simultaneously accepted and activated. 9.8.1 Block parameterisation for Distance monitoring SSC1 (OutA) Index Subindex Name 0x003C Set point SP1(SP) Set point SP2 0x003D Switch point mode Hysteresis (HY) Tab. 29 Block of coherent OutA parameters Festo — SOPA — 2020-04... -
Page 43: Block Parameterisation For Distance Monitoring Ssc2 (Outb)
5 … 3 – Significance MSB Process data Process Data Variable(PDV) SSC3 SSC2 SSC1 Data content Distance 10 bit PDV OutC OutB OutA (InA/InB) Index 0x0028 0x0028 Sub-Index Data type UInteger10 Boolean Tab. 33 Process data IN Festo — SOPA — 2020-04... -
Page 44: Correction Factors
Diagnostic levels Diagnostic Effect on display Effect on keys and out- Description level puts – – Device is OK – Shows error no. in No restriction in function yet but show mode operating parameters are deteriorat- Festo — SOPA — 2020-04... -
Page 45: Operation And Use
2. Press and hold the A pushbutton, B pushbutton and Edit button. 3. Switch on the operating voltage. Ä – [CLER] is displayed. – The factory settings are restored è Fig.18. RUN mode is active. Festo — SOPA — 2020-04... -
Page 46: Using The Differential Pressure Regulator
0x5000 Sensor module defective Replace sensor module [Er14] 0x180E Supply pressure (InC) out- Observe the measuring side the measuring range range 2 bar, 0.2 MPa); signal 15.1 Technical data, è > > cannot be evaluated general. Festo — SOPA — 2020-04... -
Page 47: Fault Clearance
Electrical connections swapped Connect the sensor module in (incorrect polarity) accordance with the plug pat- tern. Sensor module defective Replace sensor module. Incomplete display Display faulty Replace sensor module. Festo — SOPA — 2020-04... -
Page 48: Disassembly
1) If the security code can no longer be found. Tab. 38 Disassembly 1. Switch off the energy sources (operating voltage, compressed air). 2. Disconnect the connections for the control module and the sensor modules. 3. Remove device. Festo — SOPA — 2020-04... -
Page 49: Disposal
1 Loosen screws. 2 Hold the sensor and remove the screws. Fig. 20 Disassembly of the plate Disposal ENVIRONMENT! Send the packaging and product for environmentally sound recycling in accordance with the current regulations è www.festo.com/sp. Festo — SOPA — 2020-04... -
Page 50: Technical Data
+50 … Tab. 40 Input signal/measuring element SOPA-… Repetition accuracy of switching point – – Sensing range 2.5 ± 30 μm 150 μm … – – Sensing range 5 ± 20 μm 200 μm … Tab. 41 Output, general Festo — SOPA — 2020-04... - Page 51 – Load resistance of cur- Ω £ rent output – Min. load resistance of Ω ³ voltage output Tab. 43 Analogue output SOPA-… Short circuit current rating Overload protection Present Tab. 44 Output, additional data Festo — SOPA — 2020-04...
- Page 52 Tube length 0.5 8 … 1) condensate must not collect in the sensor module. Tab. 47 Mechanics SOPA-… Housing Reinforced PA/anodised alu- PA-reinforced minium Keypad – Inspection window Sealing ring HNBR, NBR HNBR, FPM, NBR Festo — SOPA — 2020-04...
- Page 53 – Exhaust air consump- [Nl/min] typ. 35 (per measuring module) tion (clean) Protection class III (in accordance with DIN VDE 0106-1) Shock resistance 30 g acceleration with 11 ms duration (half-sine) (in accordance with DIN EN 60068 Part 2-27) Festo — SOPA — 2020-04...
-
Page 54: Diagrams
Fig. 21 Typical response time t as a function of distance x after switching on the instrument air (meas- uring nozzle: 2 mm) Fig. 22 Typical response time t as a function of distance x after switching off the exhaust air (measur- ing nozzle: 2 mm) Festo — SOPA — 2020-04... - Page 55 Fig. 23 Influence of the tube length on the dimensionless display value (measuring nozzle 2 mm) Repetition accuracy of the switching point Fig. 24 Repetition accuracy of the switching point [±μm] as a function of the switching point distance x (measuring nozzle: 2 mm) Festo — SOPA — 2020-04...
-
Page 56: Hole Patterns
Technical data 15.3 Hole patterns Fig. 25 Hole patterns Festo — SOPA — 2020-04... - Page 58 Festo SE & Co. KG Ruiter Straße 82 73734 Esslingen Germany Phone: +49 711 347-0 Internet: www.festo.com © 2020 all rights reserved to Festo SE & Co. KG...
Need help?
Do you have a question about the SOPA and is the answer not in the manual?
Questions and answers