Still OPX 20 Original Instructions Manual
Hide thumbs
Also See for OPX 20:
- Original instructions manual (236 pages) ,
- Supplement to the standard operating instructions (140 pages) ,
- Original instructions manual (286 pages)

Related Manuals for Still OPX 20


Summary of Contents for Still OPX 20
- Page 1 Original instructions Order picker trucks OPX 20 OPX 25 OPX 20 PLUS OPX 25 PLUS OPX-L 12 OPX-L 16 OPX-L 20 OPX-L 20 S OPX-D 20 LTX 50 0615 1075 1076 1077 1078 1079 1080 1081 1082 1084 45878043402 EN - 10/2017...
- Page 3 • Information on transport, initial commis- sioning and storage of industrial trucks Internet address and QR code The information can be accessed at any time by pasting the address https://m.still.de/vdma in a web browser or by scanning the QR code. 45878043402 EN - 10/2017...
-
Page 5: Table Of Contents
Table of contents Introduction Forklift data ............2 General information . - Page 6 Markings ............30 OPX 20/25 and OPX 20/25 PLUS label location ......30 Location of OPX-L (12/16/20S) labels .
- Page 7 Table of contents Truck transport and lifting ..........69 Transporting the truck .
- Page 8 Table of contents Depositing a load on the ground ......... 105 Using the truck on inclines, loading bridges and lifts.
- Page 9 Table of contents Technical data Datasheet (VDI) ........... . . 142 Supply table .
-
Page 11: Introduction
Introduction... -
Page 12: Forklift Data
Introduction Forklift data Forklift data We recommend that you record the principal forklift data in the following table so that they are available if required by the sales network or authorised service centre. Type Serial number Date of delivery General information •... - Page 13 Introduction How to Consult the Manual CAUTION ENVIRONMENT NOTE Failure to observe the instructions highlighted with Failure to observe the instructions highlighted this symbol may cause damage to the forklift and, with this symbol may cause environmental in some cases, result in warranty invalidity. damage.
-
Page 14: Date Of Edition And Latest Update Of This Manual
Introduction Date of edition and latest update of this manual Date of edition and latest update of this manual The publication date of these operating instructions is printed on the cover sheet. The manufacturer makes continuous efforts to improve its industrial trucks, and therefore reserves the right to implement changes and to accept no claims concerning the information provided in this manual. -
Page 15: Ce Labelling
Introduction CE labelling CE labelling The manufacturer uses CE labelling to indi- cate that the truck complies with the standards and regulations valid at the time of marketing. This is confirmed by the issued EC declaration of conformity. The CE labelling is attached to the nameplate. -
Page 16: Ec Declaration Of Conformity In Accordance With Machinery Directive
Introduction EC declaration of conformity in accordance with Machinery Directive EC declaration of conformity in accordance with Machinery Di- rective Declaration STILL GmbH Berzeliusstraße 10 D-22113 Hamburg Germany We declare that the according to these operating instructions Industrial truck according to these operating instructions Model conforms to the latest version of the Machinery Directive 2006/42/EC. -
Page 17: Technical Service And Spare Parts
Introduction Technical service and spare parts Technical service and spare parts For scheduled maintenance and any repairs to the technical characteristics of the forklift over the forklift, contact only the authorised service time. network. Only original spare parts provided by the man- The authorised service network has personnel ufacturer may be used for forklift maintenance trained by the manufacturer, original spare... -
Page 18: Modifications To Forklift
Introduction Modifications to Forklift Do not use beyond the limits of the climatic use precautions are necessary. Contact the conditions indicated below: authorised sales network for more informa- tion. • Maximum ambient temperature: +40°C • Minimum ambient temperature: +5°C DANGER •... -
Page 19: Environmental Considerations
Introduction Environmental considerations Environmental considerations Disposal of components and batteries The truck is composed of different materials. If components or batteries need to be replaced and disposed of, they must be: • disposed of, • treated or • recycled in accordance with regional and national regulations. -
Page 20: Packaging
Introduction Environmental considerations Packaging During delivery of the truck, certain parts are packaged to provide protection during transport. This packaging must be removed completely prior to initial start-up. ENVIRONMENT NOTE The packaging material must be disposed of properly after delivery of the truck. 45878043402 EN - 10/2017... -
Page 21: Safety
Safety... -
Page 22: Safety Guidelines
Safety Safety guidelines Safety guidelines General Precautions regulations integrate those in the manual NOTE "Rules for approved use of industrial vehicles". Some safety regulations to be followed when using the forklift are listed below. These General Safety Rules • Only allow qualified, trained and authorized •... -
Page 23: Battery Connection Cables
Safety Safety guidelines CAUTION Passing over cracks or damaged parts of the floor with the truck is prohibited. Dirt and any objects in the work path must be removed immediately. Battery connection cables CAUTION Using sockets with NON-ORIGINAL battery con- nection cables can be dangerous (see purchase references in the parts catalogue) Requirements for the traction-battery... -
Page 24: Safety Regulations Relative To Operating Materials
Safety Safety guidelines Safety Regulations Relative to Operating Materials Rules for handling and disposing of Oils operating materials • Do not allow to come into contact with the skin. ENVIRONMENT NOTE • Do not inhale oil vapors. Improper use and disposal of operating and •... -
Page 25: Residual Risk
Safety Residual risk and disposal of the life-expired battery must NOTE be carried out as required by law. We advise For greater information, consult the specific you to contact the authorised service network battery manual that comes with the battery. that is equipped for eco-friendly disposal in accordance with current regulations. - Page 26 Safety Residual risk • Human error resulting from failure to observe the safety guidelines. • Unrepaired damage or defective and worn components. • Insufficient maintenance and testing • Use of incorrect consumables • Maintenance intervals exceeded The manufacturer shall not be held responsi- ble for accidents involving the truck caused by the failure of the operating company to comply with these regulations either intentionally or...
-
Page 27: Electromagnetic Radiation
Safety Electromagnetic radiation Electromagnetic radiation The limit values for electromagnetic emissions and for immunity relative to the forklift are those provided by the EN 12895 standard. Non-ionised radiation If the forklift is equipped at the factory or later with devices that emit non-ionising radiation (such as radio transmitters, RFID players, data terminals, scanners, etc), the compatibility of such devices must be verified... -
Page 28: Vibrations
Safety Vibrations Vibrations Vibrations to which the hands and arms The following values are specifically for trucks are exposed with sprung operator platforms (optional): • Operator weight between 70 kg and 90 kg The following value is valid for all truck models: ā... -
Page 29: Safety Tests
Safety tests Regular safety inspection of the truck Safety inspection based on time and extraordinary incidents STILL GmbH Hamburg The operating company must ensure that the truck is checked at least once a year, or Regelmäßige Prüfung following noteworthy incidents. -
Page 30: Safety Devices
Safety Safety devices Safety devices Damage, defects and misuse of safety devices The driver must report any damage or other defects to the truck or attachment immediately to the supervisory personnel. Trucks and attachments that are not functional or safe may not be used until they have been properly repaired. -
Page 31: Overview
Overview... -
Page 32: Overview Of The Various Models
Overview Overview of the various models Overview of the various models General features The trucks described in this manual OPX20, OPX25, OPX20 PLUS, OPX25 PLUS, OPX- L12, OPX-L16, OPX-L20S OPX-L20, OPX- D20, LTX50 are designed for transporting and order picking goods in shops, warehouses and factories. - Page 33 Euro pallets lengthwise for order picking or for horizontal transport of goods. Capacity: • The OPX 20 and the OPX20 PLUS have a maximum capacity of 2000 kg • The OPX 25 and the OPX25 PLUS have a...
- Page 34 Overview Overview of the various models OPX-L 16 Capacity: 1600 kg Speed: 12 km/h Fork length: 2390 mm The OPX-L 16 can be used to pick two pallets weighing up to 800 kg each at an ergonomic working height. The vehicle's short wheelbase gives it a small turning radius, which makes it easier to manoeuvre in confined spaces.
- Page 35 Overview Overview of the various models LTX50 Towing capacity: 5000 kg Speed: 12 km/h LTX50 is a towing vehicle that is part of the OPX range. The tow tractor has been designed to hold various tow hooks at the rear. LTX50 is compatible with Liftrunner, a complete system of hydraulic trailers for collecting loaded trolleys simply and safely.
-
Page 36: Opx Range General Overview
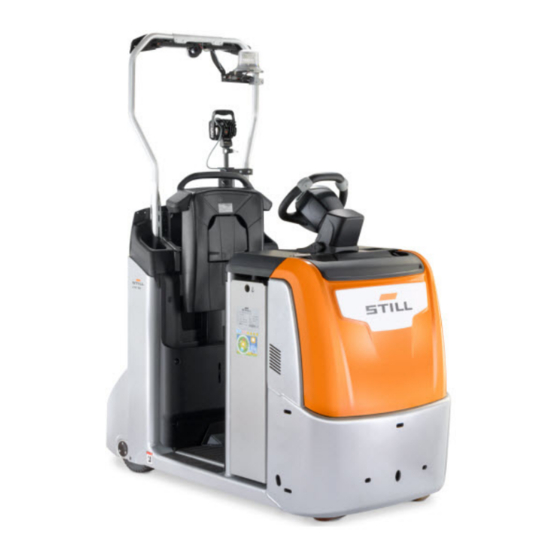
Overview OPX range general overview OPX range general overview 2371 Steering wheel with integrated controls Dashboard Drive wheel 12/24 V cigarette lighter socket Hood for accessing the battery compartment Emergency stop button Motor compartment cover On/off key Battery Digicode - Numerical Keypad Pivoting wheel Lift mast Load castor... - Page 37 Overview OPX range general overview Seat backrest push buttons Mechanical battery lock clasp Battery plug/socket Seat backrest Fork carriage Platform damping system On-board battery charger socket Load rack 45878043402 EN - 10/2017...
-
Page 38: Ltx50 General Overview
Overview LTX50 general overview LTX50 general overview 2374 Steering wheel with integrated controls 12/24 V cigarette lighter socket Drive wheel Emergency stop button Hood for accessing the battery compartment On/off key Motor compartment cover Digicode - Numerical Keypad Battery Ballast Platform damping system Operator platform Rear wheels... - Page 39 Overview LTX50 general overview Mechanical battery lock clasp Seat backrest LiftRunner system hydraulic coupling 45878043402 EN - 10/2017...
-
Page 40: Markings
Overview Markings Markings OPX 20/25 and OPX 20/25 PLUS label location Pb+Sb 2353 "Danger of crushing hands" label "Cold store" label (for cold store equipment "Operating and maintenance manual" label only) "Hook" symbol "Danger of crushing feet" label "Do not climb on the forks" label "Maximum permissible pressure"... - Page 41 Overview Markings Description of labels (9) The label indicates the danger of crushing feet under the forks (present only on certain (1) This symbol indicates the danger of versions) crushing and cutting hands. (10) This label indicates the maximum ad- (2) This label indicates that you should consult justment pressure for the operator platform.
-
Page 42: Location Of Opx-L (12/16/20S) Labels
Overview Markings Location of OPX-L (12/16/20S) labels Pb+Sb 2354 "Danger of crushing hands" label "Cold store" label (for cold store equipment "Operating and maintenance manual" label only) "Hook" symbol Truck capacity label "Annual safety inspection" label (Germany "Danger of crushing feet" label only) "Maximum permissible pressure"... - Page 43 Overview Markings Description of labels and lift height. The label varies depending on the truck capacity and is explained in more (1) This symbol indicates the danger of detail in the following section. crushing and cutting hands. (10) The label indicates the danger of crushing (2) This label indicates that you should consult feet under the forks (present only on certain the operating and maintenance manual before...
-
Page 44: Location Of Opx-L20 And Opx-D20 Labels
Overview Markings Location of OPX-L20 and OPX-D20 labels Pb+Sb 2355 "Danger of crushing hands" label Warning label "Operating and maintenance manual" label "Cold store" label (for cold store equipment "Hook" symbol only) "Nominal value" plate "Annual safety inspection" label (Germany "Danger of crushing feet"... - Page 45 Overview Markings Description of labels (10) This symbol, where present, indicates that the truck is set up for use in cold-storage (1) This symbol indicates the danger of (option). crushing and cutting hands. (11) (2) This label indicates that you should consult the operating and maintenance manual before (12) The label indicates the danger of crushing using the truck and before carrying out any...
-
Page 46: Location Of Ltx50 Labels
Overview Markings Location of LTX50 labels Pb+Sb 2352 "Danger of crushing hands" label "Danger of crushing feet" label "Operating and maintenance manual" label "Maximum permissible pressure" label "Hook" symbol "Operator platform capacity diagram" label "Annual safety inspection" label (Germany "Battery warning" label only) Version set up for gel batteries "Nominal value"... - Page 47 Overview Markings Description of labels (9) This label indicates the maximum adjust- ment pressure for the operator platform. Cau- (1) This symbol indicates the danger of tion: The adjustment system must not be crushing and cutting hands. inflated to pressures above 8 bar (only present on versions with platform damping).
-
Page 48: Data Plate
Overview Markings Data plate NOTE Please indicate the serial number for all technical enquiries. 2327 Model Rated capacity in kg Manufacturer Serial no. Unladen weight (without battery) in kg Year of manufacture EC conformity symbol QR code Battery voltage V Nominal power rating in kW Minimum battery weight Maximum battery weight... -
Page 49: Serial Number
Overview Markings Serial number xx xxxx x xxxxx NOTE Please quote the serial number with all technical questions. The serial number contains the following information: 1 Production location 2 Type 3 Year of production 4 Sequential number 7090_921-004 45878043402 EN - 10/2017... -
Page 50: Opx-L (12/16/20S) Capacity Plate
Overview Markings OPX-L (12/16/20S) capacity plate DANGER The values indicated on the capacity plate refer to compact and homogeneous loads and must not be exceeded — otherwise the stability of the truck and the load-bearing capacity of the structures may be compromised. - Page 51 Overview Markings OPX-L 20S The plate indicates the following data: • C = distance from the centre of gravity of the load on the forks to the fork carriage (mm) 2000 • h3 = maximum lift stroke of the forks (mm) •...
-
Page 52: Opx-L 20 Capacity Plate
Overview Markings OPX-L 20 capacity plate DANGER The values indicated on the capacity plate refer to compact and homogeneous loads and must not be exceeded — otherwise the stability of the truck and the load-bearing capacity of the structures may be compromised. -
Page 53: Opx-D 20 Capacity Plate
Overview Markings OPX-D 20 capacity plate DANGER The values indicated on the capacity plate refer to compact and homogeneous loads and must not be exceeded — otherwise the stability of the truck and the load-bearing capacity of the structures may be compromised. - Page 54 Overview Markings lift height), the maximum capacity of the truck is 2000 kg. 45878043402 EN - 10/2017...
-
Page 55: Instruments And Controls
Overview Instruments and controls Instruments and controls Comandi volante - Parte 1 Left-hand handle Optional control turret (where present) Travel control Initial lifting button (where present) Handle Horn button Travel control Initial lifting button (where present) Right-hand handle Optional control turret (where present) Service braking button Initial lowering button (where present) Initial lowering button (where present) - Page 56 Overview Instruments and controls (9) Straddle or fork initial lifting button (6) Service braking button (where present) • When the button is pushed, service braking is actuated The functionality of the push button depends on the model of truck used. The operation can (7) Straddle or fork initial lowering push be divided into two groups: button (where present)
- Page 57 Overview Instruments and controls • Version WITH control turrets (8) and (12) (10) Horn push-button In this case, the command moves the forks • Press the button to operate the horn. This device allows the driver to signal his The command only works if the forks are at presence when necessary.
-
Page 58: Comandi Volante - Parte 2
Overview Instruments and controls Comandi volante - Parte 2 14 16 16 14 W10370 Fork lifting button (where present) Fork lowering button (where present) Adjustable operator step plate lifting button (where present) Adjustable operator step plate lowering button (where present) WARNING (14) Fork lifting button (where present) •... - Page 59 Overview Instruments and controls (15) Fork lowering button (where present) NOTE • When the button is pressed, the forks lower The speed of the platform is proportional to • Fork movement can be stopped at any time how hard the button is pressed. by releasing the button The forks will stop in (17) Mobile platform lowering button (where the position attained.
-
Page 60: Steering Wheel Controls - Part 3
Overview Instruments and controls Steering wheel controls - Part 3 Dipped beam headlights Tortoise Flasher Battery charge level indicator Left arrow (where present) Type of alarm F1 - Optional controls Warning triangle Hazard warning signal (where present) Tortoise F2 - Optional controls Hour meter Right arrow (where present) Service reminder... - Page 61 Overview Instruments and controls When the key (2) is pressed, the button activated (necessary for steering wheel lights up and the beacon starts to flash. travel controls, not necessary for seat backrest controls with ground-based When the key (2) is pressed again, the driving).
- Page 62 Overview Instruments and controls status bars will remain lit and the battery • (13)Tortoise must be recharged. When the amount of The tortoise symbol indicates that the truck charge reaches 20%, two status bars will is operating at creep speed. Creep speed is remain lit and the truck's performance will controlled by the button (9).
-
Page 63: Backrest Controls
Overview Instruments and controls Backrest controls Description Fork controls (A) Backrest controls, where present, vary ac- The fork controls, where present, are installed cording to the version of truck and the options in the (A) zone: installed on the truck. •... -
Page 64: Definition Of Directions
Overview Instruments and controls Definition of directions Direction of movement defined by the regula- tions: • Forward travel (1) (Preferred direction of travel) • Right (2) • Reverse travel (3) • Left (4) NOTE The information is valid for the entire OPX and LTX range;... -
Page 65: Lift Mast
Overview Lift mast Lift mast Types of lift masts (where present) Some trucks in the OPX range are equipped with a lift mast: • Simplex (OPX-L20S) • Telescopic (OPX-L20 and OPX-L20D) Simplex (OPX-L20S) When the "lift" button is pressed, the fork carriage is raised to the height h3 by the central cylinder via a chain. -
Page 66: Options And Variants
Overview Options and variants Options and variants List of options and variants CAUTION • Lithium-ion battery • On-board charger After buying the truck, contact the technical service network authorised by the manufacturer for infor- • Autolift mation on assembly of the options. •... -
Page 67: Fleetmanager (Option)
Overview Options and variants FleetManager (Option) FleetManager is optional and can be mounted on the truck in several versions. A description of and information on its operation can be found in FleetManager specific instruction manual, supplied separately. 45878043402 EN - 10/2017... -
Page 68: Sistemi Di Illuminazione
Overview Options and variants Sistemi di illuminazione 2366 LED light bar Reverse lights Blue safety spotlights Dipped-beam lights and light bar push Flashing beacon button 4–5 Arrows (direction indicators) Flashing beacon push button 6–7 Multifunction lights C–D Arrow push buttons (direction indicators) Working spotlight Hazard lights push button Dipped-beam lights... - Page 69 Overview Options and variants bar flashes to warn the operator in the fol- NOTE lowing instances: This section describes all the optional lights Warning signal upon expiry of maintenance that the customer may find on the truck (contact the manufacturer's authorised depending on the equipment purchased.
- Page 70 Overview Options and variants (4 -5 - 6 - 7) Arrows (available only on an emergency situation due to a fault or other LTX50) reason: • When the push button (E) is pressed, the The arrows (direction indicators) serve to hazard lights turn on.
-
Page 71: Foldaway Step (Option)
Overview Options and variants Foldaway step (option) The foldaway step is optional and allows the operator to occasionally climb on the step to increase the picking height. DANGER Risk of crushing fingers! See label (2) While opening (from A to B) and closing (from B to A) the foldaway step, keep fingers away from hinges DANGER... -
Page 72: Attachment Mounting Bar With Data Socket (Mms)
Overview Options and variants Attachment mounting bar with data socket (MMS) The optional data socket (6 and 7) is fitted on the relevant accessories mounting bar (3). The pre-wired data socket (6) is connected to the truck and may have one of the following two characteristics depending on the choice made by the customer during purchase: •... -
Page 73: Battery Electrolyte Level Indicator Led (Optional)
Overview Options and variants CAUTION Fasten the data terminal used to the relevant sup- port (7) precisely and in accordance with technical regulations. Do not allow the data terminal used to fall from the support (7). Battery electrolyte level indicator LED (optional) There are two versions of the LED: •... - Page 74 Overview Options and variants 45878043402 EN - 10/2017...
-
Page 76: Authorised And Safe Use
Authorised and safe use Authorised and safe use Intended use of the trucks CAUTION This machine is intended for the transport of loads packed on pallets or in industrial containers de- signed for this purpose, as well as for placing pallets into and removing pallets from stock. - Page 77 Authorised and safe use Please remember the following: • Drive the truck in the correct position as described in the following sections. • The truck must not be used as a stepladder. • The truck has not been designed to trans- port anyone other than the operator and must not be used for this purpose.
- Page 78 Authorised and safe use people do not leave the danger area despite warnings. Traffic route conditions The surface of traffic routes must be suf- ficiently level, clean and clear of objects. Drainage channels, railway crossings and other similar obstacles must be levelled and, if necessary, fitted with ramps so that the truck can cross without jolting.
-
Page 79: Forklift Use In Cold-Storage Rooms
Truck transport and lifting Forklift Use in Cold-Storage Rooms. A truck specifically equipped for cold-storage CAUTION rooms must be used when working at temper- If the truck has been working in environments at atures below +5°C. temperatures below -5°C and it is taken outside the cold-storage room, let it stand either for a sufficien- Forklifts equipped for working in cold climates tly long time to allow evaporation of any condensa-... -
Page 80: Sequence To Follow For Using The Truck
Sequence to follow for using the truck Sequence to follow for using the truck • Meticulously perform the mandatory safety • Position yourself correctly in the driving seat checks before use (see list of checks on (see the relevant instructions on correct the following pages). -
Page 81: Checks And Actions Prior To Commissioning
Checks and actions prior to commissioning Checks and actions prior to commissioning List of checks before use WARNING • Check that all of the hoods and protective guards are present and check that they are Damage or other faults on the truck or attachments correctly mounted (special equipment) can result in accidents. - Page 82 Checks and actions prior to commissioning • Test that the electromagnetic brake works • The roller tracks of the mast must be coated effectively in a visible film of grease (where present) • Check that the battery harness is in good •...
-
Page 83: Optional Driver's Seat Adjustments
Optional driver's seat adjustments Optional driver's seat adjustments Height-adjustable steering wheel (option) The optional height-adjustable steering wheel can be individually tailored to the height of the driver and ensures an ergonomic operator position Procedure for adjusting the height of the steering wheel: •... -
Page 84: Height-Adjustable Seat Backrest (Option)
Optional driver's seat adjustments Height-adjustable seat backrest (option) The height-adjustable seat backrest is optio- nal and allows the operator to adjust the seat backrest according to their height to improve driving ergonomics. DANGER Risk of injury to the operator! The operator must remain inside the confines of the truck. -
Page 85: Foldaway Seat (Option)
Optional driver's seat adjustments Foldaway seat (option) 2368 The foldaway seat is optional and allows the DANGER operator to drive while seated. Risk of injury to the operator! • To open the seat, turn the seat manually The operator must remain inside the confines of the from (A) to (B). - Page 86 Optional driver's seat adjustments CAUTION The seat is height-adjustable to improve operator ergonomics: Seat operation • To raise the seat, push the toggle lever (4) With the seat fully closed (A), the operator must upwards (C) and, at the same time, pull the drive the truck standing on the platform.
-
Page 87: Adjusting The Platform (Optional)
Optional driver's seat adjustments Adjusting the platform (optional) To improve driving comfort and to reduce the vibrations felt by the operator, adjust the pressure in the damping system in accordance with the weight of the operator. Use a suitable compressor and adjust the pressure using the valve (1). -
Page 88: Climbing On And Off The Truck
– The operator must not climb down when the truck is still moving. The operator must only climb down when the truck has come to a complete stop. Do not jump into or out of the truck. Always climb onto the truck in a forwards motion. -
Page 89: Drive Modes And Positions
Drive modes and positions Drive modes and positions Drive modes and positions The following drive modes and positions Driving in pedestrian mode, with the operator may be used for the truck (depending on the on the ground alongside the truck: options chosen at the time of purchase). -
Page 90: Driving Position With The Operator On Board The Truck
Drive modes and positions Driving position with the operator on board the truck General information for driving with the DANGER operator on board the truck Disabling or tampering with protective and safety devices is strictly prohibited. The operator should drive the truck using the The mat (1) that detects the presence of the opera- controls located on the steering wheel and on tor must function correctly. - Page 91 Drive modes and positions DANGER The seat backrest must be at the correct height (only if the seat backrest adjustment It is strictly prohibited to disable protective and option is fitted) for optimum ergonomics safety devices. Operator facing the truck front The seat must not be locked in the open position with objects or anything else.
-
Page 92: Operator Position And Driving Mode With Operator On The Ground Next To The Truck: Using Seat Backrest Controls (Optional Feature)
Drive modes and positions Operator position and driving mode with operator on the ground next to the truck: using seat backrest controls (optional feature) both sides of the backrest. This enables the NOTE truck to be driven in pedestrian mode from either side of the truck. - Page 93 Drive modes and positions Using the travel controls with the NOTE operator on board If the travel control buttons are pressed • for an extended period of time (about NOTE 10 seconds), a safety circuit immobilises the truck If this occurs, simply release the The travel controls installed on the backrest (9 button and then press the travel control - 10 - 11 - 12 - 13 - 14) DO NOT work with the...
-
Page 94: Operator Position And Driving Mode With Operator On The Ground Next To The Truck: Using Steering Wheel Controls (Optional Feature)
Drive modes and positions Operator position and driving mode with operator on the ground next to the truck: using steering wheel controls (optional feature) and then turn it again in the required direc- tion Using the travel controls will move the truck •... - Page 95 Drive modes and positions Activating the travel controls from the ground steering wheel sideways with one hand, then: • With the truck switched on, press the key (F1) or (F2) on the steering wheel to - When the travel control is turned in direc- enable operation of the travel controls.
-
Page 96: Stopping The Truck In Emergencies
Stopping the truck in EMERGENCIES Stopping the truck in EMER- GENCIES In an emergency, the power supply to all functions on the truck can be shut down through the emergency stop button. CAUTION The EMERGENCY stop button (1) should be activated only and exclusively when absolutely necessary. -
Page 97: On/Off Systems
On/off systems On/off systems On/off key The key has two positions: I = To switch on the truck, turn the key to position I. Circuit powered. 0 = To switch off the truck, turn the key to position 0. No voltage to the circuit (key removal position) 45878043402 EN - 10/2017... -
Page 98: Numeric Keypad - Start-Up Using A Pin (Digicode Option)
On/off systems Numeric keypad — Start-up using a PIN (Digicode option) SWITCH ON (operating mode) SWITCH OFF and awaiting code Programming mode active Faulty key or incorrect code Delay of automatic switch-off OPERATING MODE Operation Warning red off continuous green (1)(PIN correct) * 1 2 3 4 5 # default 1 2 3 4 5... - Page 99 On/off systems PROGRAMMING MODE — to be carried out with the truck switched off (2) To reactivate the default Restoring administrator code the initial (00000000), please administrator contact your agent or code nearest dealer. The power supply red flashing green switches off automati- Activating the flashing (5) (5 s before...
-
Page 100: Driving
Driving Driving Truck operation - When the travel control (2) or (4) is turned in direction (B), the truck starts in forward travel. - When the travel control (2) or (4) is fully released, the truck brakes to a stop electri- cally. -
Page 101: Steering
Driving Steering The steering wheel is used to steer. The image To turn during travel: above shows: • When the steering wheel is turned anti- • (1) steering wheel in neutral position clockwise (G) in forward travel (A), the truck turns towards (C) •... - Page 102 Driving WARNING Adjust your speed when turning, limiting it in line with the load being transported and the steering angle. 45878043402 EN - 10/2017...
-
Page 103: Truck Brake Systems
Driving Truck brake systems WARNING CAUTION The condition of the floor surface considerably Regulate the travel control by adapting truck bra- affects the braking distance of the truck. king to the type of load you are carrying in order to avoid losing the load. -
Page 104: Reverse Drive
Driving Reverse drive Reverse of direction without load on forks Reverse of direction with load on forks • To reverse direction when travelling without • To reverse direction with a load on the fork a load on the fork arms, turn the traction arms, release the traction control throttle control throttle in the opposite direction of and wait for the truck to come to a stop. -
Page 105: Parking And Stopping The Truck
Driving Parking and stopping the truck • Park in pre-arranged and designated areas DANGER • Lower the forks to the ground. Park the truck in such a way that it does not ob- struct passageways and/or render unusable emer- • Switch off the truck: by turning the key to gency equipment (e.g. -
Page 106: Mobile Platform
Mobile platform Mobile platform Using the mobile platform (where present) DANGER Risk of impact and crushing When using the mobile platform, make sure no part of your body is outside the truck. Keep all parts of your body inside the truck. When using the mobile platform, keep both feet on the platform mat, inside the truck. - Page 107 Mobile platform standing on board the truck in the correct "working position" The speed of the platform is proportional to • how hard the button is pressed Raising the mobile platform • When the button (1) is pressed, the mobile platform rises to the maximum height •...
-
Page 108: Moving The Load
Moving the load Moving the load Safety guidelines for handling loads General rules WARNING Closely observe the following instructions before picking up loads. Never touch moving parts of the truck (e.g. lifting devices, equipment or devices for picking up loads). Do not stand near moving parts of the truck. -
Page 109: Checks To Be Carried Out Before Lifting A Load
Moving the load DANGER The loads must be arranged so that they cannot slip or overturn and fall to the ground. In order to guarantee load stability, make sure that the load is balanced and centred on the forks. DANGER Standing or walking under the raised load is strictly prohibited. - Page 110 Moving the load WARNING If small items are being transported or if the load exceeds the height of the fork carriage, a load protective guard must be installed to prevent the items from falling on the operator. 45878043402 EN - 10/2017...
-
Page 111: Using The Backrest Fork Controls (Where Present)
Moving the load Using the backrest fork controls (where present) Types of fork controls installed on the Using the fork controls with the operator backrest (where present on the truck) on board on the platform The fork controls installed on the backrest vary according to the model of truck: •... - Page 112 Moving the load Using the backrest fork controls with the The image (A) shows the position of the operator on board the truck when using the operator on the ground next to the truck backrest fork controls. DANGER Risk of accident To avoid his feet being crushed by the forks, the operator must keep both feet on the truck platform in the operator presence detection area.
-
Page 113: Palletising A Load
Moving the load - The forks will lower as shown by the platform (A) and then press the push-button symbol (6). Release the key to stop the (2). forks at the required height. Lowering the forks for trucks WITHOUT lift - The forks will not lower all the way to the mast ground, but during lowering the forks will... -
Page 114: Transporting Loads
Moving the load Transporting loads As a general rule, loads must be transported one by one (e.g. pallets). Transporting several loads at once is only authorised: • If the safety requirements are met • On the orders of the supervisor in charge The operator must ensure that the load is properly packaged. -
Page 115: Carrying The Load
Moving the load Carrying the load WARNING – Raise or lower the load until ground clearance is obtained. The load should not be so high as to block the view to the rear. If the load does block the view to the rear, a second person must walk next to the truck and act as a guide while it is reversing. -
Page 116: Using The Truck On Inclines, Loading Bridges And Lifts
Moving the load Using the truck on inclines, loading bridges and lifts. Driving on inclines Using the truck on a lift When driving the truck up or down inclines, Using the truck on lifts is only allowed if the you must not exceed the values for inclines lift has sufficient load capacity (check the indicated in the chapter "Technical data". -
Page 117: Entering Lifts
Moving the load Entering lifts The operator can only use lifts with the truck where the lift capacity is sufficient, where the lifts are suitable and where user permission has been given. The truck must be secured on the lifts so that no part of the truck comes into contact with the walls of the compartment. -
Page 118: Load Back Rest With Vertical Pallet Hook (Optional)
Moving the load Load back rest with vertical pallet hook (optional) Hand protective guard (L): • Do not remove the guard • Before using the truck, check that there is a protective guard and that this guard is intact The system allows you to transport empty pallets in a vertical position in the following two ways: •... - Page 119 Moving the load • Repeat the preceding steps for the other clamp (E) • Push the bar (G) downwards (A) to raise clamps (D) and (E) • Position the pallet in the position defined (2) and clamp it between the clamps (E), pulling the bar (G) towards (B) CAUTION Risk of crushing hands and feet...
-
Page 120: Handling Trailers
Handling trailers Handling trailers Towing trailers Order picker trucks • Order picker trucks are not equipped with a manufacturer-installed towing hook (the image shows an example of a towing hook) • Order picker trucks are not suitable for towing trailers DANGER It is forbidden to tow trailers with order picker trucks. -
Page 121: Correct Towing
Handling trailers Correct towing NOTE This tow tractor is suitable for towing trailers and is equipped with a towing device for this purpose. Maximum towed weight The nominal pulling force when towing is the nominal pulling force indicated on the identification plate of the tow tractor. -
Page 122: Coupling Trailers
Handling trailers Coupling trailers CAUTION When coupling and uncoupling trailers, the tractor and trailer must always be on level ground. Make sure that all controls are in the neutral position and the parking brake is applied. Before coupling a trailer, check if the draw bar of the trailer and the tow coupling of the tractor match. -
Page 123: Single-Position Or Multi-Position Trailer Coupling
Handling trailers Single-position or multi-position trailer coupling Trailer coupling – Pull the tow pin (2) out. – Reverse the tractor slowly. DANGER Do not allow anyone to stand between the tractor and trailer during the approach. Always drive the trailer to the tractor. –... - Page 124 Handling trailers Uncoupling – Step off the presence area (1). The tractor will be braked. – Secure the trailer with chocks or engage the trailer brake. 1047_003-039 – Turn the tow pin (2) 90° and pull it out of the trailer coupling (3).
-
Page 125: Automatically Closing Trailer Coupling
Handling trailers Automatically closing trailer coupling Hitching up – Pull the safety lever (3). – Swivel the lever (2) up. – Release the brake on the front axle of the articulated drawbar trailer. CAUTION If this is not done, the coupling jaw, drawbar eye and support can be damaged! The drawbar eye must hit the centre of the coupling jaw when hitching up a rigid drawbar trailer. - Page 126 Handling trailers Uncoupling – Step off the presence area (1). The tractors will be braked. – Secure the trailer with chocks or engage the trailer brake. – Pull the safety lever (3). – Swivel the lever (2) up. – Drive the tractor slowly forward. 1047_003-039 45878043402 EN - 10/2017...
-
Page 127: Rockinger Trailer Coupling
Handling trailers ROCKINGER trailer coupling Hitching up – Swivel the lever (2) up. – Release the brake on the front axle of the articulated drawbar trailer. CAUTION If this is not done, the coupling jaw, drawbar eye and support can be damaged! The drawbar eye must hit the centre of the coupling jaw when hitching up a rigid drawbar trailer. -
Page 128: Towing A Trailer
Handling trailers Towing a trailer NOTE Ensure that you understand how to operate any braking systems that may be fitted to trailers being towed. Ensure trailer load is secure, stable, evenly distributed on the trailer, and within the rated drawbar pull of the tractor. -
Page 129: Charging The Battery
Charging the battery Charging the battery Battery access Park the truck in a suitable area Turn off the truck DANGER Risk of crushing hands Do not put your hands under the battery hood (1). Keep your hands away from the closing points between the hood and the chassis. -
Page 130: Battery Recharging
Charging the battery Battery Recharging CAUTION • Turn on the external battery charger. • Connect plug the battery charger in to begin The battery is recharged with the forklift off. charging. • After the battery charging operation is DANGER completed, turn off the battery charger. •... - Page 131 Charging the battery CAUTION Make sure that the mains supply voltage complies with the battery charger's operating voltage. DANGER The electrical system must comply with the current national regulations. 45878043402 EN - 10/2017...
- Page 132 Charging the battery 45878043402 EN - 10/2017...
-
Page 133: Maintenance
Maintenance... -
Page 134: General Information
Maintenance General Information General Information To keep your forklift in good condition, carry NOTE out the servicing indicated regularly, within the Contact the authorised service network for times indicated and using the consumption a maintenance contract appropriate to your materials provided for that purpose, as speci- forklift. -
Page 135: Maintenance Plans
Maintenance Maintenance plans Maintenance plans Key to symbols in table: • ▲ = Every 1000 hours or at least every 12 months (whichever comes first), unless local regulations require more frequent intervention. ENVIRONMENT NOTE During maintenance operations, follow the instructions provided in the "Safety guidelines relative to operating materials"... - Page 136 Maintenance Maintenance plans Maintenance every 1000 hours Electrical system Battery: check the battery condition and that it is correctly mounted Battery: check the condition of the cables and sockets Battery: check the acid density and check that the battery is not damaged Battery: service the battery according to the manufacturer's instructions On-board charger (if present): clean On-board charger (if present): check that it is operating correctly...
- Page 137 Maintenance Maintenance plans Maintenance every 1000 hours Load lift system (if present) Mast: check that it is in good condition Mast: lubricate the sliding tracks of the mast profiles Mast: check that it is correctly mounted Lift cylinders, chains, rollers and end stops: check the condition, mounting and operation Lifting chain: check chain adjustment and maintenance ▲...
-
Page 138: Maintenance As Required
Maintenance Maintenance as required Maintenance as required Cleaning the Forklift Cleaning depends on the type of use and the Use water-dampened rags to clean the parts workplace. Should the truck come into contact of the body. with highly aggressive elements such as salt CAUTION water, fertilizers, chemical products, cement, etc., it should be cleaned as carefully as... -
Page 139: Preparation
Maintenance Maintenance as required Preparation Maintenance personnel The battery may only be changed by spe- cially trained personnel, in accordance with the manufacturer's instructions for the battery, the battery charger and the truck. The main- tenance instructions for the battery must be observed. -
Page 140: Battery Access
Maintenance Maintenance as required Battery access Park the truck in a suitable area Turn off the truck DANGER Risk of crushing hands Do not put your hands under the battery hood (1). Keep your hands away from the closing points between the hood and the chassis. - Page 141 Maintenance Maintenance as required WARNING The weight and size of the battery influence the stability of the truck. The new battery must weigh the same as the old one. Do not change its position from the original one. CAUTION Be careful not to damage any wiring when replacing the battery.
-
Page 142: Battery Replacement With Removal From The Top
Maintenance Maintenance as required Battery replacement with removal from the top – Before replacing the battery, access the battery ⇒ Chapter "Battery ac- cess", P. 5-130. Manually open the mechanical battery clasp (1) by turning it towards (A) until it is fully open (B). - Page 143 Maintenance Maintenance as required CAUTION To decide which type of battery to use, check the battery characteristics provided in the "TECHNI- CAL DATA" chapter. – When installing the new battery, be partic- ularly careful during the battery insertion stage. CAUTION Proceed with caution during the battery lowering phase! To avoid damage, do not let the battery hit the parts of the truck.
-
Page 144: Replacing The Battery With Side Removal
Maintenance Maintenance as required Replacing the battery with side removal Preliminary operations DANGER Before changing the battery, park the truck. Ensure that the truck is on an even surface and cannot move accidentally. Ensure that the unlocked battery cannot slide off and fall onto the ground. - Page 145 – Place the manufacturer-approved battery side-removal roller unit next to the truck; position it so that it is still and stable; adjust the height of the roller unit so that it is level with the underside of the battery at the...
- Page 146 Maintenance Maintenance as required DANGER "Risk of crushing hands!" The battery must be inserted by a single operator only. The operator must follow the operating instructions given in this section, positioning himself on the same side as the battery side-removal roller unit. CAUTION Carefully place the battery inside the special com- partment and centre it correctly.
-
Page 147: Fuses
Maintenance Maintenance as required Fuses NOTE This section is for information purposes only and does not authorise the operator to carry out maintenance on the electrical system. DANGER Using the wrong fuses can result in short circuits. Before carrying out any operations on the electrical system, turn off the truck power supply by discon- necting the connector Before replacing the fuse, eliminate the cause that... -
Page 148: Decommissioning
Maintenance Decommissioning Decommissioning General Information The operations to be performed for "Tem- porary decommissioning" and "Permanent decommissioning" are listed in this chapter. 45878043402 EN - 10/2017... -
Page 149: Forklift Towing
Maintenance Decommissioning Forklift Towing The forklift may not be towed in the case of breakdown. The forklift must be lifted with due caution, as described on the preceding pages. Temporary Putting Out of Commission The following operations must be performed •... - Page 150 Maintenance Decommissioning 45878043402 EN - 10/2017...
- Page 151 Technical data...
- Page 152 Technical data Datasheet (VDI) Datasheet (VDI) Datasheet (VDI) OPX 20 and OPX 25 X min A st 2346 OPX 20 OPX 25 1.3 Drive Electric Electric 1.4 Operator type Stand-on Stand-on 1.5 Rated capacity/rated load Q (t) 45878043402 EN - 10/2017...
- Page 153 Technical data Datasheet (VDI) OPX 20 OPX 25 c (mm) 1.6 Load centre distance 1200 1200 1.7 Rated draw bar pull F (N) Load distance, centre of drive x (mm) 1615 1615 axle to fork y (mm) 2717 2717 1.9 Wheelbase...
- Page 154 Technical data Datasheet (VDI) OPX 20 OPX 25 4.19 Overall length l1 (mm) 3680 3680 4.20 Length to face of forks l2 (mm) 1290 1290 4.21 Overall width (mm) s/e/l 61 (78 max) / 172 / 2390 61 (78 max) / 172 / 2390 4.22 Fork dimensions...
- Page 155 Technical data Datasheet (VDI) OPX 20 OPX 25 Energy consumption according kWh/h to VDI cycle 8.1 Drive control AC control AC control dB (A) 10.7 Sound level at driver's ear < 70 < 70 (1) with holder for vertical pallet 1365 / 765 mm (2) with forks lenght 2390 mm / x=1615 mm / pull bar version;...
- Page 156 Technical data Datasheet (VDI) Datasheet (VDI) OPX 20 Plus and OPX 25 Plus X min A st 2346 OPX 20 Plus OPX 25 Plus Drive Electric Electric Operator type Stand-on Stand-on Rated capacity/rated load Q (t) c (mm) Load centre distance...
- Page 157 Technical data Datasheet (VDI) OPX 20 Plus OPX 25 Plus Rated draw bar pull F (N) Load distance, centre of drive axle to x (mm) 1615 1615 fork y (mm) 2720 2720 Wheelbase Service weight (including battery) 1218 1243 Axle loading, laden front/rear...
- Page 158 Technical data Datasheet (VDI) OPX 20 Plus OPX 25 Plus 4.21 Overall width (mm) s/e/l 61 (78 max) / 172 61 (78 max) / 172 4.22 Fork dimensions (mm) / 2390 / 2390 Fork-carriage width 4.24 (mm) 520 (540 / 560 / 670) 520 (540 / 560 / 670) 4.25...
- Page 159 Technical data Datasheet (VDI) (1) with holder for vertical pallet 1365 / 765 mm (2) with forks lenght 2390 mm / x=1615 mm / pull bar version; for other forks dimension see table below (3)3 with load arms or forks raised (4) there is also the truck option with chassis clearance m2=100 mm, y=1150 mm, h7=180 mm, h14=1300 mm, Wa=1344 mm...
- Page 160 Technical data Datasheet (VDI) Datasheet (VDI) OPX-D 20 X min A st 2347 OPX-D 20 Drive Electric Operator type Stand-on Rated capacity/rated load Q (t) 2.0 (1.0 on main lift) c (mm) Load centre distance 45878043402 EN - 10/2017...
- Page 161 Technical data Datasheet (VDI) OPX-D 20 Rated draw bar pull F (N) x (mm) 944 / 816 Load distance, centre of drive axle to fork y (mm) 2260 / 2132 Wheelbase Service weight (including battery) 1527 Axle loading, laden front/rear 1247 / 2280 Axle loading, unladen front/rear 1063 / 464...
- Page 162 Technical data Datasheet (VDI) OPX-D 20 m1 (mm) Ground clearance, laden, below mast 4.31 m2 (mm) 25 / 155 Ground clearance, centre of wheelbase 4.32 Aisle width for pallets 1000 x1200 crossways (forks Ast (mm) 4.34.1 raised) Aisle width for pallets 800 x1200 crossways (forks Ast (mm) 4.34.2 raised)
- Page 163 Technical data Datasheet (VDI) (5) with mandatory load backrest (1290 mm from the forks to the top for OPX-L 20 S and OPX-L 12; 1575 mm for OPX-L16) (6) with lifting platform option h7 +30 mm; h14 +87 mm (7) with lifting platform option +87 mm; with tiller adjustment option, h14 setting range = +89 mm ¸...
- Page 164 Technical data Datasheet (VDI) Datasheet (VDI) OPX-L 20 A st* (with holder for vertical pallet) X* min 1200 1200 1295 1200 X min A st 2348 OPX-L 20 Drive Electric Operator type Stand-on Rated capacity/rated load Q (t) 2.0 / 1.0 on main lift c (mm) 1248 / 600 on main lift Load centre distance...
- Page 165 Technical data Datasheet (VDI) OPX-L 20 Rated draw bar pull F (N) x (mm) 1910 /1782 Load distance, centre of drive axle to fork y (mm) 3225 / 3097 Wheelbase Service weight (including battery) 1567 Axle loading, laden front/rear 1539 / 2028 Axle loading, unladen front/rear 1170 / 397 Tyres...
- Page 166 Technical data Datasheet (VDI) OPX-L 20 m1 (mm) 13 / 100 Ground clearance, laden, below mast 4.31 m2 (mm) 25 / 155 Ground clearance, centre of wheelbase 4.32 Aisle width for pallets 1000 x1200 crossways (forks Ast (mm) 4.34.1 raised) Aisle width for pallets 800 x1200 crossways (forks Ast (mm) 4.34.2...
- Page 167 Technical data Datasheet (VDI) (5) with mandatory load backrest (1290 mm from the forks to the top for OPX-L 20 S and OPX-L 12; 1575 mm for OPX-L16) (6) with lifting platform option h7 +30 mm; h14 +87 mm (7) with lifting platform option +87 mm; with tiller adjustment option, h14 setting range = +89 mm ¸...
- Page 168 Technical data Datasheet (VDI) Datasheet (VDI) OPX-L 20 S X min A st 2351 OPX-L 20 S Drive Electric Operator type Stand-on Rated capacity/rated load Q (t) c (mm) Load centre distance 1200 45878043402 EN - 10/2017...
- Page 169 Technical data Datasheet (VDI) OPX-L 20 S Rated draw bar pull F (N) x (mm) 1474 /1308 Load distance, centre of drive axle to fork y (mm) 2661 / 2497 Wheelbase Service weight (including battery) 1456 Axle loading, laden front/rear 1140 / 2316 Axle loading, unladen front/rear 1020 / 436...
- Page 170 Technical data Datasheet (VDI) OPX-L 20 S m1 (mm) Ground clearance, laden, below mast 4.31 m2 (mm) Ground clearance, centre of wheelbase 4.32 Aisle width for pallets 1000 x1200 crossways (forks Ast (mm) 4.34.1 raised) Aisle width for pallets 800 x1200 crossways (forks Ast (mm) 4.34.2 raised)
- Page 171 Technical data Datasheet (VDI) (5) with mandatory load backrest (1290 mm from the forks to the top for OPX-L 20 S and OPX-L 12; 1575 mm for OPX-L16) (6) with lifting platform option h7 +30 mm; h14 +87 mm (7) with lifting platform option +87 mm; with tiller adjustment option, h14 setting range = +89 mm ¸...
- Page 172 Technical data Datasheet (VDI) Datasheet (VDI) OPX-L 12 A st 2350 OPX-L 12 Drive Electric Operator type Stand-on Rated capacity/rated load Q (t) c (mm) Load centre distance 45878043402 EN - 10/2017...
- Page 173 Technical data Datasheet (VDI) OPX-L 12 Rated draw bar pull F (N) x (mm) Load distance, centre of drive axle to fork y (mm) Wheelbase 1823 Service weight (including battery) 1308 Axle loading, laden front/rear 920 / 1588 Axle loading, unladen front/rear 875 / 433 Tyres Polyurethane...
- Page 174 Technical data Datasheet (VDI) OPX-L 12 m1 (mm) Ground clearance, laden, below mast 4.31 m2 (mm) Ground clearance, centre of wheelbase 4.32 Aisle width for pallets 1000 x1200 crossways (forks Ast (mm) 4.34.1 raised) Aisle width for pallets 800 x1200 crossways (forks Ast (mm) 4.34.2 raised)
- Page 175 Technical data Datasheet (VDI) (5) with mandatory load backrest (1290 mm from the forks to the top for OPX-L 20 S and OPX-L 12; 1575 mm for OPX-L16) (6) with lifting platform option h7 +30 mm; h14 +87 mm (7) with lifting platform option +87 mm; with tiller adjustment option, h14 setting range = +89 mm ¸...
- Page 176 Technical data Datasheet (VDI) Datasheet (VDI) OPX-L 16 A st 2349 OPX-L 16 Drive Electric Operator type Stand-on Rated capacity/rated load Q (t) c (mm) Load centre distance 1200 Rated draw bar pull F (N) 45878043402 EN - 10/2017...
- Page 177 Technical data Datasheet (VDI) OPX-L 16 x (mm) Load distance, centre of drive axle to fork 1093 y (mm) Wheelbase 2279 Service weight (including battery) 1585 Axle loading, laden front/rear 944 / 2241 Axle loading, unladen front/rear 1041 / 544 Tyres Polyurethane Tyre size, front...
- Page 178 Technical data Datasheet (VDI) OPX-L 16 m2 (mm) Ground clearance, centre of wheelbase 4.32 Aisle width for pallets 1000 x1200 crossways (forks Ast (mm) 4.34.1 raised) Aisle width for pallets 800 x1200 crossways (forks Ast (mm) 4.34.2 raised) Aisle width for for pallets 800 x l6 lengthways (forks Ast (mm) 4.34.3 4026...
- Page 179 Technical data Datasheet (VDI) (6) with lifting platform option h7 +30 mm; h14 +87 mm (7) with lifting platform option +87 mm; with tiller adjustment option, h14 setting range = +89 mm ¸ -19 mm Datasheet (VDI) LTX 50 2345 45878043402 EN - 10/2017...
- Page 180 Technical data Datasheet (VDI) LTX 50 Drive Electric Operator type Stand-on Rated capacity/rated load Q (t) c (mm) Load centre distance Rated draw bar pull F (N) x (mm) Load distance, centre of drive axle to fork y (mm) 1133 Wheelbase Service weight (including battery) 1223...
- Page 181 Technical data Datasheet (VDI) LTX 50 b1 (mm) 4.21 Overall width s/e/l 4.22 Fork dimensions (mm) Fork-carriage width b3 (mm) 4.24 b5 (mm) 4.25 Distance between fork-arms Ground clearance, laden, below mast m1 (mm) 4.31 Ground clearance, centre of wheelbase m2 (mm) 4.32 Aisle width for pallets 1000 x1200 crossways (forks...
- Page 182 Technical data Supply table (3)3 with load arms or forks raised (4) there is also the truck option with chassis clearance m2=100 mm, y=1150 mm, h7=180 mm, h14=1300 mm, Wa=1344 mm (5) with mandatory load backrest (1290 mm from the forks to the top for OPX-L 20 S and OPX-L 12;...
- Page 183 Index Address of manufacturer ... . . I Fuses ......137 Automatically closing trailer coupling .
- Page 184 Index Safety Inspection ....19 Towing a trailer ....118 Serial number .
- Page 186 STILL GmbH 45878043402 EN – 10/2017...
Need help?
Do you have a question about the OPX 20 and is the answer not in the manual?
Questions and answers
Hello, how to change speed? Still Opx 20