Table of Contents
Advertisement
Quick Links
Advertisement
Table of Contents

Related Manuals for PXM DMX DEMUX 8


Summary of Contents for PXM DMX DEMUX 8
- Page 1 PX227 DMX/0-10V Interface 8ch MANUAL...
-
Page 2: Table Of Contents
14. Technical data....................Declaration of conformity..................Manufacturer reserves the right to make modifications in order to improve device operation. tel.: +48 12 626 46 92 PXM Marek Żupnik spółka komandytowa fax: +48 12 626 46 94 Podłęże 654 E-mail: info@pxm.pl 32-003 Podłęże Internet: www.pxm.pl... -
Page 3: General Description
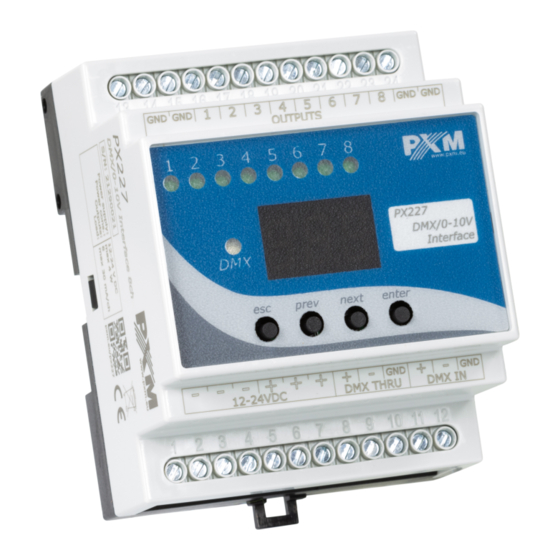
1. GENERAL DESCRIPTION Demultiplexer DMX512 signal - DMX / 0-10 V Interface 8ch The PX227 is designed to process the DMX512 signal to control the eight analog 0 - 10 V outputs (with accuracy +/- 3%). The device is manufactured in a housing designed for installation in electrical switchgear DIN rail T35. -
Page 4: Description
3. DESCRIPTION Pin no. Connection GND (-) GND (-) GND (-) GND (-) OUT 1 (+) OUT 2 (+) OUT 3 (+) OUT 4 (+) OUT 5 (+) OUT 6 (+) OUT 7 (+) OUT 8 (+) DC + power type DC + power type DC + power type DC - power type... -
Page 5: Connection Scheme
4. CONNECTION DIAGRAM Examples of connection: DMX controller e.g. PX333 to next fluorescent lamp to next fluorescent lamp fluorescent lamp DC 1-10V Electronic Ballast AC 230V fluorescent lamp DC 1-10V Electronic Ballast AC 230V 1-10 V electronic ballast terminator 230 V AC 50 Hz 12-24V DC 1-10 V electronic ballast... -
Page 6: Programming
6. PROGRAMMING After switching on, the display shows the version of the program. During the normal operation of demultiplexer, the display shows only one dot. Press “enter” to go to the main menu, the display shows ALL. Press "previous" or "next" to select the programming menu ( ALL, Ind, dEF) and press "enter"... -
Page 7: Setting The Dmx Address
7.1 Setting of DMX address PX227 menu allows you to set DMX address of the device in the range from 1 to 505. In order to set DMX address: 1. Set the Adr function. 2. By using "next" or "previous" set the selected DMX address. In order to accept the settings, press "enter". -
Page 8: Smoothing Function
In order to start the NO SIGNAL function, enter noS option 1. From the start menu (which is the address of ENTER ENTER the first channel) by pressing enter, go to the NEXT menu of group settings. ENTER 2. Press "enter" again in order to change the settings for all channels. -
Page 9: Programming Of Individual Parameters
The enabled smoothing function can slightly slow down the device response to the change of DMX signal, so it is possible to switch off this option. In order to switch off smoothing, select diS parameter and confirm the selection with "enter". The selection of P2P function allows linear transition between successive DMX values. -
Page 10: Scenes
9.1. Scenes In dEF menu, select a scene (there are four scenes available to choose from) that you want to program and press "enter". The display shows CH1 – the first channel. Press "enter" to start editing the channel. ENTER To set the value of output voltage NEXT for channel, in the tab of the... -
Page 11: Screen Blanking
10. SCREEN BLANKING The device has been equipped with the option of switching off the backlight of the screen. This is provided by the SCr option. By using it, the display is switched off after approx. 1 min. of inactivity (buttons unused). -
Page 12: Mounting
11. MOUNTING PX227 is installed on the mounting rail T35 in order to provide stable positioning and comfortable access to the device. Installation on the mounting rail: 1. Set PX227 diagonally to the rail by hooking the two supports on the rear panel of the unit on the upper part of the assembly strip. -
Page 13: Programming
12. PROGRAMMING ENTER ENTER ENTER NEXT NEXT ENTER ENTER ENTER NEXT NEXT ... NEXT NEXT NEXT NEXT NEXT NEXT ENTER ...... NEXT NEXT NEXT ENTER NEXT NEXT NEXT NEXT NEXT NEXT NEXT ENTER NEXT ENTER NEXT ENTER ENTER ENTER NEXT NEXT NEXT... -
Page 14: Dimensions
13. DIMENSIONS 60mm 70 mm 12-24V DC 14. TECHNICAL DATA - DMX channels: - power supply: 12-24 V DC - current consumption: max. 250 mA - number of output channels: - output carrying capacity: max. 30 mA / channel - voltage on outputs 0-10 V (+/- 3%) - output slots: screw terminals... -
Page 15: Declaration Of Conformity
PXM s.c. Name of producer: ul. Przemysłowa 12 Manufacturer’s address: 30-701 Kraków We declare that our product: Product name: DMX DEMUX 8 Product code: PX227 complies with the following standards: PN-EN 61000-6-1 PN-EN 61000-6-3 Additional information: 1. DMX signal connection must be made using a shielded cable, connected to pin 1 of the plug.
Need help?
Do you have a question about the DMX DEMUX 8 and is the answer not in the manual?
Questions and answers