Table of Contents
Advertisement
Quick Links
Advertisement
Table of Contents

Related Manuals for PXM PX333


Summary of Contents for PXM PX333
- Page 1 PX333 Mini DMX Controller User manual...
-
Page 2: Table Of Contents
6 Logging onto the controller..............15 6.1 Logging in to the controller in the local network..........16 6.2 Remote logging (external network)...............16 6.2.1 Logging in via the PX333 application on a PC..........18 6.2.2 Login from the PxMini application and smartphone application.....23 7 Software installation................25 7.1 Windows... - Page 3 Manufacturer reserves the right to make modifications in order to improve device operation. PXM Marek Żupnik sp.k. Podłęże 654 tel. +48 12 385 83 06 32-003 Podłęże mail: info@pxm.pl Rev.2-3 BDO register number 000005972 www.pxm.pl 09.04.2019...
-
Page 4: Description
Windows ® or Linux operating systems. PX333 sends 64 DMX-512 channels and has 3 OC outputs with a load capacity of 1500mA each, allowing for direct control of LEDs. DMX output channels can be divided into 16 zones controlled independently. -
Page 5: Safety Conditions
Safety conditions PX333 is a device powered with safe voltage 12 – 24V DC, however, during its installation and use the following rules must be strictly observed: 1. The device can be connected to 12 – 24V DC (stabilized voltage) with current-carrying capacity compatible with technical data. -
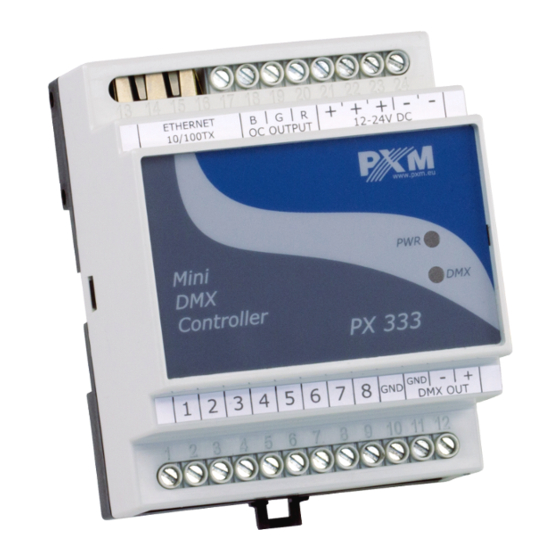
Page 6: Connectors And Control Elements
Connectors and control elements Designations: 1. Ethernet connector 2. Output of LEDs with common anode 3. Power supply 12 – 24V DC 4. 8 on / off inputs with ground (GND) 5. DMX output (64 channels) -
Page 7: Operation Of The Controller
Operation of the controller PX333 allows to save 32 scenes and 8 programs with 64 steps each. Scene – a static set of values at the output channels for which rise time, duration and fall time are given Program – a set of consecutive scenes. For the program, it is possible to set the speed, the master program and smoothness of transitions between steps. -
Page 8: Network Settings Of The Controller
The controller has the ability to save a list of scenes and programs. They are used to start the selected scenes and programs in a given order using a single control button. Scenes and programs can be listed in any order; what is more, the list elements can be repeated. - Page 9 In automatic mode (DHCP), after connecting to the network the controller attempts to get the network configuration from a DHCP server (e.g router). Thanks to this, manual configuration of networks parameters is not needed. In the absence of a DHCP server on the network the controller will operate according to the static configuration (manual setup).
-
Page 10: Change Of The Computer Network Configuration
5.1 Change of the computer network configuration The procedure for changing the computer network configuration varies depending on the operating system. Windows ® 7 system is an example here. Change of the computer network configuration in the Windows ® 7 operating system in done in the following : 1. - Page 11 6. Right-click on [Połączenie lokalne] (Local area connection) and choose the [Properties] 7. In the new window that appears, select [Internet Protocol Version 4 (TCP/IPv4)] and then press properties...
- Page 12 8. In the next window, select [Use the following IP address:] To connect directly (computer – driver) with a controller that has a default configuration, use the sample settings: IP address: 192.168.0.51 Subnet mask: 255.255.255.0 Default gateway: 192.168.0.1...
-
Page 13: Connecting Controller Directly To The Pc
When connecting the controller directly to a computer it is recommended to use a braided cable. Newer network cards will work both on a braided cable or a non-braided cable, but older ones may require braided cable. PX333: e.g: e.g: IP:192.168.0.50... -
Page 14: Automatic Addressing
Below is a diagram of the operation of the devices with the DHCP server running: Smarphone: smartphone receives Router: kconfiguration on its own e.g: IP:192.168.0.100 Mask: 255.255.255.0 DHCP server running PX333: IP, mask and gate from DHCP DHCP enabled „Obtain an IP address automatically”... -
Page 15: Static Addressing
192.168.0.1 Logging onto the controller Logging into the controller is possible from local network and from external network (Internet). In both cases, the device can be logged in from a PC using the controller configuration software (PX333 software), PxMini and... -
Page 16: Logging In To The Controller In The Local Network
PX333 Mini DMX Controller application (PxMini and PX333 Mini DMX Controller are used to control the controller which has already been loaded configuration). There is always an ADMIN user in the driver, who has the maximum level of permission. The default password of the ADMIN user is empty, the password field should be left blank. - Page 17 redirect appropriate ports to the IP address of the controller working in • the local network (so-called forwarding port): ◦ 50001 and 50002 for all applications unblock selected ports in the router’s firewall • the address of the driver / drivers in the local network can not change •...
-
Page 18: Logging In Via The Px333 Application On A Pc
6.2.1 Logging in via the PX333 application on a PC a) one controller works in the local network with the following settings: • external IP address: 66.77.88.99 (example address) IP address: 192.168.1.10 • mask: 255.255.255.0 • target device port: 50001 i 50002 •... - Page 19 If there is no option to set the port range in the router, create two separate rules for each port separately (separately for 50001 and 50002). If everything is correctly configured to connect to the controller from the (external) internet network, select the Connect with controller option in the application window and enter the IP address of the router in the IP field (assigned by the internet provider, in this case 66.77.88.99), The user's password and in the Port field enter the port number 50001.
- Page 20 The connection diagram: Router: IP:192.168.1.1 Masa: 255.255.255.0 DHCP server ¨ Redirecting port 50001 and 50002 to the device address (192.168.1.10) external IP address e.g 66.77.88.99 INTERNET PX333: 192.168. . 1 10 Masa: 255.255.255.0 Gate: 192.168. .1 DHCP ¨ internet connection...
- Page 21 b) more than one controller works in the local network with the following settings: external IP address: 66.77.88.99 (example address) • IP address of the first controller: 192.168.1.10 • IP address of the second controller: 192.168.1.11 • • mask: 255.255.255.0 target device port: 50001 and 50002 for the first controller, •...
- Page 22 IP:192.168.1.1 Mask: 255.255.255.0 DHCP server ¨ Port forwarding to appropriate IP addresses external IP address 66.77.88.99: 50001 e.g: 66.77.88.99: 50001 66.77.88.99: 60001 PX333: INTERNET 192.168. . 1 10 Mask: 255.255.255.0 Gate: 192.168. .1 DHCP ¨ 66.77.88.99: 60001 PX333: 192.168. . 1 11 Mask: 255.255.255.0...
-
Page 23: Login From The Pxmini Application And Smartphone Application
6.2.2 Login from the PxMini application and smartphone application The controller works in the local network with the following settings: external IP address: 66.77.88.99 (example address) • IP address: 192.168.1.10 • mask: 255.255.255.0 • target device port: 50001 i 50002 •... - Page 24 Port2 field enter 50002, in the mobile application only one port (50001) is entered. Router: IP:192.168.1.1 Mask: 255.255.255.0 DHCP server ¨ Redirecting port 50001 and 50002 to the device address (192.168.1.10) external IP address e.g 66.77.88.99 INTERNET PX333: 192.168. . 1 10 Mask: 255.255.255.0 Gate: 192.168. .1 DHCP ¨ internet connection...
-
Page 25: Software Installation
• recording the disc) NOTE! All these files can be found on the manufacturer's website (pxm.pl). The firmware update is recommended to be downloaded from the product page, as there is always the latest version of the device firmware update. - Page 26 1. Open an installation file, click [Next] to go to the software installation. The installation file is attached to the driver on a CD or available for download from the manufacturer’s page (pxm.pl) 2. Select the folder in which the software is to be installed. Confirm your...
- Page 27 3. Select components that you want to install and then click [Next]. 4. Read the license agreement carefully; if you agree to the terms of this agreement, click [Next] to continue the installation.
- Page 28 [Install], if you agree. 7. When the window indicating that the installation procedure was successful pops up, click [Finish] to exit the installation wizard. If you want to go to the program, in the selection window select [Run PX333 now]. 8. Windows ®...
-
Page 29: Android
7.2 Android™ The PX333 mobile application can be installed on Android™ 4.0 or later. To install software: 1. Upload *.apk installation file available on manufacturer’s page to the phone memory. 2. Go to phone settings and then check “Allow installation of apps from sourced other than The Play Store”... -
Page 30: Signaling Of Indicators
Firmware upgrade The procedure for firmware upgrade on the PX333 controller: 1. Connect the controller directly to the computer using a network cable. For older computers, it is recommended to use a crossover cable –... -
Page 31: Restoring Default Settings
6. Click on “Search”, the controller should be displayed on the list. 7. Select the controller from the list and click on “Login” (leave the password blank). 8. Click on “Upgrade Firmware”, select the *.upg file with upgrade and click [OK]. 9. -
Page 32: Construction And Functionality Of Pc Applications
The information presented in the program are grouped on the left side panel, divided into the following tabs: [Settings], [Edit mode], [Control mode] and in the main menu as a drop-down menu: [File], [PX333], [Language], [Tools] and [Help]. In addition, the central part of the application window is a work area (main panel). -
Page 33: Construction And Functionality Of A Mobile Application
The left panel consists of three tabs: [Settings] – edition of zones, devices, events, lists, security options in the controller, a preview of DMX channels (only where it is connected to the controller) and [Others] – i.e. PWM settings and a description of the controller [Edit mode] –... - Page 34 The contents of the main panel are changed depending on the tab selected in the left panel. The main menu on devices with high resolution is still visible on the left side of the screen. For smaller devices it is available in drop-down side panel.
-
Page 35: Modbus Protocol
13 Modbus protocol The PX333 controller comes equipped with slave implementation of the Modbus TCP/IP protocol. The protocol allows the user to control the operation of the controller, by activating scenes / programs and to obtain information on the status of individual components. - Page 36 value ranges for individual parameters. In the case of the read functions, the allowed values are expected response values, while for the write functions (control functions) these are the values being transmitted. Table 2 sets out interpretations and brief descriptions of values for each parameter.
- Page 37 EVENT Write Single Register 16384 4000 0 – 8 SCENE ACTION 20480 5000 20481 5001 Write Single Register 0 – 2 20511 501F PROGRAM ACTION 20736 5100 20737 5101 Write Single Register 0 – 7 20743 5107 20992 5200 PROGRAM MASTER ACTION 20993 5201 Write Single Register...
- Page 38 LIST ACTION 21760 5500 21761 5501 Write Single Register 0 – 2 21775 550F ZONE ACTION 22016 5600 22017 5601 Write Single Register 0 – 1 22031 560F 22272 5700 ZONE MASTER ACTION 22273 5701 Write Single Register 0 – 100 22287 570F...
- Page 39 Table 2. Description of parameters Parameter Range Description DMX OUT 0 – 255 Get DMX channel value Get digital input state DIGITAL INPUT 0 – 1 0: OFF 1: ACTIVE Get scene status 0: OFF SCENE STATUS 0 – 3 1: RISING 2: ON 3: FALLING...
- Page 40 Trigger event EVENT 0 – 8 0 – 7: DIGITAL INPUT EVENT 8: CONTROLLER POWER ON Trigger scene action 0: ON SCENE ACTION 0 – 2 1: OFF 2: TOGGLE Trigger program action 0: PLAY 1: PAUSE PROGRAM ACTION 0 – 7 2: STOP 3: TOGGLE 4: RESTART...
-
Page 41: Connection Scheme
Trigger element list action 0: NEXT LIST ACTION 0 – 2 1: PREV 2: OFF Trigger zone action ZONE ACTION 0 – 1 0: ALL ON 1: ALL OFF ZONE MASTER 0 – 100 Set zone master 14 Connection scheme LEDs connected power supply with common anode... -
Page 42: Dimensions
15 Dimensions 60mm 70mm... -
Page 43: Technical Data
16 Technical data type PX333 power supply 12 – 24V DC 70mA for 12V DC no-load current consumption 40mA for 24V DC DMX output channels control inputs On/Off control outputs OC OC outputs load capacity 1500mA / channel communication scenes: 32... - Page 44 Podłęże, 09.04.2019 DECLARATION OF CONFORMITY PXM Marek Żupnik spółka komandytowa Podłęże 654, 32-003 Podłęże we declare that our product: Product name: Mini DMX Controller Product code: PX333 meets the requirements of the following standards, as well as harmonised standards: PN-EN IEC 63000:2019-01...
Need help?
Do you have a question about the PX333 and is the answer not in the manual?
Questions and answers