Table of Contents
Advertisement
Quick Links
Please read all instructions carefully before assembling.
For your safety, assembly by two people is recommended.
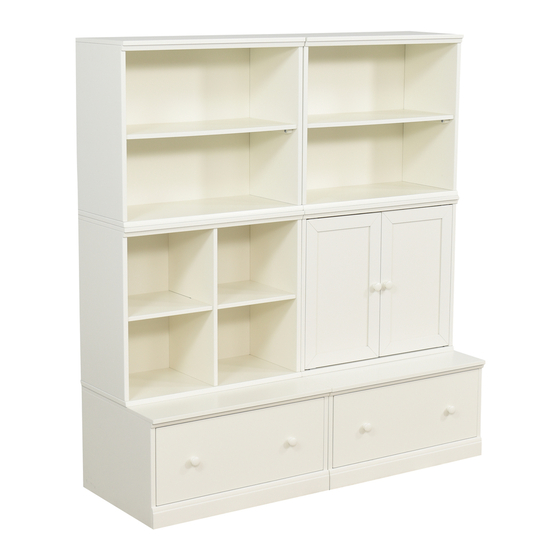
(1) Top Panel (A)
(1) Bottom Panel (B)
(1) Long Shelf Panel (C)
(1) Short Shelf Panel (D)
(2) Side Boards (E)
(1) Back Panel (F)
•
Remove all parts and hardware from the box and lay out on a clear, carpeted or scratch-free work surface.
(The shipping box provides an ideal work surface), this will avoid damaging any parts during assembly. Do
not dispose of any contents until assembly is completed to avoid accidentally discarding small parts or
hardware.
•
Use the parts and hardware lists above to identify and separate each of the pieces included.
•
The illustrations provided allow for easier assembly when used in conjunction with the assembly instructions.
•
Note: Do not fully tighten all bolts until all parts are in place. Failure to follow these instructions may cause
the bolts to misalign during assembly.
•
If using power tools to aid in assembly please use caution. Power tools can damage hardware or split
wood.
1. Carefully cross Long Shelf Panel (C) with Short Shelf Panel (D) as shown. It is very important for later
assembly to make sure Long Shelf Panel runs vertically as shown in Step #1
2. Attach (2) Side Boards to already assembled Shelf Panels.
3. Slide the Back Panel (F) into the slots on the backside of the Side Boards. Attach the Bottom Panel (B) as
shown using (4) Allen Bolts, Flat Washers & Spring Washers. Note: The correct order for the washers to go
on the Allen Bolt is: Spring Washer first, Flat Washer second. Please see diagram
4. Set the Top Panel (A) on the already assembled pieces. Attach with remaining (4) Allen Bolts, Flat
Washers & Spring Washers.
5. If connecting Cubby piece to Base piece use (12) Screws (L) and (2) Connecting Brackets (K) as shown.
Screws are self-drilling and are designed to go into wood easily. (Remaining (2) Screws are for the Tip Kit,
which has separate instructions).
6. If connecting Cubby piece to Cubby piece use (4) screws (T) and (1) Square Connecting Bracket (S) as
shown. Screws are self-drilling and are designed to go into wood easily.
•
Dust with a clean, soft cloth.
•
Avoid the use of chemicals and harsh cleaning agents.
•
Do not climb on the Cubby.
pottery barn kids
CAMERON WALL SYSTEM CUBBY
HARDWARE ENCLOSED:
(1) Allen Key (G)
(8) ¼" x 30mm Allen Bolt (H)
(8) ¼" Spring Washer (I)
(8) ¼" Flat Washer (J)
(2) Connecting Bracket (K)
(14) Screws (L)
(1) Square Connecting Bracket (S)
(4) 5/32" x 12mm Wooden Screws (T)
Thank you for your purchase.
stores | catalog | www.potterybarnkids.com
TIP KIT PARTS:
(1) Plastic Restraint (M)
(2) Plastic Wall Brackets (N)
(2) Long Screws (O)
(2) Short Screws (P)
Advertisement
Table of Contents

Related Manuals for pottery barn kids CAMERON


Summary of Contents for pottery barn kids CAMERON
- Page 1 CAMERON WALL SYSTEM CUBBY IMPORTANT SAFETY INSTRUCTIONS: Please read all instructions carefully before assembling. For your safety, assembly by two people is recommended. PARTS INCLUDED: HARDWARE ENCLOSED: TIP KIT PARTS: (1) Top Panel (A) (1) Allen Key (G)
- Page 3 Long wood screw Plastic wall bracket Short wood screw Plastic restraint...
- Page 4 CAMERON WALL SYSTEM BASE IMPORTANT SAFETY INSTRUCTIONS: Please read all instructions carefully before assembling. For your safety, assembly by two people is recommended. PARTS INCLUDED: HARDWARE ENCLOSED: TOOLS REQUIRED FOR ASSEMBLY: (1) Top Panel (A) (1) Allen Key (E)
Need help?
Do you have a question about the CAMERON and is the answer not in the manual?
Questions and answers