
Subscribe to Our Youtube Channel
Related Manuals for Thermo Scientific KingFisher Flex


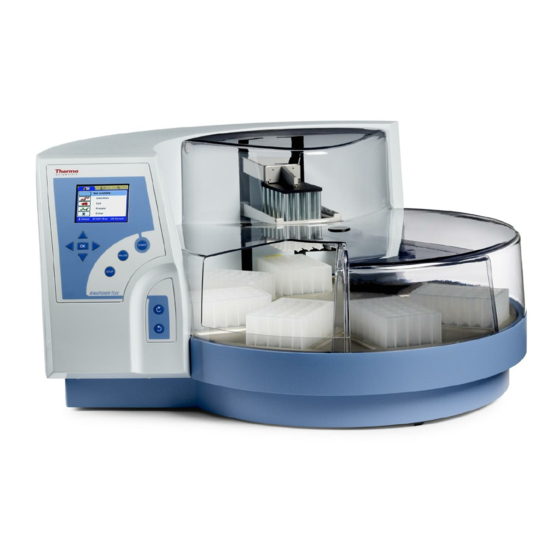
Summary of Contents for Thermo Scientific KingFisher Flex
- Page 1 Thermo Scientific KingFisher Flex Brief User Manual Catalog Number N13141 Pub. No. MAN0019871 Rev. A.0 For Laboratory Use.
- Page 2 PURPOSE. The seller is not liable for any loss or damage arising out of or in connection with the use of the product or other indirect damages. This Brief User Manual is a shorter version of the Thermo Scientific™ KingFisher™ Flex User Manual, Cat. No. N07669. The safe use of the instrument requires that all instructions are followed accordingly.
-
Page 3: Table Of Contents
Table of Contents Introduction to the KingFisher Flex ....................4 Intended use ............................ 4 Principle of operation ........................4 Consumables ........................... 4 Reagents ............................4 Installation ............................5 Unpacking the instrument......................... 5 Releasing the transport locks ......................6 Connecting the power supply cable ....................8 Fitting the shield plate ........................ -
Page 4: Introduction To The Kingfisher Flex
Introduction to the KingFisher Flex This Brief User Manual is for the KingFisher Flex instrument. It aims to give you a short introduction on installing the instrument and Thermo Scientific™ BindIt™ Software as well as starting a purification protocol from the internal software. -
Page 5: Installation
Do not place the KingFisher Flex heads on top of the instrument or any metal surfaces. Keep the KingFisher Flex heads always in their respective plastic boxes when not in use. It is very important to keep the KingFisher Flex heads away from each other and other magnets at all times. Interference of the magnets on one another may cause serious damage to the magnets. -
Page 6: Releasing The Transport Locks
Heating block transport lock Figure 2. KingFisher Flex transport locks fitted 1. To remove the transport lock of the tip comb holder, take hold of the transport lock screw and firmly turn it counterclockwise according to Figure 3. - Page 7 Figure 4. Tip comb holder transport lock removed 3. The transport lock of the heating block is removed according to Figure 5. Unscrew the transport lock screw counterclockwise (Figure 5). Lift the screw with the label attached (Figure 6). Figure 5. Removing the transport lock of the heating block (A) 4.
-
Page 8: Connecting The Power Supply Cable
5. Then fasten the screw clockwise to its storage site on the heating block base. The two screws on the heating block base guide the heating block into the correct position. Note! Keep the transport locks (Figure 4 and Figure 6) for future transportation of the instrument. Both the transport locks have been successfully removed. -
Page 9: Fitting The Heating Block
Figure 9. Inserting the shield plate 4. When fastening the two plate retaining screws (Figure 10 A), be careful not to drop them inside the instrument. Figure 10 B shows the shield plate installed. Figure 10. Fastening / loosening the shield plate (A) and when in place (B) Fitting the heating block Fastening/changing the heating block is controlled by the software. -
Page 10: Inserting The Kingfisher Flex Head
(Figure 12 and Figure 13). When you insert the KingFisher Flex head, be careful not to damage the magnet rods against the tip comb holder frame. 4. Confirm the end of the protocol by pressing START. -
Page 11: Operational Check
It is recommended that you carry out a check run using a demo protocol to verify proper instrument operation. Run the check protocol (Check_96dw_tip, Check_KF96_tip, Check_pcr_tip, or Check_24dw_tip) under the Maintenance menu according to the KingFisher Flex head and plastic consumables you are using. Refer to Chapter 9: “Ordering Information” in the instrument user manual. -
Page 12: Routine Operation
Routine Operation Keypad The relevant keys and control buttons are described in detail below (Figure 14). Arrow keys and OK button START, PAUSE and STOP function buttons TURNTABLE ROTATION CLOCKWISE and COUNTERCLOCKWISE buttons Figure 14. Keypad of the KingFisher Flex... -
Page 13: Navigating
START. The tip comb always has to be placed manually onto a Thermo Scientific™ KingFisher™ plate (Figure 15). The instrument also functions with either one plate or up to eight plates depending on the amount of steps. -
Page 14: Technical Specifications
The eight plate stations and the A1 positions of the eight plate stations are clearly marked on the turntable. When the instrument is in its basic position, plate station 1 is under the KingFisher Flex head. The plate station position depends on the protocol used. After the protocol has been run, note that the turntable may stop in a different position than the basic position. -
Page 15: General Specifications
General specifications Table 1. General specifications General specifications +5C to +40C; maximum relative humidity 80% for Operating conditions temperatures up to 31C decreasing linearly to 50% relative (indoor use) humidity at 40C Indoor use only! 100–240 Vac, 50/60 Hz, nominal Mains power supply Automatic voltage detection Power consumption...
Need help?
Do you have a question about the KingFisher Flex and is the answer not in the manual?
Questions and answers