Table of Contents
Advertisement
Quick Links
Advertisement
Table of Contents

Related Manuals for Moore Industries IST


Summary of Contents for Moore Industries IST
- Page 1 April 2016 Isolating Signal Transmitter 297-702-00 F...
-
Page 2: Table Of Contents
Figure 5. Installing the IST ........................... 8 Figure 6. Installing the IST with the TX Option ....................8 Figure 7. Installing the Single IN, Dual OUT IST with the TX and EP Options ............ 9 Figure 8. Installing the Dual IST .......................... 9 Figure 9. -
Page 3: Introduction
Note – Information that is helpful for a procedure, con- board. The setting of these jumpers determines which dition, or operation of the unit. of the IST’s rated power inputs, 117, 230, or 240 Vac, is operational in the unit. Typically, the jumpers are Description positioned according to customer order specification before shipment, but they can be reset at any time. -
Page 4: Specifications
Page 2 Specifications Accuracy: ±0.1% of rated Effect: ±0.015% of span Performance Performance RFI/EMI Effect: Ambient Negligible @ 10V/m. With per °C change over a unit span including (continued) Temperature adjustment resolution and RF option, effect is 0 to 70°C range (±0.008% (continued) 50V/m –ABC≤... -
Page 5: Options
There are no other internal adjustments or controls in the IST. Re-install the side panel when jumper set- For an IST with an input of 4-20mA and an output of ting is complete. 10-50mA using 117AC power and equipped with the TX option in DIN housing, specify: IST / 4-20mA / 10–50MA / 117AC / -TX [DIN]... -
Page 6: Calibration Setup
Figures 2 and 3 show the calibration setup for the i n i c i f c i f single and dual IST. Connect the unit as shown in the illustration, and apply appropriate ac power. Allow ± approximately five minutes for setup stabilization/ i n i ±... - Page 7 1) Appropriate input power rating is listed in the unit's ZERO model number. 2) Use a 240Ω load resistor for 4-20 mA units; 100Ω load resistor for 10-50 mA units. Figure 3. Calibrating the Dual IST – SIGNAL VOLTMETER SOURCE – VOLTMETER SIGNAL –...
-
Page 8: Calibration Procedure
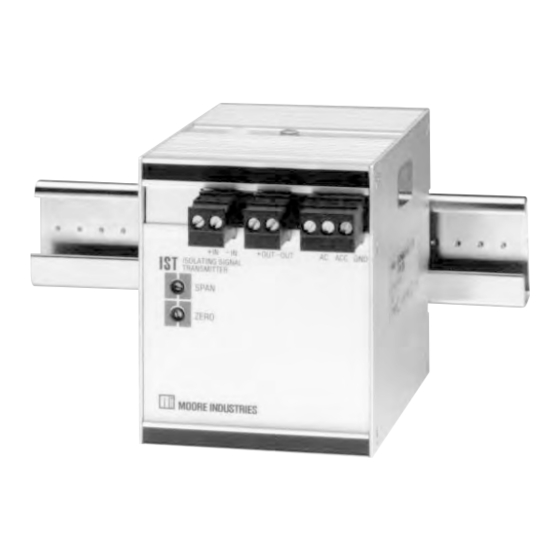
Mounting the IST over the entire input range. To mount the IST on Top Hat DIN rail, seat the upper The IST Zero and Span pots are labeled and acces- extrusion on the back panel over the top of the rail and sible on the front panel. - Page 9 +OUT are for the connection of current-driven instru- sockets. Use a slotted-tip screwdriver with a head mentation (load) to IST output; and AC, ACC, and GND width no greater than 3 mm (0.12 inch). are the terminals for connection of unit power.
- Page 10 24VDC For DC powered units, substitute: +IN -IN +OUT-OUT AC ACC GND ISOLATING SIGNAL DC DCC GND TRANSMITTER SPAN ZERO Figure 6. Installing the IST with the TX option 2-WIRE RECEIVER ISOLATED 4-20mA OR 10-50 mA SIGNAL + – POWER...
- Page 11 Page 9 Figure 7. Installing the Single IN, Dual OUT IST with the TX & EP options CURRENT- CURRENT- DRIVEN DRIVEN DEVICE DEVICE – – – – 24V POWER SUPPLY NON-ISOLATED 24V POWER SUPPLY 2-WIRE – TRANSMITTER For DC powered units, substitute:...
-
Page 12: Recommended Ground Wiring Practices
Page 10 Figure 9. Installing the Dual IST with the TX and EP Options – NON-ISOLATED 2-WIRE TRANSMITTER CURRENT- CURRENT- DRIVEN DRIVEN DEVICE DEVICE – – – – 24V POWER SUPPLY NON-ISOLATED 24V POWER SUPPLY 2-WIRE – TRANSMITTER For DC powered units, substitute:... -
Page 13: Maintenance & Troubleshooting
Factory phone numbers are on the back cover. If the IST is found to be performing below specifica- If problems involve a particular IST, there are several tion, complete the following checklist. - Page 14 4. Ship the equipment to the Moore Industries location nearest you. The returned equipment will be inspected and tested at the factory. A Moore Industries representative will contact the person designated on your documentation if more information is needed. The repaired equipment, or its replacement, will be returned to you in accordance with the shipping instructions furnished in your documentation.
Need help?
Do you have a question about the IST and is the answer not in the manual?
Questions and answers