Advertisement
Quick Links
IN-DASH INSTALLATION KIT FOR
1982-2005 GENERAL
MOTORS VEHICLES
BUICK
1982-96
CENTURY .................... 7
1985-90
ELECTRA/PARK
AVENUE ....................... 7
1992-94
LE SABRE .................... 8
1986-91
LE SABRE .................... 7
1991-94
PARK AVENUE ............ 8
1984-87
REGAL ......................... 7
1995-99
RIVIERA ....................... 8
1991-94
ROADMASTER ............ 8
1982-89
SKYHAWK ................... 9
1992-95
SKYLARK..................... 9
1983-85
SKYLARK..................... 9
CADILLAC
1982-88
CIMARRON................ 10
1992-95
DEVILLE ..................... 10
1985-91
DEVILLE ..................... 10
1986-91
ELDORADO ............... 11
1984-85
ELDORADO ............... 11
2002
ESCALADE EXT ......... 11
1999-02
ESCALADE ................ 11
1985-92
FLEETWOOD ............. 10
1986-91
SEVILLE ..................... 11
1984-85
SEVILLE ..................... 11
CHEVROLET
1996-05
ASTRO ....................... 12
1990-95
ASTRO ....................... 12
1985-89
ASTRO ....................... 12
2001-02
AVALANCHE .............. 11
1991-96
BERETTA ................... 12
1989-91
BLAZER, FULL SIZE .. 13
1997-02
CAMARO ................... 13
1993-96
CAMARO ................... 13
1982-92
CAMARO ................... 14
1994-96
CAPRICE CLASSIC ... 14
1991-93
CAPRICE/CAPRICE
CLASSIC ...................... 8
1985
1
/
-90 CAVALIER RS, Z-24 .. 15
2
1982-90
CAVALIER ("VL" OR
BASE MODELS) ......... 10
1995-99
CAVALIER .................. 15
1991-94
CAVALIER .................. 15
1982-90
CELEBRITY................ 16
1985
CITATION................... 16
1991-96
CORSICA ................... 12
1984-89
CORVETTE ................ 16
1995-02
CREW CAB DUALLY
PICKUP ...................... 11
CAR STEREO CONNECTORS
PROVIDE EASY CONNECTION OF YOUR CAR
STEREO TO FACTORY WIRING HARNESS.
GM01
1978-87 General
Motors Vehicles
This instruction booklet is based on carefully documented data and research of automobile dash disassembly,
wire harness/codes and information pertaining to installation of this kit (GM1504) in 1982-2005 General Motors
Vehicles. Scosche Industries, Inc. cannot be held responsible for discrepancies/inconsistencies that may occur
due to the automobile manufacturing changes or options, or damage that may occur in the automobile during
the installation of components while using this booklet.
If you have any further questions, call our toll free technical help line at:
© 2008 SCOSCHE INDUSTRIES, INC.
CHEVROLET (Cont'd)
1989-91
CREW CAB DUALLY
PICKUP ...................... 15
1986-87
EL CAMINO ............... 19
1996-00
EXPRESS ................... 17
1994-96
IMPALA SS ................ 14
1995-99
LUMINA ..................... 17
1990-94
LUMINA ..................... 17
1994-96
LUMINA APV ............. 18
1990-93
LUMINA APV ............. 18
1997-00
MALIBU ..................... 18
1995-99
MONTE CARLO ......... 17
1986-88
MONTE CARLO ......... 19
1985-88
NOVA ......................... 19
1995-02
PICKUP, FULL SIZE .. 11
1995-02
SUBURBAN ............... 11
1989-91
SUBURBAN ............... 13
1998-01
S-10 BLAZER ............ 19
1986-94
S-10 BLAZER ............ 20
1982-85
S-10 BLAZER ............ 20
1998-01
S-10 PICKUP ............. 19
1986-93
S-10 PICKUP ............. 20
1982-85
S-10 PICKUP ............. 20
1995-02
TAHOE ....................... 11
1988-95
VAN, FULL SIZE ........ 20
1997-99
VENTURE .................. 21
GMC
1995-02
CREW CAB DUALLY
PICKUP ...................... 11
1989-91
CREW CAB DUALLY
PICKUP ...................... 13
1989-91
JIMMY, FULL SIZE .... 13
1995-02
PICKUP, FULL SIZE .. 11
1998-01
S-15 JIMMY ............... 19
1986-94
S-15 JIMMY ............... 20
1982-85
S-15 JIMMY ............... 20
1986-93
S-15 PICKUP ............. 20
1982-85
S-15 PICKUP ............. 20
1996-05
SAFARI ...................... 12
1990-95
SAFARI ...................... 12
1985-89
SAFARI ...................... 12
1996-00
SAVANA ..................... 17
1998-01
SONOMA PICKUP ..... 19
1995-99
SUBURBAN ............... 11
1989-91
SUBURBAN ............... 13
1988-95
VAN, FULL SIZE ........ 20
2002
YUKON XL ................. 11
1995-02
YUKON ..................... 11
GMDA
1988-up General
Motors Vehicles
LIABILITY DISCLAIMER
GM1504F
ISUZU
1998-00
HOMBRE PICKUP ..... 19
OLDSMOBILE
1992-95
ACHIEVA .................... 21
1991-94
BRAVADA .................. 20
1985-91
CUTLASS CALAIS ..... 21
1982-96
CUTLASS CIERA ....... 22
1989-94
CUTLASS SUPREME 22
1984-88
CUTLASS SUPREME
CLASSIC .................... 22
1986-88
DELTA 88 ................... 23
1992-93
EIGHTY-EIGHT
ROYALE ..................... 23
1989-91
EIGHTY-EIGHT
ROYALE ..................... 23
1982-88
FIRENZA .................... 11
1984-93
NINETY-EIGHT .......... 23
1983-84
OMEGA ...................... 23
1997-99
SILHOUETTE ............. 21
1994-96
SILHOUETTE ............. 18
1990-93
SILHOUETTE ............. 18
1982-89
TORONADO ............... 24
1989-93
TOURING SEDAN ...... 24
PONTIAC
1992-99
BONNEVILLE ............. 24
1987-91
BONNEVILLE ............. 25
1984-88
FIERO ........................ 25
1993-02
FIREBIRD ................... 25
1985-92
FIREBIRD ................... 26
1982-84
FIREBIRD ................... 14
1996-98
GRAND AM ................ 26
1992-95
GRAND AM ................ 26
1985-91
GRAND AM ................ 26
1997-99
GRAND PRIX ............. 27
1994-96
GRAND PRIX ............. 27
1992-93
GRAND PRIX ............. 27
1982-88
SUNBIRD/J-2000 ...... 10
1995-99
SUNFIRE/
CONVERTIBLE .......... 28
1997-99
TRANS SPORT .......... 21
1994-96
TRANS SPORT .......... 18
1990-93
TRANS SPORT .......... 18
1982-91
6000 ........................... 28
SATURN
1991-94
SC, SL, SL1, SL2 ....... 28
1-800-621-3695x3
SI 10/08 - GM1504F (3000499F)
Advertisement

Related Manuals for Scosche GM1504F


Summary of Contents for Scosche GM1504F
- Page 1 (GM1504) in 1982-2005 General Motors Vehicles. Scosche Industries, Inc. cannot be held responsible for discrepancies/inconsistencies that may occur due to the automobile manufacturing changes or options, or damage that may occur in the automobile during the installation of components while using this booklet.
-
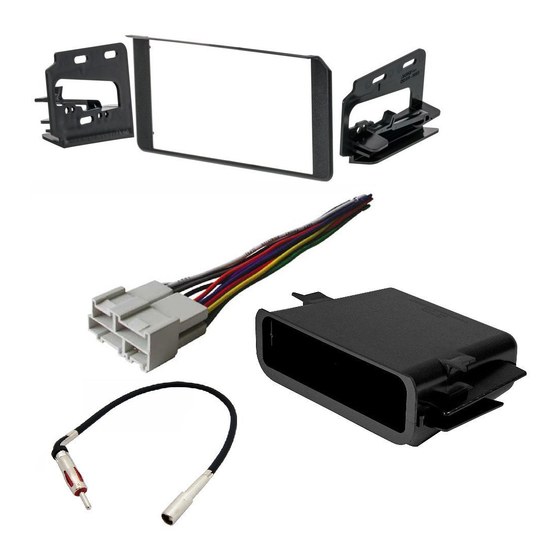
Page 2: Parts List
QUICK START GUIDE INTRODUCTION The Scosche In-Dash Installation Kit for 1982-2005 General Motors Vehicles provides the parts you need to mount your aftermarket car stereo/CD player into your vehicle’s dash. Refer to the individual instructions in this manual to remove your vehicle’s factory installed radio. - Page 3 QUICK START GUIDE PICK YOUR VEHICLE Locate your vehicle on the front cover of this instruction and disassemble the dash. FACTORY RADIO? Does your vehicle have the factory radio? If YES, proceed to next If NO, go to REMOVING FACTORY MOUNTING BRACKETS If your original radio is secured to the dash with factory mounting bracket(s), use a 10mm socket wrench to remove the nut and the bracket(s) as shown.
- Page 4 QUICK START GUIDE ASSEMBLY WITH UNIVERSAL BRACKETS ATTACHING THE SUPPLIED UNIVERSAL BRACKETS: (If no factory brackets are available) The supplied mounting panel and brackets have numbered holes, and each bracket is labeled with a letter. Before you attach the brackets to the panel, locate the instructions for your vehicle in this manual.
- Page 5 QUICK START GUIDE STEREO ASSEMBLY NOTE: The mounting sleeve must be removed from the stereo frst! Your stereo may be snapped into its sleeve. Slide the mounting sleeve (metal shroud) off the stereo towards the back. REMOVE SLEEVE FROM STEREO 1.
-
Page 6: Stereo Connection
USE THE APPROPRIATE SCOSCHE WIRING CONNECTOR (*not included) Wire up your new aftermarket stereo to the Scosche wiring connector and install the Scosche kit and new stereo assembly in your vehicle. Follow the dash disassembly for your specif c vehicle in reverse order to reassemble your dash. - Page 7 1982-1996 Buick Century Read pages 3-6 RADIO REMOVAL: for kit assembly. 1. Remove the four screws from under the top edge of the instrument cluster trim piece. 2. Remove the three screws and the two 7mm hex screws from below the instrument cluster trim piece. 3.
- Page 8 1992-94 Buick Le Sabre Read pages 3-6 1991-94 Buick Park Avenue for kit assembly. RADIO REMOVAL: 1. Extract the two screws from the top underside of the instrument trim bezel. 2. Remove the trim below the dash bezel on the left and right "A1"...
- Page 9 1982-89 Buick Skyhawk Read pages 3-6 1982-88 Oldsmobile Firenza for kit assembly. RADIO REMOVAL: 1. Disconnect the support strap from the glove box door. "C1" BRACKET USE HOLE #5 2. Remove the four screws securing the glove box liner. "C1" SOPORTE USA ABERTURA NO.
- Page 10 1982-88 Cadillac Cimarron Read pages 3-6 for kit assembly. 1982-90 Chevrolet Cavalier "VL" or Base Models 1982-88 Pontiac Sunbird/J-2000 "G" BRACKET RADIO REMOVAL: SOPORTE "G" 1. Remove the six screws from the dash trim panel. 2. Release the panel at the top frst, then carefully at "F"...
- Page 11 SOPORTE USA ABERTURA NO. 2 DERECHO NOTE: We recommended that you use the Scosche GM02 factory connector 2171 and the MDA-1 antenna adapter to eliminate the need to cut any of the factory plugs. USE THE INDICATED BRACKETS AND HOLE LOCATIONS. SEE PAGE 4.
- Page 12 1996-05 Chevrolet Astro Van Read pages 3-6 1996-05 GMC Safari Van for kit assembly. RADIO REMOVAL: 1. Extract (2) T-30 Torx bolts, one from each side of the top console area and pop out top half of center console assembly. 2.
- Page 13 Read pages 3-6 1989-91 Chevrolet Blazer/Jimmy-Full Size for kit assembly. 1989-91 Chevrolet/GMC Suburban 1989-91 Chevrolet/GMC Crew-Cab Dually Pickup RADIO REMOVAL: 1. Remove the eight screws securing the instrument/radio trim panel. 2. Extract the four screws from the steering column bottom trim piece, two on each side of the column. 3.
- Page 14 1982-92 Chevrolet Camaro Read pages 3-6 1982-84 Pontiac Firebird for kit assembly. RADIO REMOVAL: 1. Remove the four screws from the radio trim panel. 2. Pull the panel up and outward towards the right. 3. Remove the four screws from the radio bracket, pull the radio out of the cavity. Disconnect the antenna, speaker and all the electrical connections, then remove the radio.
- Page 15 1995-99 Chevrolet Cavalier Read pages 3-6 RADIO REMOVAL: for kit assembly. 1. Extract one screw from the front center defroster vent on top of the dashboard. 2. Using a panel removal tool carefully snap out the vent and remove it. "D1"...
- Page 16 1982-90 Chevrolet Celebrity Read pages 3-6 for kit assembly. RADIO REMOVAL: 1. Open the glove box and slide the box towards the rear of the car. "D1" BRACKET USE 2. Remove the fve 1/2 inch nuts from the backside HOLE #4 of the dash trim panel (directly above the glove box).
- Page 17 1996-00 Chevrolet Express Van Read pages 3-6 1996-00 GMC Savannah for kit assembly. RADIO REMOVAL: 1. Carefully pull out on 2171 RIGHT BRACKET dash instrument/ 2171 SOPORTE LEFT radio dash bezel to DERECHO BRACKET USE HOLE #8 2171 release spring clips, USE HOLE #8 SOPORTE USA ABERTURA...
- Page 18 1994-96 Chevrolet Lumina APV Read pages 3-6 for kit assembly. 1994-96 Oldsmobile Silhouette 1994-96 Pontiac Trans Sport RADIO REMOVAL: 1. Open the glove box door and remove the two Phillips-head screws at the right edge of the console. 2. Extract one 9/32 inch hex screw from the interior fan motor cover. 3.
- Page 19 1986-88 Chevrolet Monte Carlo Read pages 3-6 for kit assembly. 1986-87 Chevrolet El Camino RADIO REMOVAL: "A1" BRACKET "B1" BRACKET USE HOLE #1 LEFT SIDE USE HOLE #4 1. Remove the two "B1" SOPORTE USA LADO IZQUIERDA "A1" SOPORTE USA RIGHT SIDE screws from the top ABERTURA...
- Page 20 1986-94 Chevrolet S-10 Blazer Read pages 3-6 for kit assembly. 1986-93 Chevrolet S-10 Pickup 1986-94 GMC S-15 Jimmy LEFT SIDE RIGHT SIDE LADO IZQUIERDA 1986-93 GMC S-15 Pickup LADO DERECHO 1991-94 Oldsmobile Bravada RADIO REMOVAL: 1. Open the glove box door and remove the two screws from the radio trim panel.
- Page 21 1997-99 Chevrolet Venture Read pages 3-6 for kit assembly. 1997-99 Oldsmobile Silhouette 1997-99 Pontiac Trans Sport RADIO REMOVAL: 1. Open ashtray and extract one from lower right side of dash bezel. 2. Open 12V socket cover and extract one from lower left dash bezel. 3.
- Page 22 1982-96 Oldsmobile Cutlass Ciera Read pages 3-6 for kit assembly. RADIO REMOVAL: 1. Remove the ashtray from the mounting bracket. 2. Extract the two screws from the padded portion of the dash in the ashtray location. 3. Remove the single screw from the trim ring below the steering column and remove the trim. 4.
- Page 23 1986-88 Oldsmobile Delta 88 Read pages 3-6 for kit assembly. 1989-91 Oldsmobile Eighty-Eight Royale 1984-93 Oldsmobile Ninety-Eight LEFT SIDE RADIO REMOVAL: RIGHT SIDE LADO IZQUIERDA LADO DERECHO 1. Place the gear shift lever "C1" BRACKET SPACER "D1" BRACKET SPACER in the D1 position. Pull USE HOLE #4 EL ESPACIO USE HOLE #3...
- Page 24 1982-89 Oldsmobile Toronado Read pages 3-6 RADIO REMOVAL: for kit assembly. 1. Remove the fve screws from the top underside of the dash trim. "B1" BRACKET 2. Lower the tilt wheel and gently pull out on the trim piece from the USE HOLE #2 top side.
- Page 25 1987-91 Pontiac Bonneville Read pages 3-6 for kit assembly. RADIO REMOVAL: 1. Place the gear selector in low gear to gain clearance. 2. Gently pull on the edges of the radio panel to release the panel clips and remove the panel. SPACER EL ESPACIO 3.
- Page 26 1985-92 Pontiac Firebird Read pages 3-6 RADIO REMOVAL: for kit assembly. "A1" BRACKET USE HOLE #1 1. Carefully pull on the "B1" BRACKET "A1" SOPORTE USA ABERTURA edges of the radio USE HOLE #1 NO. 1 LEFT SIDE RIGHT SIDE "B1"...
- Page 27 1997-99 Pontiac Grand Prix Read pages 3-6 for kit assembly. RADIO REMOVAL: 1. Extract two panel fasteners from driver’s (left) side underdash cover. 2. Extract two 7mm hex screws from bottom edge of driver’s (left) side lower dash panel and carefully pull out on the upper panel to release two panel clips. Unplug and remove the dash piece.
- Page 28 1995-99 Pontiac Sunf re/Convertible Read pages 3-6 for kit assembly. RADIO REMOVAL: 1. Open glovebox then remove two screws along the right side of the radio/heater trim bezel. "B1" BRACKET USE 2. Carefully pull out on the right side of the radio/heater trim bezel and two HOLE #1 "B1"...
Need help?
Do you have a question about the GM1504F and is the answer not in the manual?
Questions and answers