Table of Contents
Advertisement
Quick Links
Advertisement
Table of Contents

Related Manuals for BOXLIGHT DLP


Summary of Contents for BOXLIGHT DLP
- Page 1 BOXLIGHT TraveLight DLP™ Digital Projector User’s Guide...
-
Page 2: Safety
™ Digital Projector User’s Guide Safety These safety precautions include information to prevent personal injury and damage to the projector. Safety Definitions WARNING: Statements identify conditions or practices that could result in personal injury. CAUTION: Statements identify conditions or practices that could result in damage to your equipment. -
Page 3: Lamp Safety
Lamp Safety WARNING: • To replace the lamp, turn off the power and unplug the power cord. To avoid burns, wait 45 minutes before opening the lamp door. Follow all instructions provided in this User’s Guide. See “Changing the Lamp Module” on page 34. •... - Page 4 The typical use is in a conference room, meeting room or auditorium. Declaration of Conformity We declare under our sole responsibility that the DLP Zoom Digital Projector conforms to the following directives and norms: Directive 89/336/EEC, Amended by 93/68/EEC...
-
Page 5: Table Of Contents
Table of Contents Safety ... 2 Safety Definitions...2 Projector Safety...2 Lamp Safety ...3 Battery Safety...3 Laser Safety...3 Preface ... 7 Package Contents ... 7 Optional Accessories ... 7 Accessories Overview... 8 Power Cord...8 Computer and Video Cables ...8 Others ...8 Product Profile ... - Page 6 ™ Digital Projector User’s Guide Language Menu ...24 Utilities Menu...24 Status Menu ...25 Reference ... 26 Positioning the Projector ...26 Remote Control Transmission Range ...28 Product Specification ...29 Timing Charts...30 Troubleshooting ...31 Power Indicator ...31 Remote Control ...31 Sound ...31 Image Source ...32 Image Quality ...32 Lamp ...33...
-
Page 7: Preface
In only minutes you can have your DLP Digital Projector ready to go. Just connect simply the projector to an image source, Computer, DVD, VCR., or HDTV. or Digital Camera. -
Page 8: Accessories Overview
™ Digital Projector User’s Guide Accessories Overview Power Cord There are four different power cords for options, US type, UK type, Euro type and China type. The appropriate Power Cord is included according to your geograhical location & safety requirement. If the standard kit does not satisfied your needs, then please contact your dealer for further service. -
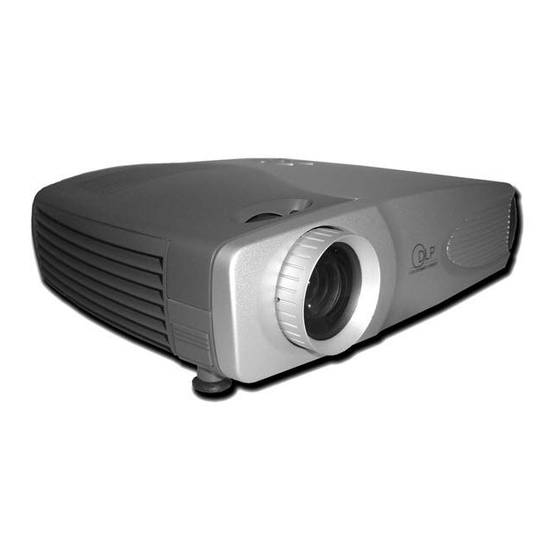
Page 9: Product Profile
Product Profile Front View Speaker Zoom Ring Focus Ring Lens Cover Rear View Kensington Security Lock Bottom Panel Fan Cover Ceiling Mounted Screw NOTE: • With ceiling installations, use approved mounting hardware & M4 screw. Min. distance from ceiling/rear wall: 30/50 cm, 12/20 inch for proper ventilation. For permanent installations, follow local codes. -
Page 10: Led Indicator & Control Pad On Projector
™ Digital Projector User’s Guide LED Indicator & Control Pad on Projector Power LED Indicator Lamp Ready LED Indicator EZKEY with function of Keystone, Volume, Frequency, and Brightness for quick selection. LED Indicators Message Status Plug in Power Cord Power on without source Power on with active source Power off in cooling stage System warming up... -
Page 11: Remote Control Instruction
Remote Control Instruction Power ON/OFF Up direction Left mouse button Left direction Down direction Keystone correction Setup menu Auto sync Video source: ie, composite or component Status of video information: ie, resolution, frequency. WARNING: To reduce the risk of injury to the eyes, do not look directly into the laser light emitted from the aperture on the Remote Control and do not point the laser light into anyone’s eyes. - Page 12 ™ Digital Projector User’s Guide The following buttons are located on the projector Control Pad or on the Remote Control Power Button Switch power on or off. Use the Power button to begin the warm-up period. The power light blinks green during warm-up and stays green when the projector is ready to use.
-
Page 13: Installation Steps
Installation Steps Getting Started 1. Place the projector on a flat surface. 2. Position the projector at the desired distance from the screen. 3. The projection distance is less than 33 feet (10M). CAUTION: • Proper ventilation is import. Don’t block ventilation openings. Never operate this projector in an enclosed area. -
Page 14: Connecting Input And Output Devices
™ Digital Projector User’s Guide Connecting Input and Output Devices The cables are color coded to assist you in making the connections. You can connect more than one image source at a time. The input source will be detected automatically when enable the “Auto Source” function is enabled in the Status Menu of the OSD MENU. -
Page 15: Starting The Presentation
Starting the Presentation Power on 1. Remove the lens cap 2. Make sure Lamp LED steady orange state. 3. Press Power on the remote control, or Power on the control pad, to turn on the unit. NOTE: • When powered on, both the fans & lamp will be turned on. The power indicator will begin to flash until a video source is found, and the lamp indicator will extinguish when lamp is in normal status. -
Page 16: Adjustment
™ Digital Projector User’s Guide Adjustment Adjusting Projector Angle Place the projector on a flat surface to position it in centre horizontally for best viewing. Height Adjustment Button Foot Adjusters Adjusting the Zoom and Focus Zoom Ring Focus Ring Adjust the projector angle using the Height Adjustment Buttons. -
Page 17: Adjusting The Keystone Control
Adjusting the Keystone Control Adjusting the Zoom and Pan ZOOM Four times as large Original size as the original size □ Make any necessary image adjustments by using the on-screen menus. (Refer page OSD Menu section for the details) ™ Digital Projector User’s Guide To adjust image vertically and make a square image. -
Page 18: Power Off
™ Digital Projector User’s Guide Power Off 1. Turn off the projector and image sources in the order listed here. a. Computer b. Projector c. Audio Source (if different from your video source or computer). d. Video source (such as VCR, DVD, HDTV). 2. -
Page 19: On-Screen-Display Menu Format And Description
On-Screen-Display Menu Format and Description The OSD menu will appear if any button is pressed thru using the control pad and remote control. Input Source OSD Source button on Remote control ™ Digital Projector User’s Guide Display Logo The projection image will appear in full brightness within 10-15 seconds and the “Digital Zoom Projector”... -
Page 20: Ezkey Osd
™ Digital Projector User’s Guide Ezkey OSD By repeatedly pressing EZKEY the following menu can be scrolled though. The user may adjust it to the desired level through keypads of Auto (-) and Source (+). Remote Control Buttons OSD Following menus/functions can be accessed through corresponding buttons on the remote control. -
Page 21: Osd Menu
OSD Menu Use the On-Screen-Display Menus shown below to adjust the projected image. To access and adjust the On-Screen-Menu do the following: 1. Press the Menu button on the remote control to select one of six on-screen menus: Main Menu, Setup Menu, Color Manager Menu, Language Menu, Utility Menu, and Status Menu. -
Page 22: Setup Menu
™ Digital Projector User’s Guide Setup Menu PC Mode Frequency Use arrow keys Left / Right ( / ) to adjust the sampling clock to eliminate flicker. Adjustment range: from low-high (0-100) by 31 steps. (Default value: auto detected) Tracking Use arrow keys Left / Right ( / ) to adjust the sampling number. -
Page 23: Color Manager Menu
Color Manager Menu PC Mode Color Temp. Use arrow keys Left / Right ( / ) to select different color temperature Adjustment range: from cool, normal, warm by 4 steps. (Default value: normal) Color Saturation Use arrow keys Left / Right ( / ) to adjust video saturation. Adjustment range: from color off to color level (0 –... -
Page 24: Language Menu
™ Digital Projector User’s Guide Language Menu Utilities Menu PC Mode PIP Size Use arrow keys Left / Right ( / ) to select different picture in picture size. Selection items: off/small/medium/large by 4 steps. (Default value: off) PIP Position Use arrow keys Left / Right ( / ) to select different picture in picture position. -
Page 25: Status Menu
Status Menu Auto Source To turn on or off the automatic function to detect one or more active input source. Auto Power Off To turn on or off the function for automatically lamp off when there is no active signal. Video Information To show resolution, H/V sync. -
Page 26: Reference
™ Digital Projector User’s Guide Reference Positioning the Projector To adjust the size of the projected image, refer to figures 1 below and table 1 on the next page for Projection Distances to increase/decrease the distance between the projector and the projection screen. - Page 27 Distance Width x Height 5 feet 31.12x23.34" - 37.34x28.01" (1.5m) (0.78x0.59 - 0.94x0.70m) 6.5 feet 41.49x31.12" - 49.79x37.34" (2m) (1.04x0.78 - 1.25x0.94m) 8 feet 49.79x37.34" - 59.75x44.81" (2.4m) (1.25x0.94 - 1.50x1.13m) 9 feet 58.09x43.57" - 69.71x52.28" (2.8m) (1.46x1.10-1.75x1.32m) 9.8 feet 62.24x46.68"...
-
Page 28: Remote Control Transmission Range
™ Digital Projector User’s Guide Remote Control Transmission Range The Remote Control shall function at a distance within the range that the IR Transceiver can receive. For best operation, kindly refer to the following illustration of the Remote Control and IR transceiver transmission range and distance. The projector is equipped with an IR Transceiver located at the front cover of the unit for the receipt of remote control... -
Page 29: Product Specification
Operating Relative Humidity Storage Relative Humidity Altitude (operating) Altitude (storage) ™ Digital Projector User’s Guide DLP™ Projection System 0.7" DMD x 1 XGA (1024 X 768 ) Native VGA, SVGA, XGA, SXGA, Macintosh 1500 ANSI Lumens 1000:1 1: 1.20 Manual Zoom / Focus 16.7 Million... -
Page 30: Timing Charts
™ Digital Projector User’s Guide Timing Charts The projector can display several resolutions. The following table outlines the resolutions that can be displayed by the projector. Table 2: ANALOG Computer Timings (Resolution and Refresh Rate【fV】) Resolution FH(kHz) 640 x 350 640 x 480 640 x 480 640 x 480... -
Page 31: Troubleshooting
Troubleshooting Power Indicator The power and lamp indicator on the control pad provides you with information about the condition of the projector. Indicator Light Status Lamp Blinking Ready Power Two blinks Three blinks Four blinks Five blinks Six blinks Seven blinks Eight blinks NOTE Every will last for 1/2 second and the interval for every blink is lasted 1 second. -
Page 32: Image Source
™ Digital Projector User’s Guide Image Source Symptom • Be sure to use the cable that comes with your projector. Some The S-Video image source does not appear. • Verify that the cables are connected correctly. Only the start-up screen •... -
Page 33: Lamp
Image is blocked Press Menu on the remote and go into the main menu of Utility • To disable PIP Size function PIP window can not • To check PIP Input selection display video • To adjust the frequency Image is “noisy” or streaked. -
Page 34: Maintenance
™ Digital Projector User’s Guide Maintenance Changing the Lamp Important! The lamp contains a trace amount of mercury. Some governments require special disposal of lamps containing mercury. Dispose of lamps in accordance with the law and any applicable local regulations. The lamp module should be replaced with a certified replacement part. -
Page 35: Changing The Battery Of Remote Control
NOTE: 1. The lamp contains a trace amount of mercury. Some governments required special disposal of lamps containing mercury. Dispose of lamps in accordance with the law and any applicable local regulations. 2. Do not loosen or remove any screw other than lamp unit or its cover. 3. -
Page 36: Cleaning
™ Digital Projector User’s Guide Cleaning Cleaning the Projection Lens Be sure the projector is powered-off and has cooled down. Unplug the projector. Remove the lens cap. Apply a non-abrasive camera lens cleaner to a soft, dry cloth. Lightly wipe the cleaning cloth over the lens. NOTE: Always keep lens cap on the projector when not in use. -
Page 37: Customer Support
Customer Support For most of your questions, it is suggested that you contact your dealer for assistance or ask your dealer to refer you to a service center. To facilitate after-sales service process, it is suggested that you fill in following information when you purchase this product.
Need help?
Do you have a question about the DLP and is the answer not in the manual?
Questions and answers