
Related Manuals for Clarke CRT130


Summary of Contents for Clarke CRT130
- Page 1 ROTARY TOOL SET MODEL NO: CRT130 PART NO: 6462000 OPERATION & MAINTENANCE INSTRUCTIONS ORIGINAL INSTRUCTIONS GC0720 -ISS 1...
-
Page 2: Specification
Sound power level 83 dB LpA (uncertainty factor = 3) GUARANTEE This CLARKE product is guaranteed against faulty manufacture for a period of 12 months from the date of purchase. Please keep your receipt as proof of purchase. This guarantee is invalid if the product is found to have been abused or tampered with in any way, or not used for the purpose for which it was intended. -
Page 3: Safety Precautions
SAFETY PRECAUTIONS WARNING: READ ALL INSTRUCTIONS. FAILURE TO FOLLOW ALL INSTRUCTIONS LISTED BELOW MAY RESULT IN ELECTRIC SHOCK, FIRE AND/ OR SERIOUS INJURY. THE TERM “POWER TOOL” IN ALL WARNINGS LISTED BELOW REFERS TO YOUR TOOL KIT. WORK AREA 1. Keep work area clean and well lit. Cluttered and dark areas invite accidents. - Page 4 5. Do not overreach. Keep proper footing and balance at all times. This enables better control of the power tool in unexpected situations. 6. Dress properly. Do not wear loose clothing or jewellery. Keep your hair, clothing and gloves away from moving parts. Loose clothes, jewellery or long hair can be caught in moving parts.
- Page 5 3. Hold the tool away from your face when switching on. 4. Keep your fingers away from rotating accessories. 5. Be careful not to accidently hit any foreign objects in the workpiece. 6. If an accessory jams, switch the tool off and disconnect from the power supply before attempting to free the accessory.
-
Page 6: Electrical Connections
ELECTRICAL CONNECTIONS WARNING: READ THESE ELECTRICAL SAFETY INSTRUCTIONS THOROUGHLY BEFORE CONNECTING THE PRODUCT TO THE MAINS SUPPLY. This product is provided with a standard 13 amp, 230 volt (50Hz), BS 1363 plug, for connection to a standard, domestic electrical supply. Should the plug need changing at any time, ensure that a plug of identical specification is used. -
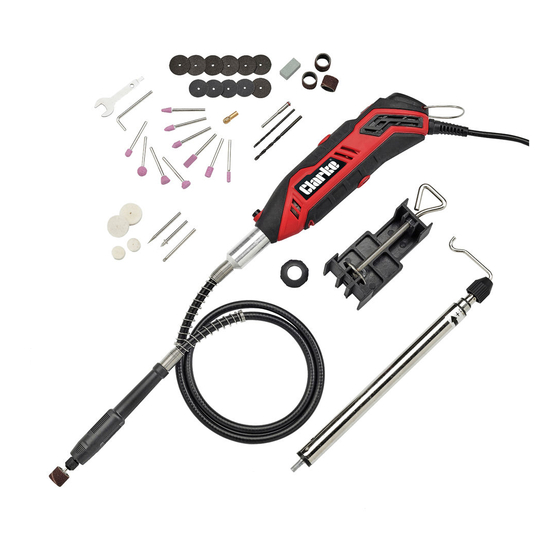
Page 7: Carton Contents
CARTON CONTENTS The following items should be supplied. If any parts are missing or damaged, please contact the dealer where you purchased the rotary tool. • Rotary tool • Flexible drive • Tool stand clamp • Telescopic tool stand column •... -
Page 8: Assembling Sanding Bands
FITTING DISCS & GRINDING STONES TO THE MANDREL 1. Mount the selected disc on to the mandrel as shown, ensuring the two washers are in place. • DO NOT overtighten the screw. FITTING CLOTH POLISHING WHEELS 1. Screw the cloth wheel onto the mandrel firmly but do not overtighten. - Page 9 To fit a collet, proceed as follows. 1. Press and hold down the spindle lock. • It may be necessary to rotate the chuck to fully engage the spindle lock. 2. Remove the chuck by rotating the chuck sleeve in an anti-clockwise direction.
- Page 10 5. Insert the accessory into the collet as far as it will go. 6. Press and hold down the spindle lock and tighten the chuck sleeve using the spanner supplied. REMOVING THE ACCESSORY FROM THE COLLET 1. Press and hold down the spindle lock. 2.
-
Page 11: Operation
5. At the opposite end of the flexible drive rotate the drive until the hole in the flexible drive shaft lines up with the hole in the outer part so that the locking rod can be inserted. • The spanner may now be used to tighten the collet and secure the mandrel. -
Page 12: Operating Speeds
TOOL ROTATIONAL SPEEDS Speed indicator position 13,000 17,500 23,000 27,200 29,500 31,600 OPERATING SPEEDS The following speeds are for guidance for working with different materials.. Stone Steel Aluminium, Polymer, Wood brass plastic Grinding stones Abrasive disc Sanding bands Diamond engraver Polishing bobs Parts &... -
Page 13: Cleaning And Maintenance
CLEANING AND MAINTENANCE WARNING: MAKE SURE THAT THE TOOL HAS BEEN DISCONNECTED FROM THE POWER SUPPLY BEFORE REMOVING OR FITTING A COLLET OR ACCESSORY 1. ALWAYS unplug the tool from the mains supply and ensure it is switched OFF when performing maintenance tasks. 2. -
Page 14: Component Parts
COMPONENT PARTS No Description No Description Chuck sleeve Carbon brush Collet 10 Stator Cap body 11 Circuit board Rotor 12 Housing Spindle lock button 13 Switch Bearing 968z 14 Hanger Bearing 626z 15 Cable & plug Bearing sleeve 16 Screw Parts &... -
Page 15: Declaration Of Conformity
DECLARATION OF CONFORMITY Parts & Service: 020 8988 7400 / E-mail: Parts@clarkeinternational.com or Service@clarkeinternational.com...
Need help?
Do you have a question about the CRT130 and is the answer not in the manual?
Questions and answers