
Related Manuals for DeviceWell HDS6506


Summary of Contents for DeviceWell HDS6506
- Page 1 HDS6506 Users’ Manual SWITCHER Model: HDS6506 VER 3.1 Website: www.devicewell.com Email: support@devicewell.cn...
-
Page 2: Precautions
HDS6506 Precautions About this device: Copyright: ●This device belongs to the When using this unit for video and/or audio switching, publishing over the Internet, or the high-frequency video processing like, in some cases it may be necessary to equipment. Therefore, please strictly... -
Page 3: Table Of Contents
HDS6506 Contents Precautions ..........................2 Overview ........................... 5 Introduction ......................5 Size: 442.0mm× 220.0mm× 43.6mm .................. 6 Interface Specification ....................... 6 Interface Introduction ..................6 TALLY ........................8 Parameters ......................10 Functional Characteristics ....................11 Control Panel and Interface ..................... 12 Control Panel .................... - Page 4 HDS6506 6.4.2 Wipe Transitions ..................27 6.4.3 FADE Transitions ..................27 6.4.4 PIP Picture in picture effects ............... 28 6.4.5 POP Picture out picture effects ..............29 6.4.6 Luma KEY ....................31 6.4.7 Panels for Luma Key ................... 32 6.4.8 Chroma KEY ....................32 6.4.9 Panels for Chroma Key ................
-
Page 5: Overview
The built-in menu display function can be more intuitive. Efficiently set up the device. DeviceWell six-channel switcher HDS6506 is a 4-channel SDI, 2-channel HDMI and 2-channel DVI-I input, 2-channel SDI and 1-channel HDMI output PGM live, 1-channel SDI and 1-channel HDMI output Screen monitoring, suitable for live performance, course recording and in-shed navigation;... -
Page 6: Size: 442.0Mm× 220.0Mm× 43.6Mm
HDS6506 2. Size: 442.0mm× 220.0mm× 43.6mm Unit: mm 3. Interface Specification Interface Introduction The DeviceWell HDS6506 interface is shown below. Website: www.devicewell.com Email: support@devicewell.cn... - Page 7 HDS6506 Definition Description POWER Power switch Extended monitor power output DC12V DC12V Main power input RS422/DB15 Optional camera RS422 and DB15 pin TALLY interface (optional) RJ45 Network control & upgrade Audio OUT RCA audio output Audio IN RCA audio Input...
-
Page 8: Tally
HDS6506 TALLY DB-9Pin Interface Pin Definition Diagram (Female) RS-422 RS-485 DATE- DATE+ 一 一 一 一 一 一 一 一 一 一 Website: www.devicewell.com Email: support@devicewell.cn... - Page 9 HDS6506 Function Function PGM-IN1 PVW-IN1 PGM-IN2 PVW-IN2 PGM-IN3 PVW-IN3 PGM-IN4 PVW-IN4 PGM-IN5 PVW-IN5 PGM-IN6 PVW-IN6 Note:PIN1 PIN2 not used. TALLY : Online schematic Note:Tally LED: for external display device Tally output : Active low (Tally LED is lit) High level is invalid (Tally out is off)
-
Page 10: Parameters
HDS6506 Parameters Input signal SDI high-definition serial digital video signal Bit rate 143Mbps~2.97Gbps Connector BNC meets the IEC169-8 standard Reflection loss >15dB 5MHz~3GHz SDI Input Signal amplitude 800mV± 10% 75Ω Impedance 100m Belden 1694A high definition Equilibrium 200m Belden 8281A high definition... -
Page 11: Functional Characteristics
HDS6506 1 way analog balanced audio, 2 way analog stereo Input input Output RCA stereo output AUDIO Response frequency 550-3.6KHz, < +/-3dB < 3% > 50dB 4. Functional Characteristics Supports up to 4 camera input sources Camera Input Multiview Output... -
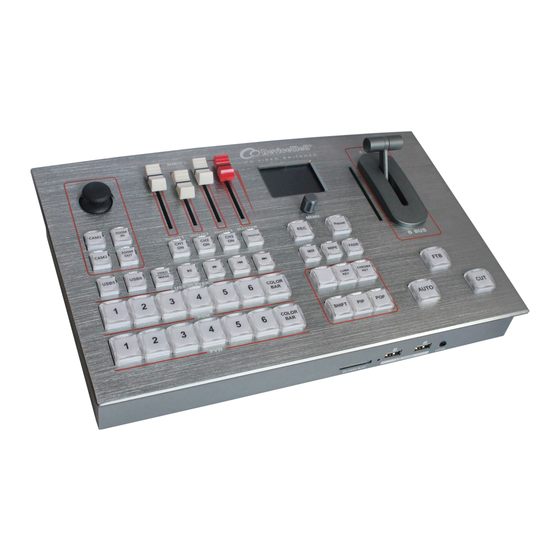
Page 12: Control Panel And Interface
HDS6506 1. Media management function, support 2 USB 10. Support 6 screen split monitoring, digital media playback, you can choose to play clock, analog clock display; videos or pictures. 11. Support PIP/POP function, the size and 2. Support SD card to record PGM position of the sub-window can be adjusted 3. -
Page 13: Control Panel
HDS6506 Control Panel 5.1.1 Area Description Name Description Control camera Camera control area Mainly for audio following, embedding and Mixer mixing settings. LCD Menu&Knob Display menu information and system status. T-bar system Manual control transfer USB multimedia Control the USB player PVW&... -
Page 14: Key Description
HDS6506 5.1.2 Key Description 1.Camera control area & mean cameras 1 and 2 respectively There are two cameras corresponding to the button selection. After CAM1 to CAM2 are lit, you can press & control the camera's distance. :Close/longer distance :Far/shorter distance 2.Mixer... - Page 15 HDS6506 3.LCD Menu LCD menu is mainly divided into status display and menu settings. The knob control menu is divided into 3 states: 1. Clockwise rotation to downward or larger value. 2. Counter clockwise rotation to upwards or small numbers.
- Page 16 HDS6506 Mixed effect, yellow indicates that it has been chosen. WIPE effects, with the use of the arrow keys, the settings are set through the menu function. Fade in and fade out special effect 7. Integrated control area The main purpose is to control the special effects of switcher. Before you use them, please be sure to read them so that you can operate the equipment.
- Page 17 HDS6506 Among them, USB5 and USB6 are control choices, and USB5 is USB5.VD/PIC chooses video or picture, and default is playing video. Playback and pause Speed, the maximum can be 32 times Previous, Press twice in order to take effect Next 9.
-
Page 18: Operation Description
HDS6506 6. Operation Description Introduction of multiview output PVW and PGM are preview and Program respectively, as show below: Preview Program There are 6 windows below, which are input source monitoring, SDI and USB or DVI. Website: www.devicewell.com Email: support@devicewell.cn... -
Page 19: Pgm And Pvw Switching
HDS6506 The lower right corner is the information display of the switcher, the digital clock, the analog clock and the system state of the switcher (CH1-CH3 audio is the source of the audio channel in the right state). PGM and PVW switching 6.2.1... - Page 20 HDS6506 If the right picture is shown to indicate that the calibration is completed, the 1 and 2 keys pressed before can be released. The picture on the left shows the status of the push indicator light from bottom to top.
-
Page 21: Transition Control
6.2.2 Transition Control The control mode of the transition of HDS6506 portable switcher is mainly divided into two kinds. One is the transition with special effect and the other is the transition without the special effect. 1. No transition special effect: Press... -
Page 22: Pgm And Pvw Channel Selection
HDS6506 If you find the PGM output is black and turn black, check whether the FTB button is pressed (blinking). Press down the black field again. 6.2.4 PGM and PVW channel selection The key board PGM corresponds to the 1-6 channel in PVW, which is the 6 sub screen under the 10 picture segmentation. -
Page 23: And 6 Channel Source Switching In Pvw
HDS6506 6.2.5 5 and 6 channel source switching in PVW Among them, 5 and 6 channels have 4 kinds of signal sources, which are DVI, USB, HDMI, VGA, can be set by button on control panel.. of the integrated control area. Press to select the key source 5 First press (do not release) or 6 in the PVW that needs to be switched. -
Page 24: Sd Card Record
HDS6506 Press Select USB5 or USB6 to select the USB channel to be controlled, and USB5 correspond to the USB5 of the front interface panel. 6.2.7 SD Card Record Insert the SD card after connecting the device first. (Note: Plug in the power and wait the device working properly, then insert the SD card, the... -
Page 25: Audio Settings
HDS6506 re-powering; if the inserted SD card does not recognize the remaining capacity, please re-insert the SD card or replace the SD card. The LED will flash during recording, and the status of the recording will be displayed in real time in the status bar of the switcher. - Page 26 HDS6506 Following mode The device has no audio output on the device. Using the knob to select the audio following mode in the LCD menu, the output volume can be controlled by opening the MASER audio switch, and the CH1 ON, CH2 ON, and CH3 ON cannot be operated under the audio following mode.
-
Page 27: Special Effect Operation Description
HDS6506 The rotary knob channel will be switched and rotated to the designated channel, then press the knob to confirm and exit. If you keep rotating counter clockwise, you can exit the audio status page settings. Special effect operation description Mix Transitions 6.4.1... -
Page 28: Pip Picture In Picture Effects
HDS6506 switch. 6.4.4 PIP Picture in picture effects The T-bar operates in the B-BUS state. Clicking on the PIP button will cause a small screen to appear in the upper left corner of the preview. The source signal of the SDI1 is displayed by default. -
Page 29: Pop Picture Out Picture Effects
HDS6506 PIP size and position You can use the knob to set the parameters of the PIP picture-in-picture, as follows: Horizontal position setting: The value from the top left to the top right is 0-1280, and the value of each rotation knob is increased/decreased by 10. - Page 30 HDS6506 At this time, the information on the LCD screen will be switched to the POP picture-out-picture setting. After pressing the knob, it can be set according to the requirements. As shown below Screen Select Horizontal Vertical Display size Large...
-
Page 31: Luma Key
HDS6506 POP size and position You can use the knob to set the parameters of the POP drawing, as follows Screen selection setting: You can select 1/2 two screens. Horizontal position setting: The value from the top left to the top right is 0-960, and the value of each rotation knob is increased/decreased by 10. -
Page 32: Panels For Luma Key
HDS6506 6.4.7 Panels for Luma Key Switch the video or picture of the black background white font to the PVW preview window, and turn on the Luma KEY brightness key function. At this time, the LCD will display a Luma key... -
Page 33: Panels For Chroma Key
HDS6506 6.4.9 Panels for Chroma Key Switch the blue background or green background to the PVW preview window. When the KEY2 chroma key function is enabled, a parameter setting interface of the chroma key will appear on the LCD screen. Select the background of your key through the knob. The image is achieved by CUT/AUTO/T-Bar, and the image you want to superimpose appears in the PGM;... -
Page 34: System Setting
HDS6506 6.5.1 System Setting After turning the knob to the system setting, you can click the knob to enter the system setting submenu, as shown below System Setting Language English Screen brightness Backlight status Bright Backlight time Time setting Analog... -
Page 35: Device Info
HDS6506 6.5.4 Device Info. Device Info. Software Version 0.1.0.0 Exit 7. Failure and Maintenance Common Faults and Solutions (1) The output image is disturbed and may be disturbed by other devices. (2) When plugging in the audio and video interface, if there is obvious static electricity, the device power ground wire may not be good grounding, please ground in the correct way;... -
Page 36: Maintenance
HDS6506 Maintenance Use a soft, dry cloth to clean the device. Do not use alcohol, paint thinner or benzene to clean. Make sure that the device is stored and operated in an environment away from liquids and stains. 7.2.1 Warranty information...
Need help?
Do you have a question about the HDS6506 and is the answer not in the manual?
Questions and answers