
Related Manuals for DeviceWell HDS7106


Summary of Contents for DeviceWell HDS7106
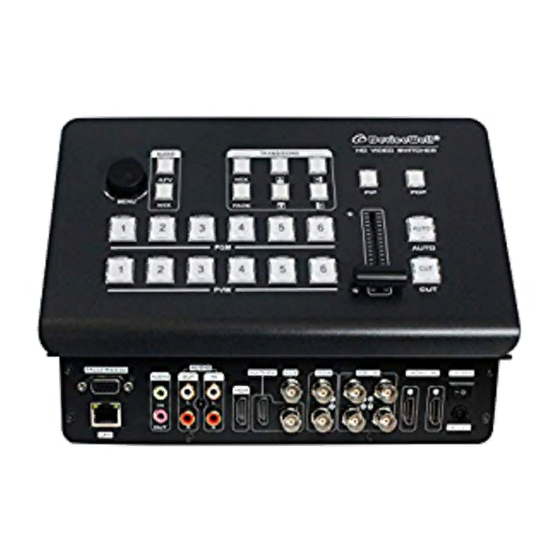
- Page 1 HDS7106 Users’ Manual SWITCHER Model: HDS7106 VER 1.0 Website: www.devicewell.com Email: support@devicewell.cn...
-
Page 2: Table Of Contents
HDS7106 Contents Overview ........................... 3 Introduction ......................3 Functional characteristics ....................4 Software panel partition introduction ................5 Software operation instructions..................6 Audio Control Area ..................... 6 Transition Effect Control Area ................9 PGM & PVW Selection ..................11 Switching table putter ..................15 Integrated Control Area .................. -
Page 3: Overview
The HDS7106 supports 4 channels of broadcast SDI and 2 channels of HDMI for a total of six video signals. The external preview signal can be output synchronously. The HDS7106 supports SDI embedded audio + external analog audio. -
Page 4: Functional Characteristics
HDS7106 2. Functional characteristics The DeviceWell HDS7106 6-channel HD video switcher is a multi-function switcher that requires no special knowledge and can be used for video switching and audio mixing with simple operation. This unit can be used in radio and television, live broadcast and various activities. -
Page 5: Software Panel Partition Introduction
HDS7106 After opening the software, you can see the entire layout of the button panel, as shown below. Name Description Audio Control Mainly for Audio Follow and mix settings. Transition Effect Control Select transition effects PVW& PGM Select Live broadcast and preview selection... -
Page 6: Software Operation Instructions
HDS7106 Audio Control Area How to use the audio follow mode: 1、Press the AFV (Follow) button on the operation panel, the AFV button will light blue at this time, indicating that the audio follow mode is turned on. 2、 The channels of the audio follow mode are IN1-SDI1, IN2-SDI2, IN3-SDI3, IN4-SDI4, IN5-HDMI5, and IN6-HDMI6. - Page 7 HDS7106 3、If you need to adjust the audio output volume, you can adjust the audio volume by adjusting the VOL1 volume progress bar on the right side. The more you slide to the right, the louder the volume. As shown below Note: CH2 and VOL2 are not operational at this time.
- Page 8 HDS7106 2、At this time, you can arbitrarily assign two channels of audio for mixing operation through the CH1 and CH2 buttons (you can do a pull-down selection). The channels assigned by the mix are IN1-SDI1, IN2-SDI2, IN3-SDI3, IN4-SDI4, IN5-HDMI5, IN6-HDMI6, XLR_IN, RCA_IN. Under the mix assignment mode, there are two additional audio add-on functions.
-
Page 9: Transition Effect Control Area
HDS7106 Transition Effect Control Area There are 3 transition modes: MIX transitions, FADE, and Wipes, where the Wipes include: up, down, left, and right. In the six transition modes, one transition mode can be arbitrarily selected for transition switching. As shown below ... - Page 10 HDS7106 FADE in and out, and A gradually darkens until it is completely black, and then gradually changes from black to B. Four special effects wipe transitions There are 4 types of wipe transition modes: up/down/left/right. Up transition: Click on the effect control area (press the blue light afterwards), and then click or use the T-bar or AUTO to switch.
-
Page 11: Pgm & Pvw Selection
HDS7106 Left transition effect, the A picture is unchanged, and the B picture is gradually drawn in the left direction until the picture completely becomes B. Right transition: Click on the effect control area (press the blue light), then click or use the fader or AUTO to switch. - Page 12 HDS7106 Multiview output window introduction PVW and PGM are the preview and live output respectively, as shown below. There are 6 windows below which correspond to input source monitoring, corresponding to buttons 1 – 6 on the control panel of the switcher.
- Page 13 HDS7106 PGM & PVW Output Signal When the switcher software control panel is opened, 1 (PGM) and 2 (PVW) in the button panel will light red and green respectively, and the live and preview signals in the output multi-screen monitor are 1 (PGM). ) and 2 (PVW), the signal sources are SDI IN1 and SDI IN2, respectively.
- Page 14 HDS7106 The effect chart is as follows: You can also switch between the PGM1-6 signal and the PVW1-6 signal in the button panel. Website: www.devicewell.com Email: support@devicewell.cn...
-
Page 15: Switching Table Putter
HDS7106 Switching table putter Open the software control panel to see the AUTO, CUT and putter sections in the middle. This section controls the switcher's transition operation. The effect is as follows. When operating the software control panel's audio control area, transition control area, and PGM and PVW control areas, you need to switch by pressing the AUTO/CUT/Pusher. -
Page 16: Integrated Control Area
HDS7106 Integrated Control Area In the software control panel, you can also use the PIP picture-in-picture and POP picture-out functions. The picture is displayed as shown below. Website: www.devicewell.com Email: support@devicewell.cn... - Page 17 HDS7106 PIP picture-in-picture special effects operation Press the PIP button in the software control panel, the button will display a blue light, indicating that the picture-in-picture function is enabled. At this time, you can make a drop-down selection in the border switch, border width, border color and display screen size, as shown below.
- Page 18 HDS7106 Output resolution adjustment When the S-Type button is selected, the resolution of the output screen can be adjusted, as shown in the figure below. Website: www.devicewell.com Email: support@devicewell.cn...
Need help?
Do you have a question about the HDS7106 and is the answer not in the manual?
Questions and answers