
Related Manuals for DeviceWell HDS9106


Summary of Contents for DeviceWell HDS9106
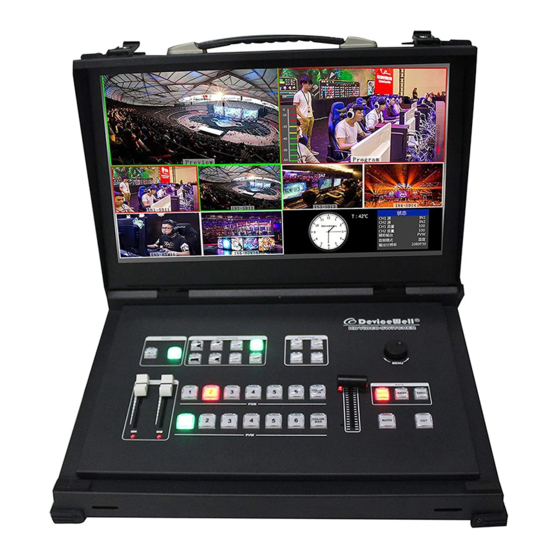
- Page 1 HDS9106 Users’ Manual SWITCHER Model: HDS9106 VER 1.0 Website: www.devicewell.com Email: support@devicewell.cn...
-
Page 2: Precautions
HDS9106 Precautions About this device: Copyright: ●This device belongs to the When using this unit for video and/or audio switching, publishing over the Internet, or the high-frequency video processing like, in some cases it may be necessary to equipment. Therefore, please strictly... -
Page 3: Table Of Contents
HDS9106 Contents Precautions ..........................2 Overview ........................... 4 Introduction ......................4 Functional characteristics ....................5 Preparation Before Installation ..................6 Equipment Unpacking ....................... 7 Size: 255*160*60mm ..................7 Interface Specification ....................... 8 Interface Introduction ..................8 TALLY Interface ....................9 Parameters ...................... -
Page 4: Overview
The HDS9106 supports 4 channels of broadcast SDI and 2 channels of HDMI for a total of six video signals. The external preview signal can be output synchronously. The HDS9106 supports SDI embedded audio + external analog audio. -
Page 5: Functional Characteristics
HDS9106 2. Functional characteristics The DeviceWell HDS9106 6-channel HD video switcher is a multi-function switcher that requires no special knowledge and can be used for video switching and audio mixing with simple operation. This unit can be used in radio and television, live broadcast and various activities. -
Page 6: Preparation Before Installation
HDS9106 3. Preparation Before Installation Caution ●During transportation, handling, and installation of switchboard equipment, avoid collisions between the switchgear equipment and doors, walls, shelves, etc. ●When the equipment is unpacked and transported, it is strictly forbidden to put it down and drag it gently to avoid damage to the switchboard equipment. -
Page 7: Equipment Unpacking
HDS9106 4. Equipment Unpacking When unpacking inspection, if the sealing label or packaging is found to be damaged, stop unpacking and report the situation to the equipment dealer. If the quantity of the goods is correct and the packaging is intact, the goods can be inspected. -
Page 8: Interface Specification
HDS9106 5. Interface Specification Interface Introduction The DeviceWell HDS9106 interface is shown below. Definition Description TALLY/RS232( reserved) TALLY / serial port control (reserved) Network upgrade AUDIO IN/OUT 3.5mm audio input and output AUDIO OUT RCA audio output AUDIO IN RCA audio input... -
Page 9: Tally Interface
HDS9106 TALLY Interface Function Function PGM-IN1 PVW-IN1 PGM-IN2 PVW-IN2 PGM-IN3 PVW-IN3 PGM-IN4 PVW-IN4 PGM-IN5 PVW-IN5 PGM-IN6 PVW-IN6 Note:PIN1 PIN2 not used. TALLY : Online schematic Note:Tally LED: for external display device Tally output : Active low (Tally LED is lit) High level is invalid (Tally out is off) Website: www.devicewell.com... -
Page 10: Parameters
HDS9106 Parameters Product Name Clamshell switcher Product Model HDS9106 Input signal SDI/HDMI Video Signal Bit rate 270Mbps~3Gbps Connector Standard Reflection loss >15dB 5MHz~3GHz Signal amplitude 800mV± 10%(SDI/ HDMI) Video Signal 100Ω (HDMI) 75Ω(SDI) Impedance Input Equilibrium Adaptive 480i/576i, 480p/576p, 720p, 1080i, 1080p... -
Page 11: Control Panel And Interface
HDS9106 6. Control Panel and Interface Before using the HD Switcher HDS9106, please take a few minutes to read this section. This chapter will introduce you the panel and interface of the HD switcher to facilitate your subsequent use and operation. -
Page 12: Key Description
HDS9106 Name Description Knob Control Use the knob to set menu information Audio fader Main control output volume PVW& PGM Select Live broadcast and preview selection T-Bar Manual control of transitions 6.1.2 Key Description 6.1.2.1 Audio Control Area How to use the audio follow mode: 1. - Page 13 HDS9106 3. The volume adjustment of the audio follow mode is controlled by the mixer of the operation panel; pressing the AFV button of the following mode, the corresponding CH1 light will also be lit, and the audio fader is pushed up, the volume is higher.
- Page 14 HDS9106 2. The channels assigned by the mix are IN1-SDI1, IN2-SDI2, IN3-SDI3, IN4-SDI4, IN5-HDMI5, IN6-HDMI6, XLR_IN, RCA_IN. The mix assignment mode is followed by two additional audio add-on functions. XLR stands for 3.5mm audio interface, RCA stands for RCA audio interface;...
- Page 15 HDS9106 The CH2 audio channel is selected in the same way as the CH1. The knob rotates clockwise once, and the background color appears in the CH2 character in the menu. It indicates that the second channel audio is currently adjusted.
-
Page 16: Transition Effect Control Area
HDS9106 6.1.2.2 Transition Effect Control Area There are 3 transition modes: MIX transitions, FADE, and Wipes and INV mirror transition where the Wipes include: up, down, left, and right. MIX Transition The MIX effect is a transition effect. After setting the transition, the original live screen will be lightened at the main output and then know that the transition to the new live screen is complete. - Page 17 HDS9106 Four special effects wipe transitions There are four transition modes for WIPE wipes. Up transition: Click on the effect control area (press the green light afterwards), and Click on the effect control area (press the green light after pressing).and then click or use the T-bar or AUTO to switch.
-
Page 18: Integrated Control Area
HDS9106 6.1.2.3 Integrated Control Area PIP Effect Picture-in-picture effects: Press the control panel (press the green light afterwards), and then click or use the T-Bar or AUTO to switch. The effect is as follows. At this time, the information on the LCD screen will be switched to the PIP setting. - Page 19 HDS9106 POP size and position You can use the knob to set the parameters of the PIP picture-in-picture, as follows (the horizontal/vertical position below is the smallest display image) Horizontal position setting: The value from the top left to the top right is 0-1440, and the value of one rotation per knob is increased/decreased by 10.
- Page 20 HDS9106 At this time, the information of the multi-screen monitor output will be switched to the POP picture-out-picture setting. After pressing the knob, it can be set according to the requirements, as shown below. At this time, the information on the LCD screen will be switched to the POP picture drawing setting.
-
Page 21: Pgm & Pvw Selection
HDS9106 6.1.2.4 PGM & PVW Selection Multiview output window introduction PVW and PGM are the preview and live output respectively, as shown below. There are 6 windows below which correspond to input source monitoring, corresponding to buttons 1 – 6 on the control panel of the switcher. - Page 22 HDS9106 PGM & PVW Output Signal After the device is connected to the video source, press 1 (PGM) and 2 (PVW) in the button panel. The live and preview signals in the output multi-screen monitor are 1 (PGM) and 2 (PVW) respectively. The signal sources are SDI IN1 and SDI IN2, respectively.
- Page 23 HDS9106 The color bar will be output when the button in the button panel is pressed. Website: www.devicewell.com Email: support@devicewell.cn...
-
Page 24: System Menu Settings
HDS9106 7. System menu settings Menu display In the menu bar, you can perform IP settings on the device, restore the system to factory settings, and change the language. In the default state of power on, press the knob to enter the main menu, as shown below. -
Page 25: Failure And Maintenance
HDS9106 Press the knob In the network settings menu, you can select in the IP acquisition: dynamic IP or static IP. After selecting the static IP, you can also set the IP address, subnet mask, and network management settings accordingly, and then save and return. -
Page 26: Maintenance
HDS9106 device power ground wire may not be good grounding, please ground in the correct way; otherwise it will easily damage the host and shorten the life of the mainframe. When RJ45 (generally: Computer network port) cannot control the Switcher, check whether the communication port set by the control software corresponds to the serial port of the connected device;...
Need help?
Do you have a question about the HDS9106 and is the answer not in the manual?
Questions and answers