Kollmorgen S700 Series Safety Manual
Hide thumbs
Also See for S700 Series:
- Safety manual (216 pages) ,
- Instruction manual (166 pages) ,
- Manual (138 pages)
Table of Contents
Advertisement
Available languages
Available languages
S700
Safety Guide
Edition: February 2017
Valid for HWR 02.30
Deutsch
English
Original Language is German. All other content is translated from the genuine German content.
Keep all manuals as a product component during the life span of the product. Pass all manuals to future users and owners of the product.
Bewahren Sie alle Anleitungen während der gesamten Nutzungs-
dauer des Produkts als Produktkomponente auf. Händigen Sie alle
Anleitungen künftigen Anwendern/Besitzern des Produkts aus.
Le manuel faisant partie intégrante du produit, conservez-le
pendant toute la durée de vie du produit. Remettez le manuel au
futur utilisateur ou propriétaire du produit.
Français
Italiano
Conservare il manuale per l'intera durata del prodotto. In caso di cam-
bio di proprietà il manuale deve essere fornito al nuovo utilizzatore
quale parte integrante del prodotto.
Сохраняйте все руководства как составную часть продукта в
течение всего срока его эксплуатации. Передавайте
руководство следующему пользователю или владельцу
продукта.
Русский
Advertisement
Chapters
Table of Contents

Related Manuals for Kollmorgen S700 Series


Summary of Contents for Kollmorgen S700 Series
- Page 1 S700 Safety Guide Edition: February 2017 Valid for HWR 02.30 Deutsch English Français Italiano Русский Original Language is German. All other content is translated from the genuine German content. Keep all manuals as a product component during the life span of the product. Pass all manuals to future users and owners of the product. Bewahren Sie alle Anleitungen während der gesamten Nutzungs- Conservare il manuale per l’intera durata del prodotto.
- Page 2 Translation of the original manual, printed in the Federal Republic of Germany All rights reserved. No part of this work may be reproduced in any form (by photocopying, microfilm or any other method) or stored, processed, copied or distributed by electronic means without the written permission of Kollmorgen Europe GmbH.
-
Page 3: Table Of Contents
1.5.1 Wichtige Hinweise 1.5.2 Anleitung für die mechanische Installation 1.6 Elektrische Installation 1.6.1 Wichtige Hinweise 1.6.2 Anleitung für die elektrische Installation 1.7 Inbetriebnahme 1.7.1 Wichtige Hinweise 1.7.2 Tastenbedienung / LED-Display 1.7.3 Basis Test 1.8 Fehlerbehebung Kollmorgen | wiki-kollmorgen.eu | February 2017... -
Page 4: Allgemeines
1.1 Allgemeines Dieses Handbuch beschreibt die digitalen Servoverstärker S700 (Standard Version, 1,5 A bis 72 A Nennstrom). Vollständige Informationen finden Sie in der Betriebsanleitung und weiteren Kollmorgen Dokumenten: Betriebsanleitung (PDF Format): Das Handbuch enthält Hinweise zur Installation und Konfiguration des Servoverstärkers. -
Page 5: Hinweise Für Die Online-Ausgabe (Pdf-Format)
Warnung vor einer Gefahr (allgemein). Die Art der Gefahr wird durch den nebenstehenden Warntext spezifiziert. Warnung vor gefährlicher elektrischer Spannung und deren Wir- kung. Warnung vor Gefahr durch heiße Oberfläche. Warnung vor Gefahr durch hängende Last. Warnung vor Gefahr durch automatischem Anlauf. Kollmorgen | wiki-kollmorgen.eu | February 2017... -
Page 6: Verwendete Abkürzungen
Sicheres Schrittmaß Sichere absolute Position Sicher begrenzte Geschwindigkeit Sicherer Stillstand Speicherprogrammierbare Steuerung SRAM Statisches RAM Sicheres Stillsetzen Sicherer Betriebshalt Synchron Serielles Interface Sicherer Geschwindigkeitsbereich Safe Torque Off, Wiederanlaufsperre V AC Wechselspannung V DC Gleichspannung Kollmorgen | wiki-kollmorgen.eu | February 2017... -
Page 7: Sicherheit
Verknüpfung zwischen dem Produkt und dem Handbuch, sie muss mit den Angaben auf der Titelseite dieses Handbuchs übereinstimmen. Wenn die Nummern nicht über- einstimmen, besuchen Sie das Tech-WIKI (http://www.wiki-kollmorgen.eu). Im Bereich "Download" finden Sie alle Handbuchversionen mit Bezug zur Hardware Revisions-Num- mer. - Page 8 50 V gesunken ist, bevor Sie Komponenten berühren. Funktionale Sicherheit Die Sicherheitsfunktion STO im S700 ist zertifiziert. Die Bewertung der Sicherheitsfunktion nach EN13849 oder EN 62061 ist abschließend durch den Anwender zu erstellen. Kollmorgen | wiki-kollmorgen.eu | February 2017...
-
Page 9: Warnhinweise Auf Dem Produkt
Isolierung (gem. EN 61800-5-1) gegenüber Systemkomponenten mit Leistungsspannung versehen sein, entsprechend der geforderten Prüfspannung der Appli- kation. Alle Kollmorgen Komponenten entsprechen diesen Anforderungen. Geräte nicht verändern Die Setup-Software kann verwendet werden, um die Einstellungen des Verstärkers zu ändern. -
Page 10: Bestimmungsgemäße Verwendung
Außenleitern und Gehäuse dürfen 2000V nicht überschreiten. Mit Gleichstrom versorgte Antriebe in Einzel- und Gruppeninstallationen Der S700 wurde weder von Kollmorgen, UL noch dem TÜV für den Ersatz der AC Netz- versorgung durch eine DC Versorgung untersucht - weder für Einzel- noch für Grup- peninstallation. -
Page 11: Nicht Bestimmungsgemäße Verwendung
Plastikfolie usw.). Legen Sie den Servoverstärker auf eine leitfähige Oberfläche. 1.3.2 Verpackung Die S700 Verpackung besteht aus einem recyclebaren Karton mit Einlagen. Maße S701...S712: (HxBxT) 125x415x350 mm Maße S724: (HxBxT) 155x415x350 mm Maße S748/S772: (HxBxT) 390x600x400 mm Kennzeichnung: Geräte-Typenschild außen am Karton Kollmorgen | wiki-kollmorgen.eu | February 2017... -
Page 12: Lagerung
Sie die Temperatur und warten Sie, bis der Verstärker auf unter 40 °C abgekühlt ist. 3. Entfernen Sie die Stecker. Trennen Sie den PE Anschluss zuletzt. 4. Ausbauen: Lösen Sie die Befestigungsschrauben und entfernen Sie das Gerät. Kollmorgen | wiki-kollmorgen.eu | February 2017... -
Page 13: System Reparatur
Gemäß den WEEE-2002/96/EG-Richtlinien u.ä. nimmt der Hersteller Altgeräte und Zubehör zur fachgerechten Entsorgung zurück. Die Transportkosten muss der Versender tragen. Setzen Sie sich mit Kollmorgen in Verbindung und klären Sie die logistische Abwicklung. Kollmorgen | wiki-kollmorgen.eu | February 2017... -
Page 14: Technische Beschreibung Und Daten
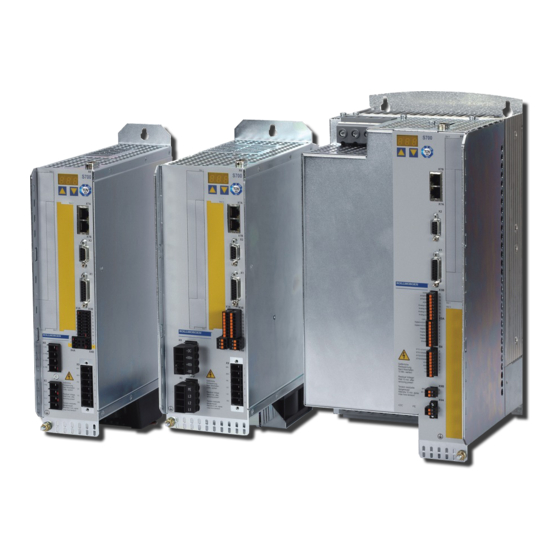
S700 Safety Guide | 1 Deutsch 1.4 Technische Beschreibung und Daten 1.4.1 Die digitalen Servoverstärker der Familie S700 Typenschlüssel Benutzen Sie den Typenschlüssel zur Produktidentifizierung, jedoch nicht für den Bestell- prozess, da nicht immer alle Merkmal-Kombinationen technisch möglich sind. Kollmorgen | wiki-kollmorgen.eu | February 2017... -
Page 15: Lieferumfang
3 x 208 V-10% … 3 x 480 V +10% (S7010...S7720) Überspannungskategorie III gem. EN 61800-5-1. DC Versorgung über den Zwischenkreis möglich (kontaktieren Sie Kollmorgen). 2 Analoge Sollwerteingänge. CANopen integriert (default: 500 kBaud), für Integration in CAN-Bus Systeme und für die Parametrierung mehrerer Verstärker über die PC-Schnittstelle eines Verstärkers. -
Page 16: Antriebssystem Mit S701
S700 Safety Guide | 1 Deutsch 1.4.3 Antriebssystem mit S701...S724 Kollmorgen | wiki-kollmorgen.eu | February 2017... -
Page 17: Antriebssystem Mit S748
S700 Safety Guide | 1 Deutsch 1.4.4 Antriebssystem mit S748...S772 Kollmorgen | wiki-kollmorgen.eu | February 2017... -
Page 18: Umgebungsbedingungen, Belüftung Und Einbaulage
X0/X8 mit bis zu 25mm² Leitung 2,5 Nm (22 in lbf) X0/X8 mit 25 bis 35mm² Leitung 4,5 Nm (40 in lbf) X3A, X3B, X4 Druckfederkontakte Druckfederkontakte, Schraubflansch 0,5 Nm (4,3 in lbf) Erdungsbolzen 3,5 Nm (31 in lbf) Kollmorgen | wiki-kollmorgen.eu | February 2017... -
Page 19: Technische Daten 110 / 230 V
SubD (Buchse) PC-Schnittstelle, CAN, ROD/SSI — SubD (Stecker) Mechanik Masse Höhe ohne/mit Stecker 345 / 379 348 / 382 Breite Tiefe ohne/mit Stecker 243 / 285 243 / 285 Weitere technische Daten siehe Betriebsanleitung. Kollmorgen | wiki-kollmorgen.eu | February 2017... -
Page 20: Technische Daten 230V
Masse Coldplate (S7480C, S7480A) 10,4 Höhe ohne/mit Stecker 345 / 379 348 / 382 386 / 505 Breite Tiefe ohne/mit Stecker 243 / 285 243 / 285 244 / 285 Weitere technische Daten siehe Betriebsanleitung. Kollmorgen | wiki-kollmorgen.eu | February 2017... -
Page 21: Sicherungen
Produkt-WIKI auf Seite "Speicherkarte" beschrieben. Die Speicherkarte darf nur bei ausgeschaltetem Servoverstärker gesteckt oder entfernt wer- den. Bei Einsatz eines Absolutwertgebers muss nach Einlesen der Parameter in ein neues Gerät eine Referenzfahrt durchgeführt werden. Kollmorgen | wiki-kollmorgen.eu | February 2017... -
Page 22: Safe Torque Off (Sto)
Wird die Funktion STO in einer Anwendung nicht benötigt, so müssen die Eingänge STO1- ENABLE und STO2-Enable direkt mit +24VDC verbunden werden. Der Servoverstärker ist nun nicht mehr als Sicherheitsbauteil im Sinne der Maschinenrichtlinie zu betrachten. Kollmorgen | wiki-kollmorgen.eu | February 2017... - Page 23 Eine Beschreibung der Testsequenz finden Sie in der Betriebsanleitung. Technische Daten STO1-Enable und STO2-Enable Daten Eingangsspannung 20V..30V Eingangsstrom 33mA – 40mA (Ieff) Spitzenstrom 100mA (Is) Reaktionszeit (fallende Flanke am STOx-Eingang bis zur STO1: 1ms Unterbechung der Energiezufuhr zum Motor) STO2: 2ms Kollmorgen | wiki-kollmorgen.eu | February 2017...
- Page 24 Anschlussbelegung S701...S724 Zum Erreichen von SIL CL3 / PLe wird der Schaltzustand der Impulssperre (Status) mit dem ASCII-Befehl OxMODE 70 auf einen der digitalen Ausgänge DIGITAL-OUT1 oder 2 (X3A/6 oder X3A/7) des S700 gelegt. Kollmorgen | wiki-kollmorgen.eu | February 2017...
- Page 25 S700 Safety Guide | 1 Deutsch Anschlussbelegung S748...S772 Zum Erreichen von SIL CL 3 / PLe wird der Schaltzustand der Impulssperre in der Sicher- heitssteuerung periodisch getestet. Kollmorgen | wiki-kollmorgen.eu | February 2017...
- Page 26 1. Bremsen Sie den Verstärker kontrolliert ab (Geschwindigkeits-Sollwert = 0 V). 2. Wenn Geschwindigkeit = 0 U/min, deaktivieren Sie den Verstärker (Enable = 0 V). 3. Bei hängender Last den Antrieb zusätzlich mechanisch blockieren 4. STO ansteuern (STO1-Enable und STO2-Enable = 0V) Kollmorgen | wiki-kollmorgen.eu | February 2017...
-
Page 27: Mechanische Installation
# 184). Montage Montieren Sie Servoverstärker und Netzteil nahe beieinander auf der lei- tenden, geerdeten Montageplatte im Schaltschrank. Erdung, EMV-gerechte Abschirmung und Erdung siehe Betriebsanleitung. Abschirmung Erden Sie Montageplatte, Motorgehäuse und CNC-GND der Steuerung. Kollmorgen | wiki-kollmorgen.eu | February 2017... -
Page 28: Elektrische Installation
Leistungskabel in ausreichendem Querschnitt nach EN 60204. Der Status des Verstärkers muss durch die Steuerung überwacht werden, um kritische Situationen zu erkennen. Verdrahten Sie den BTB/RTO-Kontakt in Reihe zur Not-Aus-Schal- tung der Anlage. Die Not-Aus Schaltung muss das Netzschütz betätigen. Kollmorgen | wiki-kollmorgen.eu | February 2017... -
Page 29: Anleitung Für Die Elektrische Installation
Sofern benötigt, externen Bremswiderstand anschließen (mit Absi- cherung) Hilfsspannung anschließen (max. zulässige Spannungswerte (➜ # 18)) Leistungsspannung anschließen (max. zulässige Spannungswerte (➜ # 18)) PC anschließen. Überprüfung End-Überprüfen der ausgeführten Verdrahtung anhand der verwendeten Anschlusspläne Kollmorgen | wiki-kollmorgen.eu | February 2017... -
Page 30: Inbetriebnahme
Servoverstärker etwa 30min einphasig mit der kleinsten zulässigen Versorgungsspan- nung an den Klemmen L1 / L2. Dadurch werden die Kondensatoren neu formiert. Das Anpassen von Parametern und die Auswirkungen auf das Regelverhalten wird in der Online Hilfe der Inbetriebnahmesoftware beschrieben. Kollmorgen | wiki-kollmorgen.eu | February 2017... -
Page 31: Tastenbedienung / Led-Display
: ein Menüpunkt nach unten, Zahl um eins verkleinern zweimal schnell hintereinander drücken : Zahl um zehn verkleinern rechte Taste gedrückt halten und linke Taste zusätzlich drücken : zur Zahleneingabe, Return-Funktion Name 1.7.2.1 Statusanzeige 1.7.2.2 Standard Menü Kollmorgen | wiki-kollmorgen.eu | February 2017... -
Page 32: Basis Test
CD-Laufwerksbuchstabe) ein. Klicken Sie OK und gehen dann wie oben beschrie- ben vor. Anschluss an serielle Schnittstelle des PC Schließen Sie die Übertragungsleitung an eine serielle Schnittstelle Ihres PC und an die seri- elle Schnittstelle (X6) des S700 an (➜ # 192). Kollmorgen | wiki-kollmorgen.eu | February 2017... - Page 33 S700 Safety Guide | 1 Deutsch 1.7.3.3 Minimale Verdrahtung für den Schnelltest S701...S724 ohne Last Diese Verdrahtung erfüllt keinerlei Anforderungen an die Sicherheit oder Funk- tionstüchtigkeit Ihrer Anwendung. Sie zeigt lediglich die für den Schnelltest erforderliche Mindestverdrahtung. Kollmorgen | wiki-kollmorgen.eu | February 2017...
- Page 34 S700 Safety Guide | 1 Deutsch 1.7.3.4 Minimale Verdrahtung für den Schnelltest S748...S772 ohne Last Diese Verdrahtung erfüllt keinerlei Anforderungen an die Sicherheit oder Funk- tionstüchtigkeit Ihrer Anwendung. Sie zeigt lediglich die für den Schnelltest erforderliche Mindestverdrahtung. Kollmorgen | wiki-kollmorgen.eu | February 2017...
- Page 35 Auswahl des Servoverstärkers. Brechen Sie die Auswahl ab indem Sie das Auswahlfenster schließen. Suchen und beseitigen Sie den Fehler, der die Kom- munikation verhindert. Starten Sie die Software erneut im Online-Modus. Kollmorgen | wiki-kollmorgen.eu | February 2017...
- Page 36 Der Setup-Wizard führt Sie durch die notwendigen Schritte bei der Basiskonfiguration Ihres Antriebes. Abhängig von der zu lösenden Aufgabe werden nur die Bildschirmseiten dar- gestellt, die benötigt werden. Das weitere Vorgehen ist in der S700 Betriebsanleitung beschrieben. Kollmorgen | wiki-kollmorgen.eu | February 2017...
-
Page 37: Fehlerbehebung
ARLPF / ARHPF vergrößern ARLP2 zu klein ARLP2 vergrößern Achse driftet bei Offset bei analoger Sollwertvorgabe nicht SW-Offset (Analog I/O) abgleichen Sollwert=0V korrekt abgeglichen AGND nicht mit CNC-GND der Steuerung AGND und CNC-GND verbinden verbunden Kollmorgen | wiki-kollmorgen.eu | February 2017... - Page 38 S700 Safety Guide | 1 Deutsch --- / --- Kollmorgen | wiki-kollmorgen.eu | February 2017...
- Page 39 2.5.2 Guide to Mechanical Installation 2.6 Electrical Installation 2.6.1 Important Notes 2.6.2 Guide to electrical installation 2.7 Setup 2.7.1 Important Notes 2.7.2 Key operation / LED display 2.7.3 Initial Drive Test 2.8 Trouble shooting Kollmorgen | wiki-kollmorgen.eu | February 2017...
-
Page 40: General
This manual describes the digital servo amplifiers of the S700 (standard version, 1.5 to 72 A nominal current). For full information refer to the Instructions Manual and additional Kollmorgen documents: Instructions Manual (PDF format): This manual provides instructions for installation and servo amplifier setup. -
Page 41: Using The Pdf Format
Warning of a danger (general). The type of danger is specified by the text next to the symbol. Warning of danger from electricity and its effects. Warning of danger from hot surface. Warning of danger from suspended loads. Warning of danger from automatic start. Kollmorgen | wiki-kollmorgen.eu | February 2017... -
Page 42: Abbreviations Used
Safe limited speed Safe operating stop SRAM Static RAM Safe stop Safe operational stop Synchronous serial interface Safe speed range Safe Torque Off V AC AC voltage V DC DC voltage Verein deutscher Elektrotechniker Kollmorgen | wiki-kollmorgen.eu | February 2017... -
Page 43: Safety
Hardware Revision Number on the cover page of the manual. If the num- bers do not match up, visit the Tech-WIKI (http://www.wiki-kollmorgen.eu). The 'Download' section contains the various manual versions based on the hardware version number. - Page 44 Thermal sensors, motor holding brakes and feedback systems built into the connected motor must have reinforced insulation (according to IEC61800-5-1) against system components with power voltage, according to the required application test voltage. All Kollmorgen com- ponents meet these requirements.
-
Page 45: Use As Directed
2000V. For the cases of DC input power for single and group installations S700 has not been evaluated by Kollmorgen, UL, or TÜV for replacing AC mains input with DC input - for either single or group installations. -
Page 46: Prohibited Use
Residual Voltage. Residual Voltage. Residual Voltage. Wait 5 minutes Wait 8 minutes Wait 10 minutes after removing power. after removing power. after removing power. If these signs are damaged, they must be replaced immediately. Kollmorgen | wiki-kollmorgen.eu | February 2017... -
Page 47: Handling
There is a danger of serious personal injury or death by electrical shock or electrical arcing. Switch off the main switch of the switchgear cabinet. Secure the system against restarting. Block the main switch. Wait at least 10 minutes after disconnecting. Kollmorgen | wiki-kollmorgen.eu | February 2017... -
Page 48: Maintenance And Cleaning
If parts of the drive system ( for example cables) must be replaced, proceed as follows: 1. Decommission the device (see chapter 2.3.4 "Decommissioning"). 2. Exchange the parts. 3. Check all connections for correct fastening. 4. Setup the system as described in this manual. Kollmorgen | wiki-kollmorgen.eu | February 2017... -
Page 49: Disposal
To dispose the unit properly, contact a certified electronic scrap disposal merchant. In accordance with the WEEE-2002/96/EC-Guidelines and similar, the manufacturer accepts returns of old devices and accessories for professional disposal. Transport costs are the responsibility of the sender. Contact Kollmorgen and clarify the logistics. Kollmorgen | wiki-kollmorgen.eu | February 2017... -
Page 50: Technical Description And Data
2.4.1 The S700 Family of digital servo amplifiers Part Number Scheme Use the part number scheme for product identification only, not for the order process, because not all combinations of features are possible, always. Kollmorgen | wiki-kollmorgen.eu | February 2017... -
Page 51: Package Supplied
3 x 208V-10% ... 3 x 480V+ 10% (S7010-S7720, S7xx0) Overvoltage category III acc. to EN 61800-5-1. DC supply via DC bus link possible (for details, contact Kollmorgen). 2 analog setpoint inputs. Integrated CANopen (default 500 kBaud), for integration into CAN bus systems and for setting parameters for several amplifiers via the PC-interface of one amplifier. -
Page 52: Motion System With S701
S700 Safety Guide | 2 English 2.4.3 Motion system with S701...S724 Kollmorgen | wiki-kollmorgen.eu | February 2017... -
Page 53: Motion System With S748
S700 Safety Guide | 2 English 2.4.4 Motion system with S748...S772 Kollmorgen | wiki-kollmorgen.eu | February 2017... -
Page 54: Ambient Conditions, Ventilation, And Mounting Position
2.5 Nm (22 in lbf) X0/X8 with 25 to 35mm² wire 4.5 Nm (40 in lbf) X3A, X3B, X4 Cage clamps Cage clamps. Mounting flange: 0.5 Nm (4.3 in lbf) Ground bolt 3.5 Nm (31 in lbf) Kollmorgen | wiki-kollmorgen.eu | February 2017... -
Page 55: Technical Data 110 / 230 V
PC interface, CAN, ROD/SSI — SubD (male) Mechanical Weight Height without/with connectors 345 / 379 348 / 382 Width Width without/with connectors 243 / 285 243 / 285 More technical data see Instructions Manual. Kollmorgen | wiki-kollmorgen.eu | February 2017... -
Page 56: Technical Data 230V
Weight Coldplate (S7480C,S7480A) 10.4 Height without/with connectors 345 / 379 348 / 382 386 / 505 Width Width without/with connectors 243 / 285 243 / 285 244 / 285 More technical data see Instructions Manual. Kollmorgen | wiki-kollmorgen.eu | February 2017... -
Page 57: Fusing
Card"". Always switch off the servo amplifier before inserting or removing the memory card. If an absolute encoder is used, homing must be carried out before the parameters are loaded into a new device. Kollmorgen | wiki-kollmorgen.eu | February 2017... -
Page 58: Safe Torque Off (Sto)
If the STO function is not needed in the application, then the inputs STO1-ENABLE and STO2-Enable must be connected directly with +24VDC. The servo amplifier cannot be used as a safety component referring to the EC Machine Directive now. Kollmorgen | wiki-kollmorgen.eu | February 2017... - Page 59 STO1-Enable and STO2-Enable Data Input voltage 20V..30V Input current 33mA – 40mA (Ieff) Peak current 100mA (Is) Response time (falling edge at STO input STO1: 1ms until energy supply to motor is interrupted) STO2: 2ms Kollmorgen | wiki-kollmorgen.eu | February 2017...
- Page 60 Therefore the status must be linked to one of the digital outputs DIGITAL-OUT1 or 2 (X3A/6 or X3A/7) with the ASCII com- mand OxMODE70. Kollmorgen | wiki-kollmorgen.eu | February 2017...
- Page 61 S700 Safety Guide | 2 English Pinout S748...S772 To achieve PLe / SIL CL3, the safe switching of the pulse inhibitor must be tested peri- odically by analyzing the status signal from a safety control. Kollmorgen | wiki-kollmorgen.eu | February 2017...
- Page 62 1. Brake the drive in a controlled manner (speed setpoint = 0V) 2. When speed = 0 rpm, disable the servo amplifier (enable = 0V) 3. If there is a suspended load, block the drive mechanically 4. Activate STO (STO1-Enable and STO2-Enable = 0V) Kollmorgen | wiki-kollmorgen.eu | February 2017...
-
Page 63: Mechanical Installation
Assemble the servo amplifier and power supply, filter and choke close together on the conductive, grounded mounting plate in the cabinet. Grounding EMC-compliant (EMI) shielding and grounding see Instructions Manual. Shielding Earth (ground) the mounting plate, motor housing and CNC-GND of the controls. Kollmorgen | wiki-kollmorgen.eu | February 2017... -
Page 64: Electrical Installation
The servo amplifier's status must be monitored by the PLC to acknowledge critical situ- ations. Wire the BTB/RTO contact in series into the emergency off circuit of the installation. The emergency off circuit must operate the supply contactor. Kollmorgen | wiki-kollmorgen.eu | February 2017... -
Page 65: Guide To Electrical Installation
Connect main power supply (for max. permissible voltage values (➜ # 54)) Connect PC. Final check Final check of the implementation of the wiring, according to the wiring dia- grams which have been used. Kollmorgen | wiki-kollmorgen.eu | February 2017... -
Page 66: Setup
Supply the servo amplifier for about 30 minutes from single-phase 230VAC to the terminals L1 / L2. This will re-form the capacitors. The adaptation of parameters and the effects on the control loop behavior are described in Online Help of the setup software. Kollmorgen | wiki-kollmorgen.eu | February 2017... -
Page 67: Key Operation / Led Display
: decrease number by ten press and hold right key, then press left key as well : enter a number, return function name 2.7.2.1 Status display 2.7.2.2 Standard Menu Kollmorgen | wiki-kollmorgen.eu | February 2017... -
Page 68: Initial Drive Test
(x = correct CD drive letter). Click OK and proceed as described above. Connection to the serial interface of the PC Connect the interface cable to a serial interface on your PC and the PC interface (X6) of the S700 (➜ # 192). Kollmorgen | wiki-kollmorgen.eu | February 2017... - Page 69 2.7.3.3 Minimum Wiring for Drive Test S701...S724 without load This wiring does not fulfill any requirements to safety or functionality of your application, it just shows the required wiring for drive testing without load. Kollmorgen | wiki-kollmorgen.eu | February 2017...
- Page 70 2.7.3.4 Minimum Wiring for Drive Test S748...S772 without load This wiring does not fulfill any requirements to safety or functionality of your application, it just shows the required wiring for drive testing without load. Kollmorgen | wiki-kollmorgen.eu | February 2017...
- Page 71 Quit the error message. The software starts in the offline mode now, that requires the manual selection of the amplifier's type. Quit this selection by closing the window. Fix the com- munication problem. Restart the software in Online mode. Kollmorgen | wiki-kollmorgen.eu | February 2017...
- Page 72 The Setup Wizard leads you through the necessary steps for configuring your servo amp- lifier. Depending on the selected application, only the active screen pages are necessary. More setup information see S700 Instructions Manual. Kollmorgen | wiki-kollmorgen.eu | February 2017...
-
Page 73: Trouble Shooting
ARLPF / ARHPF increase ARLP2 Axis drifts at offset not correctly adjusted for analog adjust setpoint-offset (analog I/O) setpoint = 0V setpoint provision join AGND and CNC-GND AGND not joined to the CNC-GND of the controls Kollmorgen | wiki-kollmorgen.eu | February 2017... - Page 74 S700 Safety Guide | 2 English --- / --- Kollmorgen | wiki-kollmorgen.eu | February 2017...
- Page 75 3.5.2 Guide d’installation mécanique 3.6 Installation électrique 3.6.1 Remarques Importantes 3.6.2 Guide d’installation électrique 3.7 Mise en service 3.7.1 Remarques Importantes 3.7.2 Utilisation des touches / Affichage DEL 3.7.3 Test rapides 3.8 Elimination des défauts Kollmorgen | wiki-kollmorgen.eu | February 2017...
-
Page 76: Généralités
Si vous rencontrez des difficultés de lecture en raison de la taille de la police, vous pouvez imprimer la version PDF au format DIN A4 1:1. La version PDF du document figure sur le CD-ROM joint avec le produit, ainsi que sur le site de Kollmorgen Kollmorgen | wiki-kollmorgen.eu | February 2017... -
Page 77: Utilisation Du Format Pdf
Avertissement de danger de tension électrique dan- gereuse et l'effet. Avertissement de danger des surfaces chaudes. Avertissement de danger d'une charge suspendue. Avertissement de danger de redémarrage automatique. Kollmorgen | wiki-kollmorgen.eu | February 2017... -
Page 78: Abréviations
Mise hors tension sûre Arrêt de fonctionnement sûr Interface sérielle synchrone Plage de vitesse sûre Fonction de suppression sûre du couple (Safe Torque Off) V AC Tension alternative V DC Tension continue Association des Electrotechniciens allemands Kollmorgen | wiki-kollmorgen.eu | February 2017... -
Page 79: Sécurité
Vérifiez le numéro de version matérielle du produit (voir plaque signalétique). Ce numéro doit correspondre aux indications figurant sur la page de titre du présent manuel. Si les numéros ne correspondent pas, consultez notre “Tech-WIKI” (http://www.wiki-kollmorgen.eu). Dans la rubrique "Download", vous trouverez toutes les versions du manuel en rapport avec le numéro de révision du matériel. - Page 80 être pourvus d’une isolation renforcée (selon la norme EN 61800- 5-1) par rapport aux composants systèmes dotés d’une tension d’alimentation, confor- mément à la tension d’essai requise de l’application. Tous les composants de Kollmorgen satisfont à ces exigences.
-
Page 81: Utilisation Conforme
2000V. En cas d'alimentation d'entrée c.c. pour les installations simples et groupées Le S700 n'a pas été approuvé par Kollmorgen, UL ou TÜV pour le remplacement d'une entrée secteur c.a. par une entrée c.c., dans les installations simples ou groupées. -
Page 82: Utilisation Non Conforme
Attendre 5 minutes Attendre 8 minutes Attendre 10 minutes apres mise hors ten- apres mise hors ten- apres mise hors ten- sion! sion! sion! Des symboles d’avertissement endommagés doivent être remplacés immédiatement Kollmorgen | wiki-kollmorgen.eu | February 2017... -
Page 83: Manipulation
Il ya un risque de blessures graves ou la mort par choc électrique et de formation d'arc élec- trique. Coupez l'interrupteur principal de l'armoire de commande. Protégez le système contre toute remise en marche. Bloquez l'interrupteur principal.. Attendez au moins 10 minutes. Kollmorgen | wiki-kollmorgen.eu | February 2017... -
Page 84: Maintenance Et Nettoyage
°C. Avant de toucher le variateur, vérifiez la température et attendez qu'elle soit redes- cendue au-dessous de 40 °C. 3. Retirez les connecteurs. Déconnectez la prise de terre en dernier le cas échéant. 4. Démontage : desserrez les vis de fixation et retirez l'appareil. Kollmorgen | wiki-kollmorgen.eu | February 2017... -
Page 85: Réparation
Conformément à la directive WEEE-2002/96/CE ou réglementation similaire, le fabricant accepte le retour d'appareils ou d'accessoires usagés pour une mise au rebut pro- fessionnelle. Les frais de transport incombent à l'expéditeur. Contactez Kollmorgen et de clarifier la logistique. Kollmorgen | wiki-kollmorgen.eu | February 2017... -
Page 86: Déscription Technique Et Donnée Techniques
Utilisez le code de type uniquement à des fins d'identification des produits. Ne pas utiliser le code type pour les bons de commande, comme toutes les combinaisons de caractéristiques ne sont pas techniquement possible. Kollmorgen | wiki-kollmorgen.eu | February 2017... -
Page 87: Etendue De La Livraison
3 x 208 V-10% … 3 x 480 V +10% (S7010...S7720) Catégorie de surtensions III conformément à EN 61800-5-1. Alimentation CC via Bus CC possible (pour plus de détails, contacter Kollmorgen). Deux entrées de valeur de consigne analogiques CANopen intégrée (default : 500 kBaud), pour l'intégration dans des systèmes de bus CAN et pour le paramétrage de plusieurs variateurs via l'interface PC d'un variateur. -
Page 88: Système D'entraînement Avec S701
S700 Safety Guide | 3 Français 3.4.3 Système d'entraînement avec S701...S724 Kollmorgen | wiki-kollmorgen.eu | February 2017... -
Page 89: Système D'entraînement Avec S748
S700 Safety Guide | 3 Français 3.4.4 Système d'entraînement avec S748...S772 Kollmorgen | wiki-kollmorgen.eu | February 2017... -
Page 90: Conditions Ambiantes, Aération, Position De Montage
X0/X8 cable de 25 jusqu'à 35mm² 4,5 Nm (40 in lbf) X3A, X3B, X4 Contacts à ressort de compression Contacts à ressort de compression, bride à vis 0,5 Nm (4,3 in lbf) Prise de terre 3,5 Nm (31 in lbf) Kollmorgen | wiki-kollmorgen.eu | February 2017... -
Page 91: Donnée Techniques 110 / 230 V
Interface PC, CAN, ROD/SSI — SubD (mâle) Mécanique Poids Hauteur sans/avec connecteurs 345 / 379 348 / 382 Largeur Profondeur sans/avec connecteurs 243 / 285 243 / 285 Pour plus caractéristiques techniques voir Manuel d'Instructions. Kollmorgen | wiki-kollmorgen.eu | February 2017... -
Page 92: Donnée Techniques 230V
Poids version Coldplate (S7480C, S7480A) kg 10,4 Hauteur sans/avec connecteurs 345 / 379 348 / 382 386 / 505 Largeur Profondeur sans/avec connecteurs 243 / 285 243 / 285 244 / 285 Pour plus caractéristiques techniques voir Manuel d'Instructions. Kollmorgen | wiki-kollmorgen.eu | February 2017... -
Page 93: Protection
La carte mémoire ne peut être enfichée ou retirée du variateur S700 que s’il est déconnecté. En cas d’utilisation d’un codeur absolu, un trajet de référence doit être effectué après la lec- ture des paramètres dans un nouvel appareil. Kollmorgen | wiki-kollmorgen.eu | February 2017... -
Page 94: Fonction De Suppression Sûre Du Couple (Sto)
Si la fonction n’est plus nécessaire dans une application, les entrées STO1-ENABLE et STO2-Enable doit être directement raccordée à l’alimentation +24 V DC. Le variateur ne peut alors plus être considéré comme composant de sécurité au sens de la directive Machine. Kollmorgen | wiki-kollmorgen.eu | February 2017... - Page 95 Courant d’entrée 33mA – 40mA (Ieff) Courant de crête 100mA (Is) Temps de réaction (front descendant sur l’en- trée STOx jusqu’à pour interruption de l’ali- STO1: 1ms mentation en énergie du moteur) STO2: 2ms Kollmorgen | wiki-kollmorgen.eu | February 2017...
- Page 96 Pour atteindre SIL CL3 / PLe, l’état de commutation du blocage d’impulsions (état) est défini sur l’une des sorties numériques DIGITAL-OUT1 ou 2 (X3A/6 ou X3A/7) du variateur S700à l’aide de la commande ASCII OxMODE 70. Kollmorgen | wiki-kollmorgen.eu | February 2017...
- Page 97 S700 Safety Guide | 3 Français Brochage S748...S772 Pour atteindre SIL CL 3 / Ple, l'état de commutation du blocage d'impulsions dans la com- mande de sécurité est testé périodiquement. Kollmorgen | wiki-kollmorgen.eu | February 2017...
- Page 98 2. Lorsque la vitesse = 0 tr/min, désactivez le variateur (activation=0V). 3. En cas de charge suspendue, bloquez le moteur mécaniquement. 4. Activez la fonction STO de verrou de redémarrage (STO1-Enable et STO2-Enable = 0V). Kollmorgen | wiki-kollmorgen.eu | February 2017...
-
Page 99: Installation Mécanique
Mise à la terre, Blindage et mise à la terre conformes à la CEM voir Manuel d'Ins- blindage tructions. Mettre à la terre la plaque de montage, le carter du moteur et la CNC-GND de l'API. Kollmorgen | wiki-kollmorgen.eu | February 2017... -
Page 100: Installation Électrique
L'état du variateur doit être contrôlé par l'automate programmable afin de reconnaître les situa- tions critiques. Posez le contact BTB/RTO en série dans le circuit e coupure d’urgence de l'installation. Le circuit e coupure d’urgence doit utiliser le contacteur d'alimentation. Kollmorgen | wiki-kollmorgen.eu | February 2017... -
Page 101: Guide D'installation Électrique
Raccorder la tension auxiliaire (valeurs max. admissibles (➜ # 90)). Raccorder la tension de puissance (valeurs max. admissibles (➜ # 90)). Raccorder le PC. Vérification Vérification finale du câblage réalisé sur la base des schémas de rac- cordement utilisés. Kollmorgen | wiki-kollmorgen.eu | February 2017... -
Page 102: Mise En Service
230 V CA sur les bornes L1 / L2. Ceci aura pour effet de reformer les condensateurs. L'adaptation de paramètres et les effets sur la régulation sont décrits dans Online Help de la logiciel de mise en service. Kollmorgen | wiki-kollmorgen.eu | February 2017... -
Page 103: Utilisation Des Touches / Affichage Del
10 du chiffre maintenir la touche de droite enfoncée puis appuyer en plus sur la touche de gauche : pour l'entrée numérique, fonction Return (Entrée) 3.7.2.1 Affichage d'état 3.7.2.2 Menu Standard Kollmorgen | wiki-kollmorgen.eu | February 2017... -
Page 104: Test Rapides
CD). Cliquez sur OK puis continuez comme décrit plus haut. Raccordement à l'interface sériel du PC Raccordez la ligne de transfert à l'interface sériel de votre PC puis à l'interface PC (X6) du S700 (➜ # 192). Kollmorgen | wiki-kollmorgen.eu | February 2017... - Page 105 3.7.3.3 Câblage minimal pour le test rapide S701...S724 sans charge Ce câblage ne remplit pas d’exigences en matière de sécurité ou efficacité du fonc- tionnement de votre application. Elle ne montre que le câblage minimal nécessaire pour le test rapides. Kollmorgen | wiki-kollmorgen.eu | February 2017...
- Page 106 3.7.3.4 Câblage minimal pour le test rapide S748...S772 sans charge Ce câblage ne remplit pas d’exigences en matière de sécurité ou efficacité du fonc- tionnement de votre application. Elle ne montre que le câblage minimal nécessaire pour le test rapides. Kollmorgen | wiki-kollmorgen.eu | February 2017...
- Page 107 Après confirmation du message d’erreur, le logiciel passe en mode hors ligne. Ceci exige la sélection manuelle du variateur. Interrompez la sélection en fermant la fenêtre de sélection. Identifiez et corrigez l’erreur empêchant la communication. Redémarrez le logiciel en mode en ligne. Kollmorgen | wiki-kollmorgen.eu | February 2017...
- Page 108 L’assistant de configuration vous guide tout au long de la procédure de configuration de base de votre entraînement. Selon la tâche à effectuer, seuls les écrans nécessaires sont affi- chés. Plus d'informations de configuration voir le S700 Manuel d'Instructions. Kollmorgen | wiki-kollmorgen.eu | February 2017...
-
Page 109: Elimination Des Défauts
équilibrer l'offset VC (Analog I/O) valeur de consi- définie analogique n'est pas correctement gne=0V équilibré l'AGND n'est pas reliée à la CNC-GND de relier l'AGND et la CNC-GND l'API Kollmorgen | wiki-kollmorgen.eu | February 2017... - Page 110 S700 Safety Guide | 3 Français --- / --- Kollmorgen | wiki-kollmorgen.eu | February 2017...
- Page 111 4.6 Installazione elettrica 4.6.1 Indicazioni importanti 4.6.2 Guida all'installazione elettrica 4.7 Messa in funzione 4.7.1 Indicazioni importanti 4.7.2 Comando a tasti / display a LED 4.7.3 Avvio immediato, test rapido 4.8 Eliminazione dei guasti Kollmorgen | wiki-kollmorgen.eu | February 2017...
-
Page 112: Indicazioni Generali
In caso di difficoltà a leggere il testo nel formato stampato ridotto, è possibile stampare e utilizzare la versione PDF in formato DIN A4 1:1. La versione PDF è memorizzata sul CD-ROM del prodotto, oltre a essere disponibile sul sito Web di Kollmorgen. Kollmorgen | wiki-kollmorgen.eu | February 2017... -
Page 113: Uso Del Formato Pdf
Avviso di pericolo (generale). Il tipo di pericolo è specificato nel testo a fianco. Avviso di pericolo dovuto all'elettricità e ai suoi effetti. Avviso di pericolo per la presenza di superfici calde. Avviso di un carico sospeso. Avviso di riavvio automatico. Kollmorgen | wiki-kollmorgen.eu | February 2017... -
Page 114: Abbreviazioni Utilizzate
Unità di controllo a logica programmabile SRAM RAM statica Arresto sicuro Arresto activa sicuro Interfaccia seriale sincrona Range di velocità sicuro Interfaccia sincrono-seriale Safe Torque Off V AC Tensione alternata V DC Tensione continua Associazione elettrotecnica tedesca Kollmorgen | wiki-kollmorgen.eu | February 2017... -
Page 115: Sicurezza
Questo numero deve corrispondere alle indicazioni riportate sulla copertina del presente manuale. Se i numeri non corrispondono, accedere a Tech-WIKI (http://www.wiki-kollmorgen.eu). Nella sezione “Download” sono presenti tutte le versioni del manuale con riferimento ai numeri di revisione dell’hardware. Rispettare i dati tecnici Osservare i dati tecnici e le indicazioni sulle condizioni di collegamento (targhetta di omologazione e documentazione). - Page 116 50 V prima di toccare i componenti. Sicurezza di funzionamento L’implementazione della funzione di sicurezza STO sul modello S700 è certificata. La verifica delle funzioni di sicurezza secondo le norme EN13849 o EN 62061 deve essere eseguita alla fine dall’utente. Kollmorgen | wiki-kollmorgen.eu | February 2017...
-
Page 117: Uso Conforme
Nei casi di alimentazione in ingresso CC per installazioni singole e di gruppo S700 non è stato valutato da Kollmorgen, UL o TÜV per la sostituzione della tensione di rete in ingresso in CA con l’ingresso CC, né per installazioni singole né per installazioni di gruppo. -
Page 118: Uso Vietato
Tensione residua. Attendere 5 minuti Attendere 8 minuti Attendere 10 minuti dopo la rimozione di dopo la rimozione di dopo la rimozione di potenza. potenza. potenza. Se questi simboli sono danneggiati vanno sostituiti immediatamente. Kollmorgen | wiki-kollmorgen.eu | February 2017... -
Page 119: Utilizzo
Vi è il rischio di lesioni gravi o morte da shock elettrico o di arco. Disinserire l’interruttore generale dell’armadio elettrico.. Mettere in sicurezza il sistema per evitarne il riavvio accidentale. Bloccare l’interruttore principale. Attendere dopo aver scollegato il istema almeno 10 minuti. Kollmorgen | wiki-kollmorgen.eu | February 2017... -
Page 120: Manutenzione E Pulizia
è scesa sotto i 40°C. 3. Rimuovere i connettori. Scollegare il collegamento della terra potenziale per ultimo. 4. Smontaggio: Allentare le viti di fissaggio e rimuovere il dispositivo. Kollmorgen | wiki-kollmorgen.eu | February 2017... -
Page 121: Riparazione
In conformità alle linee guida della direttiva 2002/96/CE (RAEE) e simili, il costruttore accetta la restituzione di vecchi dispositivi ed accessori per uno smaltimento professionale. I costi di trasporto sono a carico del mittente. Contattare Kollmorgen e chiarire la logistica. Kollmorgen | wiki-kollmorgen.eu | February 2017... -
Page 122: Descrizione E Dati Tecnici
Schema di numero Utilizzare il codice di tipo esclusivamente a scopo di identificazione del prodotto. Non utilizzare il codice tipo per ordini di acquisto, in quanto non tutte le combinazioni sono dotate sono tecnicamente possibili. Kollmorgen | wiki-kollmorgen.eu | February 2017... -
Page 123: Dotazione
3 x 208 V-10% … 3 x 480 V +10% (S7010...S7720) Categoria di sovratensione III secondo EN 61800-5-1 Alimentazione DC tramite il circuito intermedio possibile (contattare Kollmorgen). 2 ingressi analogici per i valori nominali CANopen integrata (default: 500 kBaud) per l'integrazione in sistemi CAN-Bus e per l'impostazione dei parametri di più... -
Page 124: Sistema Di Azionamento Con S701
S700 Safety Guide | 4 Italiano 4.4.3 Sistema di azionamento con S701...S724 Kollmorgen | wiki-kollmorgen.eu | February 2017... -
Page 125: Sistema Di Azionamento Con S748
S700 Safety Guide | 4 Italiano 4.4.4 Sistema di azionamento con S748...S772 Kollmorgen | wiki-kollmorgen.eu | February 2017... -
Page 126: Condizioni Ambientali, Aerazione, Posizione Di Montaggio
X0/X8 con 25 a 35 mm² cavo 4,5 Nm (40 in lbf) X3A, X3B, X4 Morsetti a molla Morsetti a molla, flange di montaggio 0,5 Nm (4,3 in lbf) Perno di terra 3,5 Nm (31 in lbf) Kollmorgen | wiki-kollmorgen.eu | February 2017... -
Page 127: Dati Tecnici 110 / 230 V
Interfaccia PC, CAN, ROD/SSI — SubD (maschio) Meccanica Peso Altezza senza/con connettori 345 / 379 348 / 382 Larghezza Profondità senza/con connettori 243 / 285 243 / 285 Altro dati tecnici vedere Manuale d'Istruzioni. Kollmorgen | wiki-kollmorgen.eu | February 2017... -
Page 128: Dati Tecnici 230V
Peso versione Coldplate (S7480C, S7480A) 10,4 Altezza senza/con connettori 345 / 379 348 / 382 386 / 505 Larghezza Profondità senza/con connettori 243 / 285 243 / 285 244 / 285 Altro dati tecnici vedere Manuale d'Istruzioni. Kollmorgen | wiki-kollmorgen.eu | February 2017... -
Page 129: Protezione
Inserire e togliere la scheda di memoria solo quando l’ S700 è spento. Se si impiega un trasduttore assoluto, dopo aver caricato i parametri in un apparecchio nuovo occorre eseguire una corsa al punto di riferimento. Kollmorgen | wiki-kollmorgen.eu | February 2017... -
Page 130: Funzione Sto (Safe Torque Off)
+24 V DC. In tal modo si esclude il sistema di protezione contro il riavvio accidentale che quindi non può essere utilizzato. Il servoamplificatore non può essere utilizzato come componente di sicurezza riferirsi alla Direttiva Macchine CE. Kollmorgen | wiki-kollmorgen.eu | February 2017... - Page 131 Tensione di ingresso 20V..30V Corrente in ingresso 33mA – 40mA (Ieff) Corrente di picco 100mA (Is) Tempo di reazione (fronte in discesa sull'ingresso STO fino STO1: 1ms all'interruzione dell'alimentazione diretta al motore) STO2: 2ms Kollmorgen | wiki-kollmorgen.eu | February 2017...
- Page 132 SIL CL3/PLe richiede il controllo periodico della serratura della fase dell’uscita. Di conseguenza la condizione deve essere collegata ad una delle uscite digitali DIGITAL- OUT1 o a 2 (X3A/6 o X3A/7) con l’ordine OxMODE70 di ASCII. Kollmorgen | wiki-kollmorgen.eu | February 2017...
- Page 133 S700 Safety Guide | 4 Italiano Schemo collegamenti S748...S772 SIL CL3/PLe richiede il controllo periodico lo stato di commutazione di impulsi inibisce nel controllore di sicurezza. Kollmorgen | wiki-kollmorgen.eu | February 2017...
- Page 134 2. Quando la velocità è = 0 giri/min, disattivare il S700 (Enable = 0 V). 3. Se è presente un carico sospeso, bloccare il S700meccanicamente. 4. Attivare il blocco riavvio STO (STO1-Enable e STO2-Enable = 0V) Kollmorgen | wiki-kollmorgen.eu | February 2017...
-
Page 135: Installazione Meccanica
Messa a terra, Schermatura conforme alla direttiva in materia di compatibilità Schermatura elettromagnetica e messa a terra vedere Manuale d'Istruzioni. Collegare a terra piastra di montaggio, carcassa del motore e CNC- GND dell'unità di controllo. Kollmorgen | wiki-kollmorgen.eu | February 2017... -
Page 136: Installazione Elettrica
EN 60204. Il PLC deve monitorare lo stato del servoamplificatore. Inserire il contatto BTB nel circuito di spegnimento d’emergenzia. Il circuito di spegnimento d’emergenzia deve azionare il contattore di rete. Kollmorgen | wiki-kollmorgen.eu | February 2017... -
Page 137: Guida All'installazione Elettrica
Collegare la tensione ausiliaria (valori massimi ammessi (➜ # 126)) Collegare la tensione di potenza (valori massimi ammessi (➜ # 126)) Collegare il PC. Controllo Verificare il cablaggio eseguito sulla base degli schemi di collegamento utilizzati Kollmorgen | wiki-kollmorgen.eu | February 2017... -
Page 138: Messa In Funzione
Alimentare il servoamplificatore per ca. 30 min con una corrente monofase di 230V AC sui morsetti L1/L2. In questo modo i condensatori vengono ricondizionati. L’adeguamento dei parametri e gli effetti sul tipo di controllo sono descritti nel Online Help software di messa in funzione. Kollmorgen | wiki-kollmorgen.eu | February 2017... -
Page 139: Comando A Tasti / Display A Led
: per diminuire il valore di una decina tenere premuto il tasto destro e contemporaneamente premere il tasto sinistro : per immettere numeri, funzione return 4.7.2.1 Visualizzazione delle condizioni di stato 4.7.2.2 Menu standard Kollmorgen | wiki-kollmorgen.eu | February 2017... -
Page 140: Avvio Immediato, Test Rapido
CD). Fare clic su OK e procedere come indicato sopra. Collegamento all'interfaccia seriale del PC Collegare il cavo di trasmissione ad un'interfaccia seriale del PC e all'interfaccia PC (X6) di S700 (➜ # 192). Kollmorgen | wiki-kollmorgen.eu | February 2017... - Page 141 4.7.3.3 Cablaggio minimo richiesto per il test rapido S701...S724 senza carico Questi collegamenti non soddisfano alcune condizioni a sicurezza o a funzionalità della vostra applicazione ma mostrano solamente i collegamenti richiesti per provare l’azionamento senza carico. Kollmorgen | wiki-kollmorgen.eu | February 2017...
- Page 142 4.7.3.4 Cablaggio minimo richiesto per il test rapido S748...S772 senza carico Questi collegamenti non soddisfano alcune condizioni a sicurezza o a funzionalità della vostra applicazione ma mostrano solamente i collegamenti richiesti per provare l’azionamento senza carico. Kollmorgen | wiki-kollmorgen.eu | February 2017...
- Page 143 Dopo la conferma del messaggio di errore, il software passa alla modalità off-line. Ciò richiede una selezione manuale del servoamplificatore. Interrompere la selezione chiudendo la finestra. Cercare ed eliminare l’errore o il guasto che impedisce la comunicazione. Riavviare il software in modalità on-line. Kollmorgen | wiki-kollmorgen.eu | February 2017...
- Page 144 Il Wizard di configurazione guida l’utente attraverso le fasi fondamentali della configurazione di base dell’azionamento. A seconda della funzione da portare a termine vengono rappresentate solo le videate necessarie. Ulteriori informazioni sull'installazione vedere S700 Manuale d'Istruzioni. Kollmorgen | wiki-kollmorgen.eu | February 2017...
-
Page 145: Eliminazione Dei Guasti
Aumentare ARLP2 Deriva asse con Offset con valore nominale analogico Compensare l’offset del software valore nom. =0V predefinito non compensato correttamente (analogico I/O) AGND non collegato con CNC-GND dell’unità di controllo Collegare AGND e CNC-GND Kollmorgen | wiki-kollmorgen.eu | February 2017... - Page 146 S700 Safety Guide | 4 Italiano --- / --- Kollmorgen | wiki-kollmorgen.eu | February 2017...
- Page 147 5.5.2 Руководство по механическому монтажу 5.6 Электрический монтаж 5.6.1 Важные указания 5.6.2 Руководство по электрическому монтажу 5.7 Ввод в эксплуатацию 5.7.1 Важные указания 5.7.2 Кнопочное управление / светодиодный дисплей 5.7.3 Быстрый запуск, быстрое тестирование привода 5.8 Устранение ошибок Kollmorgen | wiki-kollmorgen.eu | February 2017...
-
Page 148: О Данном Руководстве
отпечатан в формате DIN A5. Если мелкий шрифт этого экземпляра вызывает проблемы при чтении, можно распечатать PDF-версию в формате DIN A4 (масштаб 1:1) и использовать ее. PDF-версия имеется на компакт-диске, прилагаемом к изделию, и на интернет-сайте Kollmorgen. Kollmorgen | wiki-kollmorgen.eu | February 2017... -
Page 149: Использование Pdf-Документа
печению безопасности. Данное условное обозначение ука- зывает на важную информацию. Внимание! Опасность (прочие опасности). Характер опасности указывается в сопровождающем тексте предупреждения. Опасность поражения электрическим током. Осторожно. Горячая поверхность. Предупреждение о подвешенного груза. Осторожно. Автоматический повторный пуск. Kollmorgen | wiki-kollmorgen.eu | February 2017... -
Page 150: Используемые Сокращения
Программируемый логический контроллер SRAM Статическое ОЗУ Надежный перевод в нерабочее состояние Надежная приостановка эксплуатации Синхронный последовательный интерфейс Надежныйдиапазон скоростей Safe Torque Off, Система надежного останова V AC В пер. тока V DC В пост. тока Kollmorgen | wiki-kollmorgen.eu | February 2017... -
Page 151: Безопасность
номер должен совпадать с данными на титульной странице данного руководства. Если номера не совпадают, используйте пожалуйста наш информационный ресурс WIKI (http://www.wiki-kollmorgen.eu). В разделе "Download" Вы найдете все версии инструкций по эксплуатации со ссылкой на номер версии аппаратного обеспечения. Соблюдение технических данных... - Page 152 Установленные в двигателе термодатчики, тормоза и датчики обратной связи в отличие от системных компонентов с силовым питанием должны иметь усиленную изо- ляцию (согласно EN 61800-5-1), которая соответствует необходимому испы- тательному напряжению системы. Все компоненты Kollmorgen отвечают этим требованиям. Kollmorgen | wiki-kollmorgen.eu | February 2017...
-
Page 153: Применение По Назначению
кабелей и корпусом не должны превышать 2000 В. В случаях питания постоянного тока для отдельных и групповых приводов S700 не оценивался в Kollmorgen, UL или TÜV на предмет замены питания от сети переменного тока на питание от источника постоянного тока – ни для отдельных, ни... -
Page 154: Применение Не По Назначению
Остаточное напря- Остаточное напря- жение. Подождите, жение. Подождите, жение. Подождите, через 5 минут после через 8 минут после через 10 минут после отключения питания. отключения питания. отключения питания. Поврежденные знаки должны быть немедленно заменены. Kollmorgen | wiki-kollmorgen.eu | February 2017... -
Page 155: Обслуживание
нения на складе более 1 года: перед вводом сервоусилителя в эксплуатацию кон- денсаторы должны быть заряжены заново. Отсоедините все электрические соединения. В течение приблизительно 30 минут подавайте на сервоусилитель питающее однофазное напряжение макс. 230 В пер. тока на клеммы L1 / L2. Kollmorgen | wiki-kollmorgen.eu | February 2017... -
Page 156: Вывод Из Эксплуатации
работы температура радиатора может превышать 80 °С. Перед прикосновением проверьте темпер. радиатора и подождите, пока она не опустится ниже 40 °C. 3. Отсоедините все штекерные разъемы. Последним отсоедините провод зазем- ления. 4. Демонтаж: Выверните крепёжные винты и демонтируйте устройство. Kollmorgen | wiki-kollmorgen.eu | February 2017... -
Page 157: Ремонт
Для надлежащей утилизации устройства обращайтесь в сертифицированную фирму по утилизации электронного лома. Согласно директивам WEEE-2002/96/EG и аналогичным изготовитель принимает ста- рое оборудование для надлежащей утилизации. Транспортные расходы несет отпра- витель. Контакты Kollmorgen и уточнить логистики. Kollmorgen | wiki-kollmorgen.eu | February 2017... -
Page 158: Техническое Описание И Данные
S700 Safety Guide | 5 Русский 5.4 Техническое описание и данные 5.4.1 Цифровые сервоусилители серии S700 Типовые обозначения Используйте условное обозначение для идентификации продукта, а не для процесса заказа, поскольку не все комбинации признаков технически возможны. Kollmorgen | wiki-kollmorgen.eu | February 2017... -
Page 159: Комплект Поставки
3 x 208 B-10% … 3 x 480 B +10% (S7010...S7720) Категория по перенапряжениям III в соответствии с EN 61800-5-1. Питания постоянного тока через линии DC-Bus возможно (контакт Kollmorgen). Два аналоговых входа уставок. Встроенный интерфейс CANopen, для установки в системы шины CAN и для... -
Page 160: Приводная Система С S701
S700 Safety Guide | 5 Русский 5.4.3 Приводная система с S701...S724 Kollmorgen | wiki-kollmorgen.eu | February 2017... -
Page 161: Приводная Система С S748
S700 Safety Guide | 5 Русский 5.4.4 Приводная система с S748...S772 Kollmorgen | wiki-kollmorgen.eu | February 2017... -
Page 162: Условия Окружающей Среды, Вентиляция, Монтажное Положение
X0/X8 с 25 до 35mm² кабель 4,5 Nm (40 in lbf) X3A, X3B, X4 Клеточные пружинные зажимы Клеточные пружинные зажимы, Монтажный фланец 0,5 Nm (4,3 in lbf) Заземляющие болты 3,5 Nm (31 in lbf) Kollmorgen | wiki-kollmorgen.eu | February 2017... -
Page 163: Технические Данные 110 / 230 V
Механические характеристики Масса кг Высота без/со штекера мм 345 / 379 348 / 382 Ширина мм Глубина без/со штекера мм 243 / 285 243 / 285 Другие технические данные см. в инструкции по эксплуатации. Kollmorgen | wiki-kollmorgen.eu | February 2017... -
Page 164: Технические Данные 230V
Высота без/со штекера мм 345 / 379 348 / 382 386 / 505 Ширина мм Глубина без/со штекера мм 243 / 285 243 / 285 244 / 285 Другие технические данные см. в инструкции по эксплуатации. Kollmorgen | wiki-kollmorgen.eu | February 2017... -
Page 165: Предохранители
сание ASCII-команд Вы найдете в Product-WIKI на странице "Memory Card". Карту памяти можно вставлять или вынимать только при выключенном S700. При при- менении датчика абсолютного отсчёта после считывания параметров в новый прибор необходимо выполнить перемещение в 0-позицию. Kollmorgen | wiki-kollmorgen.eu | February 2017... -
Page 166: Функция Безопасности (Sto)
ходимо укладывать с прочным креплением и защитой от внешнего повреждения. Если система блокировки запуска STO не требуется, STO-ENABLE необходимо соеди- нить непосредственно с клеммой +24 В. В соответствии с директивой по машинам сер- воусилитель более не рассматривается в качестве безопасного компонета машины. Kollmorgen | wiki-kollmorgen.eu | February 2017... - Page 167 Pасположение выводов STO1-Enable / STO2-Enable Дата Входное напряжение 20B..30B Входной ток 33мА – 40мА (Ieff) Пиковый ток 100мА (Is) Время реакции (спадающий фронт сигнала на входе STO1: 1ms STOx до прерывания энергоснабжения двигателя) STO2: 2ms Kollmorgen | wiki-kollmorgen.eu | February 2017...
- Page 168 Сигнальная диаграмма S701...724 Для достижения категории безопасности SIL CL3 / PLe сигнал о состоянии ком- мутирующего элемента блокировки импульсов командой ASCII OxMODE70 подается на один из цифровых выходов, DIGITAL-OUT1/2 (X3A/6 или X3A/7) усилителя S700. Kollmorgen | wiki-kollmorgen.eu | February 2017...
- Page 169 S700 Safety Guide | 5 Русский Сигнальная диаграмма S748...772 Для достижения SIL CL 3 / PLe состояние импульсной схемы в системе безопасности должно периодически контролироваться. Kollmorgen | wiki-kollmorgen.eu | February 2017...
- Page 170 1. Регулируемое торможение привода (уставка частоты вращения = 0 В) 2. Блокировка сервопривода при частоте вращения = 0 об/мин (0 В на входе Enable) 3. При висящем грузе дополнительная механическая блокировка привода 4. Активация системы блокировки пуска STO (STO1-Enable и STO2-Enable = 0V) Kollmorgen | wiki-kollmorgen.eu | February 2017...
-
Page 171: Механический Монтаж
Установите сервоусилитель и блок питания друг около друга на проводящей заземленной монтажной плате в распределительном шкафу. Заземление Экранирование и заземление согласно требованиям элек- Экраниро- тромагнитной совместимости см. Инструкцию по эксплуатации. вание Заземлите монтажную плату, корпус двигателя и вывод CNC-GND системы управления Kollmorgen | wiki-kollmorgen.eu | February 2017... -
Page 172: Электрический Монтаж
мозным резистором должны быть экранированы. Уложите все силовые кабели с доста- точным поперечным сечением согласно EN 60204 Состояние сервоусилителя должно контролироваться системой управления. Под- ключите контакт BTB к контуру аварийного отключения установки. Контур аварийного выключения должен переключать сетевой контактор. Kollmorgen | wiki-kollmorgen.eu | February 2017... -
Page 173: Руководство По Электрическому Монтажу
защитой предохранителем). Подключите вспомогательное напряжение (макс. допустимые значения напряжения (➜ # 162)). Подключите напряжение сети (макс. допустимые значения напряжения (➜ # 162)). Подключите ПК. Проверка Окончательная проверка выполненных проводных соединений на основании использованных схем соединений Kollmorgen | wiki-kollmorgen.eu | February 2017... -
Page 174: Ввод В Эксплуатацию
соединения. В течение 30 минут подавайте на сервоусилитель однофазное напря- жение Наименьший допустимое напряжение питания на клеммы L1 / L2. Это поз- воляет заново зарядить конденсаторы. Настройка параметров и влияние параметров на характеристики регулирования опи- сываются в интерактивной справке по вводу в эксплуатацию. Kollmorgen | wiki-kollmorgen.eu | February 2017... -
Page 175: Кнопочное Управление / Светодиодный Дисплей
нажать один раз: уменьшение числа на единицу числа на единицу нажать два раза подряд: уменьшение числа на десять держа нажатой правую клавишу, дополнительно нажать левую: для ввода чисел, функция Return (возврат) 5.7.2.1 Индикация состояния 5.7.2.2 Структура стандартного меню Kollmorgen | wiki-kollmorgen.eu | February 2017... -
Page 176: Быстрый Запуск, Быстрое Тестирование Привода
Соединение с последовательным интерфейсом ПК: Соединение с последовательным интерфейсом ПК: Подсоедините кабель для пере- дачи данных к последовательному интерфейсу вашего ПК (от COM1 до COM 10) и к последовательному интерфейсу (X6) S700 (➜ # 192). Kollmorgen | wiki-kollmorgen.eu | February 2017... - Page 177 5.7.3.3 Минимально необходимая схема соединений S701...724 для быстрого тестирования Данная схема проводных соединений не соответствует требованиям по безопасности и работоспособности при выполнении вашей задачи. Здесь представлена только минимально необходимая схема проводных соединений для быстрого тестирования. Kollmorgen | wiki-kollmorgen.eu | February 2017...
- Page 178 5.7.3.4 Минимально необходимая схема соединений S748...772 для быстрого тестирования Данная схема проводных соединений не соответствует требованиям по безопасности и работоспособности при выполнении вашей задачи. Здесь представлена только минимально необходимая схема проводных соединений для быстрого тестирования. Kollmorgen | wiki-kollmorgen.eu | February 2017...
- Page 179 После квитирования сообщения об ошибке программа выполнит переключение в авто- номный режим. Это требует выбора сервоусилителя вручную. Прервите выбор, закрыв окно выбора. Найдите и устраните ошибку, препятствующую обмену данными. Снова запустите программу в интерактивном режиме. Kollmorgen | wiki-kollmorgen.eu | February 2017...
- Page 180 Setup Wizard (Мастер установки) поможет вам выполнить необходимые шаги при основной конфигурации вашего привода. В зависимости от выполняемой задачи, отоб- ражаются только те экранные страницы, которые требуются. Дополнительную информацию по установке см. в S700 Инструкции по эксплуатации. Kollmorgen | wiki-kollmorgen.eu | February 2017...
-
Page 181: Устранение Ошибок
вращения) по умолчанию ARLPF/ARHPF/ARLP2 слишком низкий Увеличить ARLPF/ARHPF/ARLP2 Дрейф оси при Смещение аналоговой уставки подогнано Подогнать смещение уставки (ана- уставке = 0 В неправильно логовый вход/выход) Клемма AGND не соединена с CNC-GND Соединить AGND и CNC-GND Kollmorgen | wiki-kollmorgen.eu | February 2017... - Page 182 S700 Safety Guide | 5 Русский --- / --- Kollmorgen | wiki-kollmorgen.eu | February 2017...
- Page 183 6.3 Fault and Warning Messages 6.3.1 Error messages 6.3.2 Warning messages 6.4 Approvals 6.4.1 Conformance with UL/cUL 6.4.2 Conformance with CE 6.4.3 Conformance with EAC 6.4.4 Conformance with REACH 6.4.5 Conformance with RoHS 6.5 Referred Standards Kollmorgen | wiki-kollmorgen.eu | February 2017...
-
Page 184: Dimensions And Mounting
S700 Safety Guide | 6 Appendix 6.1 Dimensions and Mounting Detailed dimensions see Instructions Manual. 6.1.1 S701...S724 6.1.1.1 Dimensions S701...S724 S701, S703, S706, S712 S724 Kollmorgen | wiki-kollmorgen.eu | February 2017... - Page 185 S700 Safety Guide | 6 Appendix 6.1.1.2 Mounting S701...S724 Material: three M5 hexagon socket screws to ISO 4762, tool required : 4 mm Allen key. Remove the fan before mounting the servo amplifier and replace it again afterwards. Kollmorgen | wiki-kollmorgen.eu | February 2017...
- Page 186 S700. Push the fan onto the con- nector until the fan casing clicks into place. Gently squeeze the fan casing together crosswise to check that it is fully engaged. Kollmorgen | wiki-kollmorgen.eu | February 2017...
-
Page 187: S748
S700 Safety Guide | 6 Appendix 6.1.2 S748...S772 6.1.2.1 Dimensions S748...S772 with heat sink Kollmorgen | wiki-kollmorgen.eu | February 2017... - Page 188 S700 Safety Guide | 6 Appendix 6.1.2.2 Mounting S748...S772 with heat sink Material: four M5 hexagon socket screws to ISO 4762, tool required : 4 mm Allen key. Kollmorgen | wiki-kollmorgen.eu | February 2017...
- Page 189 S700 Safety Guide | 6 Appendix 6.1.2.3 Dimensions S748 with cold plate These devices are not UL listed and are not EAC and Safety certified. Kollmorgen | wiki-kollmorgen.eu | February 2017...
- Page 190 S700 Safety Guide | 6 Appendix 6.1.2.4 Mounting S748 with cold plate Material: six M5 hexagon socket screws to ISO 4762, tool required : 4 mm Allen key. Kollmorgen | wiki-kollmorgen.eu | February 2017...
- Page 191 S700 Safety Guide | 6 Appendix 6.1.2.5 Mounting the shielding plate to S748...S772 Material: unscrew existing screws and re-use them. Tool required : standard screw driver (cross) Kollmorgen | wiki-kollmorgen.eu | February 2017...
-
Page 192: Connections
S700 Safety Guide | 6 Appendix 6.2 Connections Detailed connector pinout and interface descriptions see Instructions Manual. 6.2.1 S701...S724 6.2.1.1 Connector assignment S701...S724 Kollmorgen | wiki-kollmorgen.eu | February 2017... - Page 193 S700 Safety Guide | 6 Appendix 6.2.1.2 Connection overview "single cable" S701...S724 Kollmorgen | wiki-kollmorgen.eu | February 2017...
- Page 194 S700 Safety Guide | 6 Appendix 6.2.1.3 Connection overview "dual cable" S701...S724 Kollmorgen | wiki-kollmorgen.eu | February 2017...
-
Page 195: S748
S700 Safety Guide | 6 Appendix 6.2.2 S748...S772 6.2.2.1 Connector assignment S748...S772 Kollmorgen | wiki-kollmorgen.eu | February 2017... - Page 196 S700 Safety Guide | 6 Appendix 6.2.2.2 Connection overview "single cable" S748...S772 Kollmorgen | wiki-kollmorgen.eu | February 2017...
- Page 197 S700 Safety Guide | 6 Appendix 6.2.2.3 Connection overview "dual cable" S748...S772 Kollmorgen | wiki-kollmorgen.eu | February 2017...
-
Page 198: Supported Feedback Types
30, 31 ROD 5V with zero 17,27 ROD 5V with zero + Hall ROD 24V w/o zero 12, 16 ROD 24V w/o zero + Hall X3/X1 Hall Step / Direction 24V Sensorless (no Feedback) Kollmorgen | wiki-kollmorgen.eu | February 2017... -
Page 199: Fault And Warning Messages
Fieldbus Error ASCII object reference Fieldbus Error ASCII object reference Emergency timeout Timeout emergency stop Safety Supervision Safety card error. Code follows: oXX=error number, iYY=error subindex System Error system software not responding correctly Kollmorgen | wiki-kollmorgen.eu | February 2017... -
Page 200: Warning Messages
Firmware is an unreleased beta version More information to the messages can be found in the ASCII Object Reference (online help ), see parameter STATCODE. Hints for removal can be found in section "Trouble-Shooting" of the online help. Kollmorgen | wiki-kollmorgen.eu | February 2017... -
Page 201: Approvals
RK5, CC, J, T 600VAC 200kA 15A (Time-Delay) S7240 RK5, CC, J, T 600VAC 200kA 30A (Time-Delay) S7480 RK5, CC, J, T 600VAC 200kA 60A (Time-Delay) S7720 RK5, CC, J, T 600VAC 200kA 80A (Time-Delay) Kollmorgen | wiki-kollmorgen.eu | February 2017... -
Page 202: Conformance With Ce
Kollmorgen declares the conformity of the products S700 with the following directives EC Machinery Directive (2006/42) EC EMC Directive (2014/30/EC) -
Page 203: Conformance With Eac
Customs Union (Russia, Belarus, Kazakhstan) similar to the European CE mark. Kollmorgen declares, that the S700 has passed all required conformity procedures in a mem- ber state of the Eurasian Customs Union, and that the S700 meets all technical requirements... -
Page 204: Referred Standards
UL Standard for Safety for Insulation Coordination Including Clearances and Creepage Distances for Electrical Equipment UL 508C UL Standard for Safety Power Conversion Equipment IEC - International Electrotechnical Commission ISO - International Organization for Standardization UL - Underwriters Laboratories Kollmorgen | wiki-kollmorgen.eu | February 2017... - Page 205 11/2015 Use as Directed (DC supply notes), UL markings corrected (fuses) 12/2015 Use as Directed updated 04/2016 LVD 2014/35/EG, EMCD 2014/30/EG, warning notes updated, handling chapter, safe voltage 50V 02/2017 New Hardware revision (02.30, SFD3 and Hiperface DSL support) Kollmorgen | wiki-kollmorgen.eu | February 2017...
- Page 206 We are committed to quality customer service. In order to serve in the most effective way, please contact your local sales representative for assistance. If you are unaware of your local sales representative, please contact the Customer Support. Europe KOLLMORGEN Internet: www.kollmorgen.com/uk E-Mail: technik@kollmorgen.com...
Need help?
Do you have a question about the S700 Series and is the answer not in the manual?
Questions and answers