Table of Contents
Advertisement
Quick Links
Advertisement
Table of Contents

Related Manuals for Nokia IP71


Summary of Contents for Nokia IP71
- Page 1 IP71 User Guide version 2.0 N450794001 Rev A October, 2002...
- Page 2 Rights clause at FAR 52.227-19. IMPORTANT NOTE TO USERS This software and hardware is provided by Nokia Inc. as is and any express or implied warranties, including, but not limited to, implied warranties of merchantability and fitness for a particular purpose are disclaimed. In no event shall Nokia, or its affiliates, subsidiaries or suppliers be liable for any direct, indirect, incidental, special, exemplary, or consequential damages (including, but not limited to, procurement of substitute goods or services;...
- Page 3 Tel: +358 9 692 7156 email: ipsecurity.apac@nokia.com Nokia Customer Support Web Site: https://support.nokia.com/ Email: tac.support@nokia.com Americas Europe Voice: 1-888-361-5030 or Voice: +44 (0) 125-286-8900 1-613-271-6721 Fax: 1-613-271-8782 Fax: +44 (0) 125-286-5666 Asia-Pacific Voice: +65-67232999 Fax: +65-67232897 021018 Nokia IP71 User Guide...
- Page 4 Nokia IP71 User Guide...
-
Page 5: Table Of Contents
Managing the IP71 ........ - Page 6 Configuring IP71 ........35...
- Page 7 Defining Network Objects ......86 Defining IP71 Platforms ......86 Setting the Network .
- Page 8 Index ..........119 Nokia IP71 User Guide...
-
Page 9: About This Guide
About This Guide This IP71 User Guide version 2.0 is intended for administrators and network installation engineers. This User Guide provides an overview of the installation process and covers all the features of Nokia IP71. The information in this guide addresses PC users only. Unless otherwise mentioned, Windows refers to Windows 95, Windows 98, Windows 2000/ NT. -
Page 10: Document Conventions
IP address notation conventions used throughout this guide. Cautionary Icons Warning Warnings advise the user that bodily injury might occur because of a physical hazard. Note Notes provide information of special interest or recommendations. Nokia IP71 User Guide... -
Page 11: Overview
Overview This chapter provides an overview of the features and functionality of the IP71 and tells you what you need before you can set up the IP71 and use it to connect to the Internet. About the IP71 The IP71 is an Ethernet-to-Ethernet network security platform (NSP) with four 10/100 Ethernet LAN ports and a 10BaseT WAN port. -
Page 12: Features
An Ethernet straight-through cable An Ethernet crossover cable, labeled Crossover An RS-232 console (serial) cable The IP71 CD. The IP71 CD includes the following documents needed to set up and use the IP71: IP71 User Guide IP71 Quick Start Guide... -
Page 13: Ip71 Externals
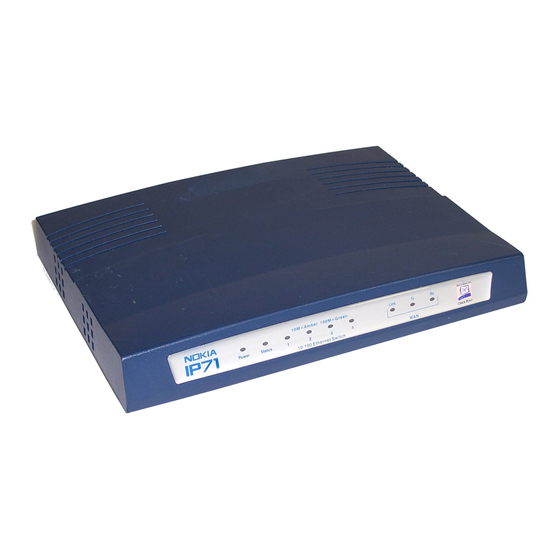
Adobe Acrobat Reader You can run the CD on a Windows computer with a CD drive. IP71 Externals This section provides an overview of the IP71 hardware. Figure 1 shows the front view of the IP71. Figure 1 IP71 Front View... - Page 14 Description Power LED When the IP71 is connected to the power source, this LED is green. When there is no power or when the IP71 power is not plugged in, the LED is off. Status LED The IP71 performs a series of diagnostic checks at start up.
-
Page 15: Restoring Factory Defaults
Console Restoring Factory Defaults Restore Defaults button is inside a hole on the back panel of the IP71. To press the button, use a straightened paper clip or pin. Pressing the Restore Defaults button restores all IP71 settings back to factory defaults. The button works only after booting is complete, and the green light must be illuminated to activate the button. -
Page 16: Upgrading
When you upgrade the IP71 to firmware v2.0, you need to replace your existing firewall license and security policy with a Check Point NG firewall license and push a new Check Point NG security policy on to your IP71 from the Check Point management server. -
Page 17: Using Nokia Horizon Manager
Advanced > Upgrade. Upgrading Using CLI You can use CLI to upgrade your IP71 to the latest version of Firmware. To upgrade to the new firmware, do the following as shown in Figure 3: On the console, enter set upgrade. - Page 18 Configure the parameters for TFTP/SCP and enter set command =start to upgrade. Note Users with IP71 v1.0 or v1.1, use CLI to upgrade the IP71. Use HTTPS- based GUI using after you upgrade to v1.6 or later. Nokia IP71 User Guide...
-
Page 19: Managing The Ip71
From the Check Point NG management server From Nokia Horizon Manager Secure web-based GUI You can access the IP71 securely through the HTTPS-based GUI to configure the IP71. You can configure the IP71 in two ways: Using Quick Setup Wizard Configure the most common settings required... - Page 20 Interface configure the LAN and WAN interfaces Interface Options configure advanced interface information Date/ Time set the device date and time Admin configure the Session Timeout, HTTPS Encryption type and to change the access password Nokia IP71 User Guide...
- Page 21 Diagnostics tools: Ping, Trace Route and NS Look up Utilization displays utlization information of the device Services reset the IP71 to Factory Defaults, access Quick Setup Wizard, Restart Device and view Technical Support Dump Nokia IP71 User Guide...
-
Page 22: Command-Line Interface
When the IP71 device boots up, a number sequence representing the boot process of the different features in the IP71 appears. You can now configure the IP71. Enter Help or ? in the CLI prompt for help on IP71 CLI. Console... -
Page 23: Ssh Client
To access the IP71 with SSH client requires that the computer running the SSH client has an active network connection to the IP71. This connection must use the same IP address range as the IP71 on the local network or the routing setup to reach the IP71. For more information, refer... -
Page 24: Check Point Management Server
The Check Point management server is on the WAN side (to manage a single IP71 or multiple IP71 devices from a central location) or on the LAN side (to locally manage an IP71). Using a Check Point management server, you can manage multiple IP71 devices in remote offices and push a single security policy to all devices or multiple security policies to multiple devices. -
Page 25: Installing Ip71
The IP71 functions as a firewall between the WAN and the LAN at a given office site. As part of the network arrangement, the system administrator must assign a WAN IP address and a LAN IP address to the IP71. Each IP address is accompanied by a subnet mask. -
Page 26: Obtaining Check Point License
In this scenario, a Check Point management server manages a remote IP71 from the WAN interface. This is the ‘Central’ option used to generate the Check Point NG license. To use Check Point to manage a remote IP71 from the WAN interface, you need the following:... - Page 27 Local Management Managing IP71 from Check Point NG management server on the LAN side. In this scenario you can manage the IP71 locally with a Check Point NG management server in the same network as the IP71. This is the ‘Local’...
-
Page 28: Linking To The Ip71
SmallOffice management server Linking to the IP71 You can link your computer to the IP71 in two ways: Using Console. From Hyperterminal to access the CLI Using Ethernet. From abrowser to access the web-based GUI Using Console Connection Connect the IP71 to your computer using the console cable provided. -
Page 29: Using Hyperterminal
You are now ready to link your computer to the IP71. Using Hyperterminal With the IP71 physically installed, the next task is to link your computer to the IP71. The following example uses Windows HypterTerminal. To link your computer to the IP71, do the following. - Page 30 3. The Connect To screen appears. In the Connect using menu, select COM1 (Direct to Com1) or COM2 (Direct to Com2) to connect the console cable to the COM1 or COM2 port, respectively, on the computer. Click OK. Nokia IP71 User Guide...
- Page 31 Linking to the IP71 The COM1 or COM2 Properties screen appears. 4. Enter the following values in the appropriate fields. Bits per second: 9600 Data bits: 8 Parity: None Stop bits: 1 Flow Control: None 5. Click OK. The COM Properties screen disappears.
-
Page 32: Using Ethernet Connection
Internet Explorer 5.0 or later; Netscape 6.2 or later. To connect to the IP71 from your computer using a browser 1. Connect one of the LAN port of IP71 to the network port. Ensure your computer is using an ethernet cable. -
Page 33: Logging In
Linking to the IP71 Note To access the IP71 over the LAN, the device has a default IP address set to 192.168.1.1 and the DHCP Server is enabled. 2. Configure your computer to obtain the IP address automatically from the DHCP server in your IP71. -
Page 34: Logging Off
Installing IP71 Note If you are upgrading an existing IP71 (v1.0 or v1.1) to v2.0, the old LAN and WAN IP addresses are retained. 1. Enter the IP address of the device in the following ‘quad’ format. https://192.168.1.1 Note that you should enter https instead of http. -
Page 35: Configuring Ip71
Configuring Through the CLI. Using a Console connection. Managing through Nokia Horizon Manager. For managing remotely. This chapter also describes the following features and functions in the IP71. SNMP Secured access to GUI using security certificates Event logging Check Point Firewall configuration... -
Page 36: Configuring Through A Secure Web-Based Gui
Configuring IP71 Configuring Through a Secure Web-Based GUI You can configure the IP71 through the secure Web-based GUI in two ways: Quick Setup Wizard Custom Configuration Note Before configuring the IP71, obtain a Check Point NG SmallOffice license. On successful login, the Quick Setup Wizard appears, as shown in Figure 8. -
Page 37: Using The Quick Setup Wizard
Using the Quick Setup Wizard The Quick Setup Wizard allows you to configure the most common settings that you are likely to use. For advanced configuration of your IP71, use the IP71 GUI. You can configure the following through the Quick Setup Wizard:... - Page 38 If you do not know the IP address of the management server, you can still enable Automatic Fetch. The management server uses the WAN IP address of the IP71 and pushes a security policy. Nokia Horizon IP Address Enter the IP address of Nokia Horizon Manager Manager.
- Page 39 5. Click Submit for all the configuration settings to take effect. 6. Click Cancel to nullify the Wizard configuration. The IP71 Status page appears. 7. Click Finish. The IP71 is configured to be up and running. Nokia IP71 User Guide...
-
Page 40: Configuring Using The Gui
System The default Status page that appears displays the existing configuration of your IP71. If you have used Quick Setup Wizard to perform an initial setup configuration, the configuration settings will be displayed on this page. Figure 10 Device Status... -
Page 41: Interface
To set the manual WAN mode, Enter the WAN IP Address and the corresponding Subnet Mask of your IP71. This is given by your service provider. Enter the Gateway IP Address. Click Submit for the settings to take effect. - Page 42 Enter the External WAN IP.You need this information to configure the static WAN interface of IP71 and ensure that every time you connect through the PPPoE server, you get the same address. This is optional.
-
Page 43: Interface Options
PPPoE client should connect to. • Always On. Always On is enabled by default. It allows the IP71 to be always connected to Internet. If you unselect Always On, you need to restart the PPPoE Client each time the PPPoE connection terminates. -
Page 44: Date And Time
GUI once a session times out. HTTPS Encryption Type. Select the security level of access to your IP71 from the menu. You can choose the following encryption levels: None (Disable SSL): Select if you wish not to use secure access to GUI. -
Page 45: Manage
Configuring Using the GUI Note The IP71 uses Port 80 for access through http:// and Port 443 for access through https://. 40-bit key or stronger 56-bit key or stronger 128-bit key or stronger Triple-DES You can change the access Password to your IP71. To change password, Enter the Old Password. - Page 46 Configuring IP71 You can securely configure your IP71 from a remote location using SSH. The IP71 supports client-based SSH through both the HTTP GUI and the CLI. Configure the SSH client before you configure the IP71 using SSH. You need the following to configure using SSH: LAN and WAN IP addresses are defined using the Wizard setup.
- Page 47 Click Submit. Initiate a SSH session from the SSH client to access the IP71. You can also use the IP71 as an SSH server and initiate an SSH connection with a remote SSH client. To initiate an SSH connection, d.
- Page 48 1024 Key Length The key must be exchanged with the IP71 to authenticate. The key is too large to enter into the IP71 through the CLI so it is converted into a fingerprint. Fingerprints are a more secure way of transferring keys than passwords. The CD that comes with the IP71 contains fpgen.exe a tool that converts an...
- Page 49 5. Enter fpgen and the name of the public key file. For example: fpgen ip71.pub. 6. Copy the generated fingerprint. 7. Log on to the IP71 with the console port or through SSH by using the Password-Based Authentication as described above.
- Page 50 Configuring IP71 To enhance the security of the IP71, disable the IP71 from accepting further fingerprints or password-based connections. The IP71 continues to use the keys that were exchanged. To do this, type set ssh sshauthmethod=publickeys fingerprint=disable and press Enter. Now, SSH clients can only connect using already exchanged keys.
-
Page 51: Configuring Through Snmp Manager
(active/delete). additional information. Configuring Through SNMP Manager You can configure the IP71 using an SNMP Manager from a remote location. To access SNMP, click Manage > SNMP. You can view and configure your IP71 from a remote computer by using SNMP manager as in Figure 12. - Page 52 To access the CLI from the GUI, click Manage > CLI. A secure Web-based GUI also allows you to execute CLI commands within the GUI. The CLI screen appears, as in Figure 13. Figure 13 Using CLI in the GUI Nokia IP71 User Guide...
-
Page 53: Generating Security Certificates
You can create a Secure Socket Layer (SSL) certificate to set up a secure Web access (HTTPS) to your device. To do this, first generate a certificate using the Certificate Tool. Figure 14 Generating Security Certificate You can generate a certificate in two ways: Nokia IP71 User Guide... - Page 54 State/ Province Name Locality (Town) Name Organization Name Organizational Unit Common Name (FQDN) or the IP address of the IP71 Email 3. Click Submit. You will be prompted to close the browser and open after a few minutes. 4. Click Reset to reset.
-
Page 55: Managing Through Nokia Horizon Manager
You can access and manage the IP71 remotely using Nokia Horizon Manager (NHM). NHM identifies a device with the help of the IP address. However, the IP71 uses dynamic WAN IP where an IP address is issued to the device. In order for NHM to identify the IP71, use a Host ID. -
Page 56: Logging
2. Enter the Port number. Port 6654 is dedicated for NHM by default. 3. Enter the Retry Timeout. Make sure you have configured the Host ID in the IP71 Interface Options. Logging The IP71 supports a standard system-logging feature (syslog) that allows system event logging locally on the IP71 and to a remote server. -
Page 57: Syslog
Configuring Using the GUI Figure 16 Log Syslog You can enable or disable logging on your IP71 using the Syslog. To access Syslog, click Logging > Syslog. Figure 17 Syslog To configure Syslog 1. Select Enable or Disable. 2. Select the logging type: All or Critical. -
Page 58: Check Point
Configuring IP71 Check Point The Check Point NG firewall in your IP71 is enabled by default. The firewall uses a security policy issued by a Check Point NG management server. To access the Check Point, click Check Point. Figure 18 Check Point Details... - Page 59 You can configure the IP71 using a Central license. To do this, enable Automatic Fetch. When using a Central license, the Check Point license is attached to the IP71 module from the Check Point management server through SmartUpdate (in Check Point FP3) or SecureUpdate (in Check Point FP2).
-
Page 60: Advanced
Enter the name of the Network Object that you have defined for your IP71. 5. Click Submit. Note Check Point settings can take several minutes to complete. Advanced The Advanced Features section describes the following features in your IP71: DHCP Server Routing Upgrading Import and Export Nokia IP71 User Guide... - Page 61 If the DHCP server detects another DHCP server on the LAN, it disables itself to avoid conflict. In the IP71, the DHCP server is enabled only on the LAN interface. The HTTP GUI of IP71 allows you to configure the DHCP server quickly.
- Page 62 1. Select to Enable or Disable the DHCP Server. 2. Configure the following settings: a. Enter the LAN IP Address of the IP71 and the Subnet Mask. b. Enter the Domain name of your IP71. This is usually the Domain Name assigned to the computer within the network.
-
Page 63: Routing
To access Routing, click Advanced > Routing. The Routing feature allows you to configure host and network specific routes on LAN and WAN interfaces, as well as the default gateway for the device. Figure 20 Configuring Routes Nokia IP71 User Guide... -
Page 64: Arp
ARP (Static NAT) enables your LAN to use a set of private IP addresses for internal traffic and a second set of public IP addresses for external traffic. ARP allows the IP71 to maintain a public IP address mapped to a private IP address when communicating with computers or devices outside your LAN. -
Page 65: Upgrading
ARP Entry table and Click Modify or Delete. 5. Click Submit. Upgrading To access Upgrade, click Advanced > Upgrade. The Upgrade feature enables you to upgrade your IP71 with new firmware. It displays the current firmware information. Figure 22 Firmware Upgrade To upgrade 1. -
Page 66: Import And Export
Upgrade the IP71 to new firmware Reconfigure the device. In such a situation, a backup of the IP71 configuration to your computer will help reconfigure the device later. You can export (backup) the IP71 configuration using the Export function.The backed up configuration can be restored with the Import function. - Page 67 5. Enter the username and password of the computer (only for SCP). 6. Click Submit. Note When you import a configuration file, the existing configuration on the IP71 is overwritten with the new configuration. Nokia IP71 User Guide...
-
Page 68: Diagnostics
Configuring IP71 Diagnostics Diagnostics provide you information about the performance of your IP71. Tools Utilization Services Console Edit Files Tools To access Tools, click Diagnostics. Figure 24 Diagnostics - Tools Diagnostics Tools provide you the following information: Ping checks for reachability of a device installed in a remote location. If you select Ping as in Figure 24, Enter the number of times you want to ping. -
Page 69: Utilization
Enter the IP address of the DNS Server. Utilization To access Utilization, click Diagnostics > Utilization. Figure 25 Diagnostics - Utilization The Utilization page displays the performance statistics of the IP71. The following statistics are displayed: LAN Interface Statistics - Receive LAN Interface Statistics - Transmit... -
Page 70: Services
Technical Support Dump Click Technical Support Dump to save the complete configuration details of your IP71 as well as the log of all actions performed on the device. Save the dump file to send it to Customer Support when you report a problem. -
Page 71: Snort
Show the version number and exit Show the program usage statement and exit. Console To access Console, click Diagnostics > Console. The Console feature allows you to establish an SSH Session to your IP71 installed in a remote location. Nokia IP71 User Guide... - Page 72 1. Select Console. A pop-up window prompts you for your Username and Password (same as your device username and password). 2. Enter your Username and Password. Click OK. You can now configure the IP71 using CLI commands from the Console. Note Enter Exit or the SSH session remains open.
-
Page 73: Edit Files
Configuring Using the GUI Edit Files You can edit a specific configuration file that is in the IP71. Figure 28 Diagnostics - Edit Files To edit a configuration file 1. Select Edit Files. A screen as in Figure 27 appears. -
Page 74: Configuring Through Console
You can configure the IP71 through a Console connection using the Command-line interface (CLI). To access CLI on IP71, you need a VT100 terminal emulation program such as Hyperterminal. Table 5 gives the list of available configuration commands in the IP71 CLI: Table 5 CLI Commands CLI Commands... - Page 75 Example: Set ipinterface table index=lan ipaddress=192.168.1.2 mask=255.255.255.0 state=up You can configure the IP71 with CLI using the CLI Quick Setup Wizard. Configuring the IP71 using CLI involves providing the same information as when configuring using secure Web-based GUI. 1. Enter the default login username (admin) and password (password). An IP71 prompt appears and you can begin the system configuration.
- Page 76 2. Enter Wizard to start the configuration procedures. A series of date, time, IP address options (with defaults), Chekc Point and Nokia Horizon Manager details appear in sequence as you enter the information for a given option. To quit the Wizard, press Ctrl and C keys (Ctrl + C). This brings you back to the IP71 prompt.
- Page 77 Configuring Using the GUI Installing Check Point NG License To configure the Check Point NG settings using CLI 1. Enter set check point after the IP71 prompt. 2. Enter the Check Point details. Figure 31 Installing Check Point License IP71% set checkpoint set checkpoint state=[Disable/Enable] expdate=[expdate (1 ...
-
Page 78: Configuring Static Nat
Configuring IP71 4. Enter the following information: Host ID represents the IP71. The Host ID helps Nokia Horizon Manager identify the IP71 even if the IP address changes. Expiration date of the Check Point NG license. SKU/ Features identifies what the License allows the IP71 to do. The... -
Page 79: Configuring Network Objects
204.32.38.10. The rest of the computers will hide behind the external IP address (204.32.38.1) of the firewall. Perform the following tasks to configure Static NAT: Configuring Network Objects Configuring Security Policy Configuring NAT Rules Configuring Routing and ARP Entries Installing the Security Policy Configuring Anti-Spoofing Nokia IP71 User Guide... - Page 80 The “legal” IP address (204.32.38.10) of the WWW server. External IP71 The workstation object for the IP71 (defined as an internal gateway with FireWall-1 installed). Though all its interfaces are defined in the Interfaces section, the IP address listed in the network object itself is 204.32.38.1 (the external IP).
-
Page 81: Configuring Nat Rules
204.32.38.10), it will be translated to the server's “real” IP address (e.g. 192.168.1.10) through a static translation. Replies to this traffic will automatically be translated. 2. Users in the Internal_Network_Range (e.g. all IPs in 192.168.1.0 except for 192.168.1.1) will be hidden behind the Firewall’s external interface Nokia IP71 User Guide... -
Page 82: Configuring Routing And Arp Entries
Configuring Routing and ARP Entries Configure the Routing and ARP entries in your IP71. To configure routing and ARP entries, 1. Set up a proxy ARP for the legal IP address. -
Page 83: Configuring Anti-Spoofing
In this case, it means adding 204.32.38.10 to the valid addresses setting for the internal interface. Create a group to do this. In this case, it is called eth1-valid. Put the following objects into the group: Internal_Network WWW_Server_External Nokia IP71 User Guide... - Page 84 Set the valid addresses for eth1 (the internal interface) to eth1-valid. Table 9 Configuring Valid Addresses Interface IP Address Valid Address Setting eth0 204.32.38.1 Others eth1 192.168.1.1 Specific: eth1-valid Now, install your firewall security policy on the IP71. Nokia IP71 User Guide...
-
Page 85: Configuring A Vpn
Internet elements. You can configure a VPN from your IP71 to another IP71 or any other VPN gateway. In this guide, a VPN refers to secure communication between an IP71 with a SmallOffice Check Point NG license and another similarly configured element such as another IP71 or Check Point VPN gateway. -
Page 86: Defining Network Objects
Defining IP71 Platforms Use the following procedure to define your Network Objects. This example assumes that two IP71 devices (IP71A and IP71B) are configured on two different networks. However, two connecting units can be on the same or different networks to use a VPN. - Page 87 In this example, the first IP71 is designated as IP71A. 4. Enter the IP address of the IP71 (Select Dynamic Address if DAIP is enabled). 5. Select Check Point products information: Version: Select NG FP2 Select either VPN -1 Pro or VPN-1 Net. On selecting VPN-1 Pro, Firewall-1 is selected by default Click Secure Internal Communication.
- Page 88 Configuring a VPN a. Enter and confirm the Activation Key (the same activation key as entered by you on the IP71). b. Click Initialize. The Trust State will change to Established once both the objects are configured. 6. Click Topology. The Topology screen appears.
- Page 89 VPN. 8. On the Topology page, select the VPN Domain. 9. Click VPN in General Properties. a. Select IKE and click Edit. The IKE Properties appear b. Select the Key Exchange encryption. Nokia IP71 User Guide...
-
Page 90: Setting The Network
Click OK. Setting the Network Once you have defined the two IP71 platforms as Network Objects that will act as gateways for their respective networks, you need to set the networks. To configure the network behind which one of the IP71 is located, 1. -
Page 91: Building Vpn Groups
You can build a VPN group with two or more VPNs configured by you. This will simplify the VPN configuration. To build a VPN group, 1. On the Check Point Policy Editor, choose Manage and Network Objects. The Network Objects window appears. Nokia IP71 User Guide... -
Page 92: Installing Policies
(policies) to the various column entries in the rule base; a sample of a completed rule base is shown in Figure 38. Figure 36 Rule Base To initiate policy installation, 1. Choose the Install policies icon (or click Policy > Install). The install policy screen appears. Nokia IP71 User Guide... - Page 93 4. Click OK. The Install Policy status display runs. When the policy is installed, click To confirm the integrity of the configured VPN, ping from one IP71 computer to another. You can view the status of the VPN on the log viewer.
- Page 94 Configuring a VPN Nokia IP71 User Guide...
- Page 95 Obtaining a Check Point License Before you configure the IP71 and activate the firewall in the device, you need to obtain a Check Point NG Firewall License. You can obtain the License with the help of the certificate key given to you when you purchase the device and the Check Point license.
-
Page 96: A Obtaining A Check Point License
On successfully creating a User Account, log on using your email ID and the password you used to create your account. The Products List page appears. There are no products shown in your User Account. Click the Add Products. The following screen appears. Nokia IP71 User Guide... - Page 97 The Key entered will be added to your User Account. Click the Products List on the right top corner of the screen shown in the Figure. The product for which you want the license is displayed. Nokia IP71 User Guide...
- Page 98 Obtaining a Check Point License Check the product displayed. Click the product link, CPMPEVAL-BANK-NG to enter the product details. Nokia IP71 User Guide...
- Page 99 Click License. Select the licensing scheme - central or local licensing. Click Continue with Software Details. Nokia IP71 User Guide...
- Page 100 For the management, enter the following information: Enter the IP Address or the Host ID Select NG as the Product Version Select the Operating System used in the IP71 Select the Hardware Platform Click Continue to Confirmation. The License is created.
- Page 101 Click Download these Licenses. The License Download Notice appears. Click Download License. Copy the screen output text or E mail text to a text file and save it for reference. Nokia IP71 User Guide...
- Page 102 Obtaining a Check Point License Nokia IP71 User Guide...
-
Page 103: B Technical Specifications
Technical Specifications Physical Table 10 Physical Dminesions Dimension Metric Height 1.4in 3.5cm Width 10.0in 25.4cm Depth 7.0in 17.5cm Weight 1.82lb 830g Environmental Table 11 Environmental Specifications System Dimension Range Temperature Operating 40° F to 105° F (0° C to 40° C) Humidity Non Condensing 10% to 90%... -
Page 104: Default Settings
Technical Specifications Table 11 Environmental Specifications System Dimension Range Electrical Input 100 to120/200 to 240 VAC 12 VDC 50 or 60 Hz 12 W max consumption Weight 1.82lb 830g Default Settings Table 12 Default Settings LAN IP address 192.168.1.1 LAN Subnet Mask 255.255.255.0 WAN IP Address 192.168.2.1... - Page 105 Default Settings Table 12 Default Settings Nokia Horizon Manager IP address 0.0.0.0 Nokia Horizon Manager port Number 6654 Nokia Horizon Manager Retry 5 Minutes Timeout SSH Fingerprint Enabled SSH Auth. Method Log Type Log Server IP 0.0.0.0 Log View 10 events...
-
Page 106: Software Specifications
Technical Specifications Software Specifications Routing Multi-user sharing through Ethernet LAN TCP/IP Static routing on both LAN and WAN Management Features HTTPS-based GUI Command-line interface (CLI) SNMP management features Export and Import configuration Firmware Upgrade Reset to factory defaults Diagnostics Ping test Trace Route NS Lookup Document Title Variable... -
Page 107: Hardware Specifications
Clock Year 2000-compliant, real-time clock Copyrights © Nokia 2002. Nokia is a registered trademark of Nokia Corporation. Portions of this software may fall under the following copyrights: Copyright © 1995, 1996, 1997, 1998, 1999 The Internet Software Consortium. All rights reserved. - Page 108 Technical Specifications Document Title Variable...
-
Page 109: C Compliance Information
IP71 Product options: Serial number: 6CYYWK5N Date first applied: 2000 conforms to the following standards: Safety: EN60950:1992, A1,A2:1993, A3:1995, A4:1997, A11:1998 with Japanese National Deviations EMC: EN50024, EN55022A 1998, CISPR 22 Class B 1985, EN61000-3-2, EN61000-3-3 Nokia IP71 User Guide... -
Page 110: Compliance Statement
FCC Part 15, Subpart B, Class B US and Canada EN55022A: (CISPR 22, Class B) European Community (CE) EN6100-3-2 European Community (CE) EN6100-3-3 European Community (CE) Immunity EN50024: European Community (CE) EN61000-4-2 EN61000-4-3 EN61000-4-4 EN61000-4-5 EN61000-4-6 EN61000-4-8 EN61000-4-11 ENV50204 Nokia IP71 User Guide... -
Page 111: Fcc Notice (Us)
Increase the separation between the computer and receiver. Connect the computer into an outlet on a circuit different from that to which the receiver is connected. Consult the dealer or an experienced radio/TV technician for help. Nokia IP71 User Guide... - Page 112 Compliance Information Caution Any changes or modifications not expressly approved by the grantee of this device could void the user’s authority to operate the equipment. Nokia IP71 User Guide...
- Page 113 Service Provider, Nokia grants to Customer a personal, nonexclusive and nontransferable license to use the Software in object code form solely as embedded in equipment provided by Nokia. If Customer is an approved Managed Service Provider ("MSP"), Nokia grants a nonexclusive and non...
- Page 114 If the Software is found to contain a substantial nonconformance, Nokia’s sole obligation under this warranty shall be, at Nokia’s option: (a) to correct, or provide a "work around" for any material programming error or defect in the Software, or (b) to refund to Licensee the purchase price paid and this Agreement shall terminate.
- Page 115 Nokia cannot reasonably reproduce the Software error. Furthermore, the above warranty does not apply to any portion of the product supplied by a third party. In no event does Nokia warrant that the Software is error-free or that the Customer will be able to operate it without problems or service interruptions.
-
Page 116: D Warranty And Software License
Customer’s breach of this Agreement. 7. FORCE MAJEURE. Nokia shall not be liable for any delay or failure in performance whatsoever due to reasons beyond its reasonable control. - Page 117 Upon termination, Customer shall cease all use of the Software and shall destroy or return to Nokia the original(s) and all copies of the Software and documentation made or furnished hereunder. Customer may terminate the License at any time by destroying all copies of the Software and documentation.
- Page 118 US. Government shall be governed solely by the terms of this Agreement and shall be prohibited except to the extent expressly permitted by the terms of this Agreement. Nokia IP71 User Guide...
-
Page 119: Index
Snort 70 Disabling Fingerprints 49 software specifications 112 document conventions 10 specifications cautions and warnings 10 compliance 116 emissions 116 environmental 111 emissions 116 physical 111 Encryption Type 44 depth Externals 13 height Nokia IP71 Version 2.0 Index - 119... - Page 120 117 SSH Authentication 46 SSH Client 23 Static NAT Configuration 77 Upgrade 64 Upgrading 16 defining IP71 platforms 86 installing policies 92 warning 10 width 111 Index - 120 Nokia IP71 Version 2.0...
Need help?
Do you have a question about the IP71 and is the answer not in the manual?
Questions and answers