Advertisement
Table of Contents
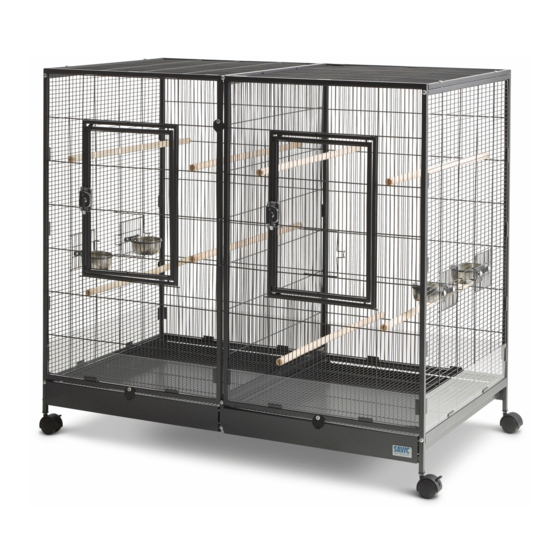
Tasmania 120
Assembly instructions for Tasmania 120
Richtlijnen voor de montage van Tasmania 120
Instructions pour le montage de la Tasmania 120
Aufbau-Anleitung des Tasmania 120
Instrucciones de montaje de la Tasmania 120
инструкция по сборке Tasmania 120
120 x 65 x 107 cm (total)
120 x 65 x 98,5 cm (cage)
Advertisement
Table of Contents

Related Manuals for Savic Tasmania 120


Summary of Contents for Savic Tasmania 120
- Page 1 Tasmania 120 Assembly instructions for Tasmania 120 Richtlijnen voor de montage van Tasmania 120 Instructions pour le montage de la Tasmania 120 Aufbau-Anleitung des Tasmania 120 Instrucciones de montaje de la Tasmania 120 инструкция по сборке Tasmania 120 120 x 65 x 107 cm (total)
- Page 2 Savic would like to thank you for Wij, firma Savic, danken u voor Savic vous remercie de votre Wir, die Firma Savic, danken Savic le agradece que haya Savic благодарит вас за your purchase and confidence in uw aankoop en uw vertrouwen achat et de votre confiance en Ihnen für Ihren Einkauf und...
- Page 3 Parts list - Inhoud onderdelen - Liste des pièces livrées Gelieferte Teile - Lista de piezas - Обозначения деталей A) left back panel A) linkerachterpaneel A) panneau arrière gauche I) left roof panel I) linkerdakpaneel I) panneau de toit gauche B) right back panel B) rechterachterpaneel B) panneau arrière droit...
- Page 4 Assemble one of the side panels (C) to the right front panel (E). Tighten the screws (S) at the top and bottom using the hexagon key (Q). Monteer één van de zijpanelen (C) tegen het rechter voorpaneel (E). Draai de schroeven (S) bovenaan en onderaan aan met de inbussleutel (Q) Montez un des panneaux latéraux (C) sur le panneau avant droit (E).
- Page 5 Slide the left front panel (D) into the right front panel (E). Assemble the slider (H) between the left and right front panel and back panel. Schuif het linkervoorpaneel (D) in het rechter voorpaneel (E). Monteer de geleider (H) tussen de linker en rechter voor- en Glissez le panneau avant gauche (D) dans le panneau avant droit (E).
- Page 6 Assemble the second side panel (C) to the left front and back panel. Assemble now the right roof panel (J). Monteer het tweede zijpaneel (C) tussen de linker voor- en Monteer nu het rechter dakpaneel (J). achterpanelen. Assemblez maintenant le panneau de toit droit (J). Montez le deuxième panneau latéral (C) sur les panneaux avant et arrière gauches.
- Page 7 Place now all the stainless steel bowls (O) into the cup holders and Place the plastic panels (U, V, W) on all sides of the cage. install the castors (P). Plaats de plastic panelen (U, V, W) aan alle kanten van de kooi. Plaats alle roestvrijstalen kommen (O) in de bekerhouders en installeer de wieltjes (P).
- Page 8 You can convert the standard version of Tasmania cage into a small animal cage. The wooden kit is separately available (art.nr.: A951137). U kunt de standaardversie van de Tasmania-kooi ook omvormen tot een kooi voor knaagdieren. De houten kit is apart verkrijgbaar (art.nr.: A951137).
- Page 9 Ringlaan 10 • B-8501 Heule • Belgium Tel. +32 56 35 33 45 • Fax +32 56 35 77 30 info@savic.be...
Need help?
Do you have a question about the Tasmania 120 and is the answer not in the manual?
Questions and answers