
Subscribe to Our Youtube Channel
Related Manuals for Savic Royal Suite XL


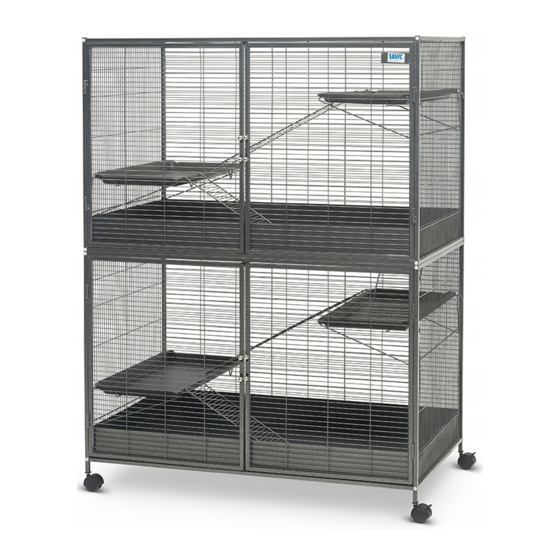
Summary of Contents for Savic Royal Suite XL
- Page 1 Royal Suite XL Add-on unit Assembly instructions Montage-instructies - Instructions de montage - Montageanleitung - Instrucciones de montaje - Istruzioni di montaggio - Návod k sestavení - Instrukcja montażu - Инструкция по сборке...
- Page 2 Het is mogelijk om de Royal Suite XL kooi met Single Unit uit te breiden met onze Add-on Unit. Maximaal 1 Add-on Unit per kooi. Vérifiez tous les composants. Si une pièce est manquante ou endommagée, n’utilisez pas votre cage.
- Page 3 A 1 middle grid with opening and small ladder A 1 middenrooster met opening en kleine ladder A 1 grille centrale avec ouverture et petite échelle B 8 screws with hexagon tool B 8 schroeven met inbussleutel B 8 vis avec outil hexagonal C 2 side panels C 2 zijpanelen C 2 panneaux latéraux...
- Page 4 G 1 ladder 47 cm G 1 ladder 47 cm 1 échelle 47 cm H 1 ladder 64 cm H 1 ladder 64 cm H 1 échelle 64 cm 2 frames for platforms 2 frames voor platformen 2 cadres pour plates-formes 2 platforms 2 platforms 2 plates-formes...
- Page 5 Possible to extend with add-on unit for the most spacious habitat. Maximum of 1 add-on unit per cage. Single unit - 115 x 67 x 81 cm Single unit + 1 add-on unit 115 x 67 x 152 cm...
- Page 6 NL 1 Firstly, remove all accessories and the tube ends. Remove the top screws of the front panel and back panel. Verwijder eerst alle accessoires en de uiteinden van de buizen. Verwijder de bovenste schroeven van het voorpaneel en het achterpaneel. Tout d’abord, retirez tous les accessoires et les extrémités des tubes.
- Page 7 NL 2 Remove the roof panel, set it aside, and replace it with the grid that has an opening (A). Ensure it fits securely between the grooves of the side panels and that the pins are correctly positioned in the back and front panel. Verwijder het dakpaneel, zet het opzij en vervang het door het rooster met een opening (A).
- Page 8 NL 3 Choose one corner of the cage. Take a tube connector (D) and place it at one corner in the cage. Slide the connector so that the bottom opening is in the correct position, then secure the connector with a screw.. Repeat this step for the other 3 corners. Kies een hoek van de kooi.
- Page 9 NL 4 Slide the back panel (F) over the two rear tube connectors. The openings in the back panel should face inward. Schuif het achterpaneel (F) over de twee buisconnectoren aan de achterzijde. De openingen in het achterpaneel moeten naar binnen wijzen.
- Page 10 NL 5 Choose one of the two side panels and attach it to the back panel wit at screw at the bottom. The screw now goes through the top opening of the tube connector. Ensure the grooves of the side panel face inward. Kies één van de twee zijpanelen en bevestig deze aan het achterpaneel met een schroef onderaan.
- Page 11 NL 6 Proceed with the front panel (E), slide it over the two front tube connectors and fix it with 2 screws at the top opening of the tube connector. Ga verder met het voorpaneel (E), schuif het over de twee voorste buisconnectoren en bevestig het met een schroef in de bovenste opening van de buisconnector.
- Page 12 NL 7 Mount the second side panel in the same way as the first side panel. Monteer het tweede zijpaneel op dezelfde manier als het eerste zijpaneel. Montez le deuxième panneau latéral de la même manière que le premier panneau latéral. Montieren Sie das zweite Seitenpanel auf die gleiche Weise wie das erste Seitenpanel.
- Page 13 NL 8 Retrieve the roof panel from the Single Unit, slightly bend it and first slide the short side into the grooves of the side panels. Also, ensure the pins fit securely into the openings of the back and front panel. Haal het dakpaneel van de Single unit, buig het lichtjes en schuif eerst de korte zijde in de groeven van de zijpanelen.
- Page 14 NL 9 Install the remaining screws at the top and secure now all the screws firmly. Installeer de resterende schroeven bovenaan en zet nu alle schroeven stevig vast. Installez les vis restantes en haut et serrez maintenant toutes les vis fermement. Installieren Sie die verbleibenden Schrauben oben und ziehen Sie nun alle Schrauben fest an.
- Page 15 Open all doors and fit the accessories as shown in the image. Open alle deuren en plaats de accessoires zoals getoond op de afbeelding. Ouvrez toutes les portes et installez les accessoires comme montré sur l’image. Öffnen Sie alle Türen und passen Sie das Zubehör an, wie auf dem Bild gezeigt. Abra todas las puertas y ajuste los accesorios como se muestra en la imagen.
- Page 16 Detach the ladder from the middle grid. It will now rest on the top platform at the bottom of the cage Maak de ladder los van het middelste rooster. Deze rust nu op het bovenste platform onderaan de kooi. Détachez l’échelle du grillage central. Elle reposera maintenant sur la plateforme supérieure au bas de la cage. Lösen Sie die Leiter vom mittleren Gitter.
- Page 17 Close all doors. The cage is now assembled and ready for use. Tip: For easy cleaning, you can temporarily place the animals in one compartment of the cage by reattaching the short ladder to the hook on the middle grid. You can also create two separate cages for different purposes, such as separating genders.
Need help?
Do you have a question about the Royal Suite XL and is the answer not in the manual?
Questions and answers