Advertisement
Quick Links
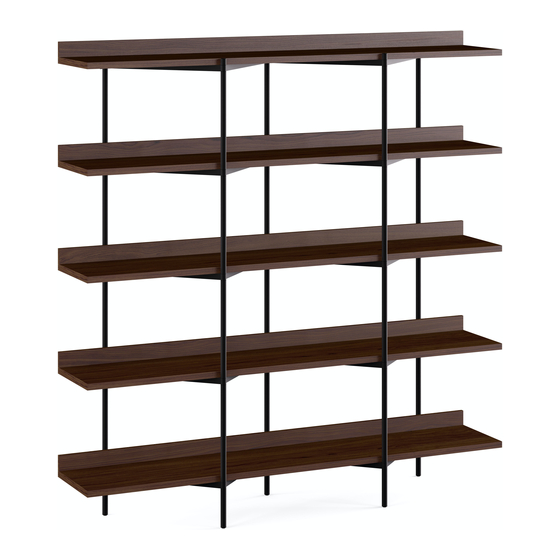
KITE
5 Tier Shelf
Product Registration
Registering your new BDI product allows us to send you important
product updates, service information and helpful hints related to your BDI
products. Register today, and you will be entered to win free a BINK table
from BDI: www.bdiusa.com/register
Placement and Maintenance
Your Kite Shelf is designed for indoor use on level floors.
Clean wood veneer and steel parts with a moist cloth.
Kite is engineered for easy assembly. Carefully follow this procedure to
prevent any damage. Do not use power tools for assembly of this product.
Step 1
Unpack and identify the parts listed below. The assembly workspace
should be a non-marring surface such as carpet. For missing hardware
pieces, contact BDI Customer Service at: customerservice@bdiusa.com.
For all other concerns, please contact your BDI retailer.
C4 Shelf x 5
Designed by Matthew Weatherly.
These distinctive product configurations are protected by US and international patents, trade dress, and/or
copyright laws. Kite & BDI are trademarks of Becker Designed, Inc. All rights reserved. ©2017, BDI
Made in China. 2.15.2018 V3
5305
™
H2 1/4-20 x 85 mm
Wall leveler x 2
bdiusa.com
customerservice@bdiusa.com
T1 Hex Wrench x 1
T2 Leveler wrench x 1
H1 1/4-20 x 15 mm
Flat head Screw x 25
H3 Wall anchor
strap x 2
H4 Leveler x 5
C1 Horizontal shelf frame
x 5
C2 Upright x 20
C5 Cap x 5
C3 Foot x 5
Advertisement

Subscribe to Our Youtube Channel
Related Manuals for BDI KITE 5305


Summary of Contents for BDI KITE 5305
- Page 1 C3 Foot x 5 Designed by Matthew Weatherly. These distinctive product configurations are protected by US and international patents, trade dress, and/or copyright laws. Kite & BDI are trademarks of Becker Designed, Inc. All rights reserved. ©2017, BDI Made in China. 2.15.2018 V3...
- Page 2 Step 3 - Unscrew caps from all 5 feet. Screw in 1 leveler H4 into the end of each foot. Repeat for all 5 feet. Remove Caps Foot Foot Attach Levelers bdiusa.com KITE 5305 customerservice@bdiusa.com 5 Tier Shelf...
- Page 3 5 uprights making sure the shoulder of the hubs go into the top of the uprights as shown. Secure with 5 more uprights as shown. Repeat until your shelf has 4 levels. Uprights x 5 Shelf/frame Assembly bdiusa.com KITE 5305 customerservice@bdiusa.com 5 Tier Shelf...
- Page 4 Step 6 - Attach the 5th level horizontal frame A1 with the 3 middle caps C5 as shown. Do not attach the 2 outer caps yet. Thread on 3 middle Caps Step 7 - Install 2 wall levelers H2 into the back of the third level (or center) shelf as shown. H2 x 2 bdiusa.com KITE 5305 customerservice@bdiusa.com 5 Tier Shelf...
- Page 5 2 Person Task mark position of wall insert neck use top hole if your wall has shoe molding Recommended for drywall: Insert with wings that flair out Recommended for solid wall: Plastic insert with barbs bdiusa.com KITE 5305 customerservice@bdiusa.com 5 Tier Shelf...
- Page 6 Your Kite Shelf comes with levelers under each leg. Dial out the levelers if needed. Dial out the wall levelers to make contact with the wall. Make sure your Kite Shelf is parallel to the wall. Enjoy! wall T2 Leveler middle shelf wrench wall leveler parallel bdiusa.com KITE 5305 customerservice@bdiusa.com 5 Tier Shelf...
- Page 7 Use a step ladder to reach items on the top shelf if needed. • Place heavier objects on the bottom shelves • The wall anchor straps should be attached behind the 5th level shelf (or above). • Enjoy! bdiusa.com KITE 5305 customerservice@bdiusa.com 5 Tier Shelf...
Need help?
Do you have a question about the KITE 5305 and is the answer not in the manual?
Questions and answers