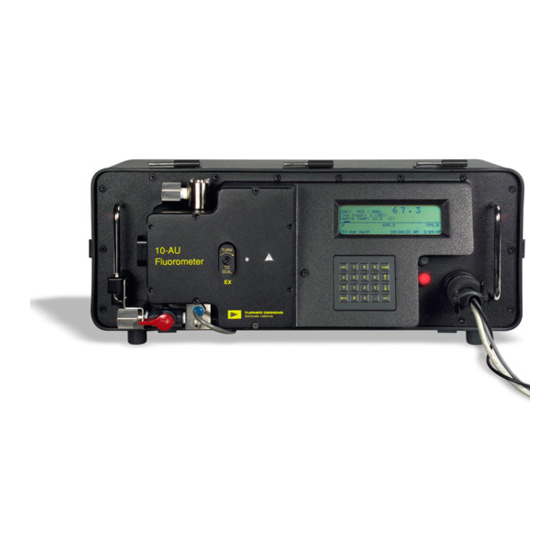
Turner Designs 10-AU Calibration Manual
Calibration for chlorophyll
Hide thumbs
Also See for 10-AU:
- Quick start operating instructions (13 pages) ,
- Replacement instructions (3 pages)
Advertisement
Quick Links
Advertisement

Related Manuals for Turner Designs 10-AU


Summary of Contents for Turner Designs 10-AU
- Page 1 10-AU Calibration for Chlorophyll...
- Page 2 3 Main Steps Setting the basic operating level Blanking the instrument Calibration with a liquid primary standard that has a known concentration...
- Page 3 #1 Setting the Basic Operating Level This procedure should be performed the 1 time you use the instrument, or any time you switch to a different application, change filters or lamps. 1. Turn on the 10AU and allow the instrument to warm up for at least 30 minutes.
- Page 4 2. Table 1 is an example of how set the sensitivity of the 10-AU. Users should determine the appropriate range and %FS for their calibration standard. % FS (+/-5) Chlorophyll (ug/l) Rhodamine WT (ppb) Range Table 1 is an example...
- Page 5 3. Prepare your standards and acetone blank in test tubes so you are ready to set the sensitivity and calibrate the instrument. Be sure to clear past calibrations on screen # 2.6...
- Page 6 4. Access screen 2.43 and set range control to manual and range to the appropriate level for your standard. For our example the range should be set to MED on Screen 2.42. Change to MAN...
- Page 7 4. Access Screen 3.2 5. Loosen the sensitivity locking screw using allen wrench.
- Page 8 6. Insert and cover your 20µg/L standard. 7. Using the sensitivity knob slowly turn the knob to adjust the %FS to the value appropriate for your standard’s concentration. A deviation ± 5% is acceptable. Sensitivity Knob...
- Page 9 8. When the %FS reaches the designated value, tighten the sensitivity locking screw. For our example this is ≈ 80% of medium The Basic Operating Level is now set, and you can remove the standard for the 10-AU.
- Page 10 Setting the Basic Operating Level (aka Sensitivity) of your 10-AU is now complete. You can access Screen 2.43 again and return range control to AUTO and begin calibration.
- Page 11 Now that the sensitivity is set, you should blank the instrument. 1. Access screen 2.1 2. Insert and cover your blank (acetone). Press 1 to Run blank. *You can also choose to have the 10-AU subtract the blank signal from the sample readings on screen 2.12.
- Page 12 Wait for the readings to stabilize and press “0”. Wait for 15 seconds for the instrument to blank. If Blanking is successful you will receive a “Blank Finished” message...
- Page 13 #3 Calibration with Your Standard Now that the blank is set, you should calibrate with your standard. 1. Access screen 2.0 2. Press <2> to access screen 2.2 and input the actual concentration of your standard. Return to screen 2.0 3.
- Page 14 4. Press 3 to run standard. Wait for the reading to stabilize. Press the <*> key and the calibration point is set. Wait 15 seconds and you should receive a “FINISHED” message.
- Page 15 You can test/check your calibration by running your standards and other samples or standards. I ran the 50µg/L and got: I ran the blank and got: I ran a 10µg/L standard and got:...
Need help?
Do you have a question about the 10-AU and is the answer not in the manual?
Questions and answers