Table of Contents
Advertisement
Quick Links
LP0249
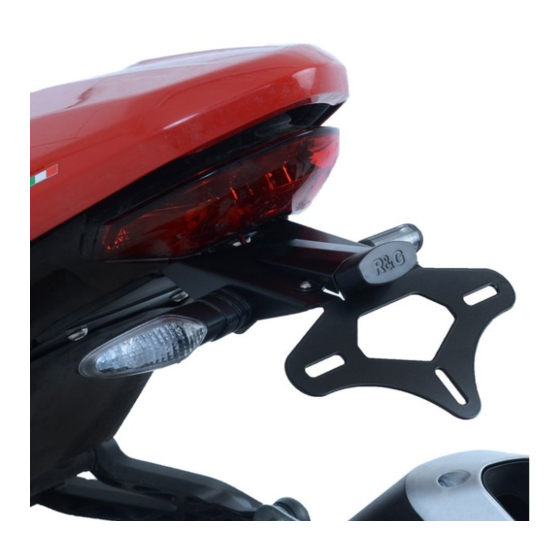
FITTING INSTRUCTIONS FOR LP0249BK LICENCE PLATE BRACKET
Tail Tidy for Ducati Monster 821 '18-, 1200 (S) '17- & 1200R '18- for Ducati Monster
821 (2018)
Page | 1
THIS KIT CONTAINS THE ITEMS PICTURED AND LABELLED BELOW.
DO NOT PROCEED UNTIL YOU ARE SURE ALL PARTS ARE PRESENT.
Please note that the way the kit is packed does not necessarily represent the way of
mounting to the bike
T
(
)
HE PARTS SHOWN MAY BE REPRESENTATIVE ONLY
FOR CLARITY OF INSTRUCTIONS ONLY
1
16
15
2
14
3
4
6
13
5
12
7
8
6
11
9
10
R&G
Unit 1, Shelley's Lane, East Worldham, Alton, Hampshire, GU34 3AQ
Tel: +44 (0)1420 89007 Fax: +44 (0)1420 87301
www.rg-racing.com
Email:
info@rg-racing.com
1
Advertisement
Table of Contents

Related Manuals for R&G LP0249BK


Summary of Contents for R&G LP0249BK
- Page 1 LP0249 FITTING INSTRUCTIONS FOR LP0249BK LICENCE PLATE BRACKET Tail Tidy for Ducati Monster 821 '18-, 1200 (S) '17- & 1200R '18- for Ducati Monster 821 (2018) Page | 1 THIS KIT CONTAINS THE ITEMS PICTURED AND LABELLED BELOW. DO NOT PROCEED UNTIL YOU ARE SURE ALL PARTS ARE PRESENT.
-
Page 2: Tools Required
LP0249 Page | 2 LEGEND ITEM 1 = MAIN LICENCE PLATE MOUNTING BRACKET (TB0249BK-PART 1) (x1). ITEM 2 = M8x30mm BUTTON HEAD BOLTS (x4). ITEM 3 = MINI INDICATOR ADAPTORS (I0033) (x4). ITEM 4 = MOUNTING SPACERS (S1121) (x4). ITEM 5 = COVER (TB0224BK-PART 2) (x1). ITEM 6 = M4x5mm BUTTON HEAD BOLTS (x2). - Page 3 LP0249 Page | 3 PICTURE 1 PICTURE 2 PICTURE 3 PICTURE 4 PICTURE 5 PICTURE 6 R&G Unit 1, Shelley’s Lane, East Worldham, Alton, Hampshire, GU34 3AQ Tel: +44 (0)1420 89007 Fax: +44 (0)1420 87301 www.rg-racing.com Email: info@rg-racing.com...
- Page 4 LP0249 Page | 4 PICTURE 7 PICTURE 8 PICTURE 9 PICTURE 10 PICTURE 11 PICTURE 12 R&G Unit 1, Shelley’s Lane, East Worldham, Alton, Hampshire, GU34 3AQ Tel: +44 (0)1420 89007 Fax: +44 (0)1420 87301 www.rg-racing.com Email: info@rg-racing.com...
- Page 5 LP0249 Page | 5 PICTURE 13 PICTURE 14 PICTURE 15 R&G Unit 1, Shelley’s Lane, East Worldham, Alton, Hampshire, GU34 3AQ Tel: +44 (0)1420 89007 Fax: +44 (0)1420 87301 www.rg-racing.com Email: info@rg-racing.com...
-
Page 6: Fitting Instructions
LP0249 PICTURE 16 PICTURE 17 Page | 6 PICTURE 18 FITTING INSTRUCTIONS • Remove the seat using the keys. • Remove the five bolts arrowed in pictures 1 and 2. • Remove the plastic cable cover/indicator clamp plate. • Remove the four bolts arrowed in picture 3. •... - Page 7 LP0249 • Reconnect the indicators to the original wiring plug sockets. • It is a good idea to check the operation of the licence plate illuminator and indicators at this stage (if the licence plate illuminator fails to light please swap the bullet connectors over).
- Page 8 LP0249 CONSUMER NOTICE The catalogue description and any exhibition of samples are only broad indications of the Products and R&G may make design changes which do not diminish their performance or visual appeal and supplying them in such state shall conform to the order. The Buyer acknowledges no representation or warranty (other than as to title) has been given or will apply to the Products other than those in R&G’s order or confirmation and the Buyer confirms it has chosen the Products as being of merchantable quality and suitable for its particular purposes.
- Page 9 LP0249 NOTICE DE MONTAGE LP0249BK SUPPORT DE PLAQUE Ducati Monster 821 '18-, 1200 (S) '17- & 1200R '18- pour Ducati Monster 821 (2018) Page | 9 Le kit contient les articles exposés ci-dessous, vérifier que toutes les pièces soient présentes avant de procéder au montage.
-
Page 10: Outils Requis
LP0249 Page | 10 LÉGENDE ARTICLE 1 = PLAQUE DE FIXATION DE LA PLAQUE D’IMMATRICULATION (TB0249BK- PARTIE 1) (x1). ARTICLE 2 = M8x30mm BOULONS (x4). ARTICLE 3 = ADAPTATEURS DE MINI CLIGNOTANT (I0033) (x4). ARTICLE 4 = ENTRETOISES DE FIXATION (S1121) (x4). ARTICLE 5 = CACHE (TB0224BK-PARTIE 2) (x1). -
Page 11: Notice De Montage
LP0249 NOTICE DE MONTAGE • Enlever le siège à l’aide des clés. • Enlever les 5 boulons, voir photos 1 et 2. • Enlever câble cache/plaque de fixation clignotant. • Enlever les 4 boulons, voir photo 3. • Baisser le support de plaque d’origine délicatement, voir photo 4. Page | 11 •... - Page 12 LP0249 longueur de manchon thermo rétractable (article 11) pour protéger le fil) voir photo 17. Répéter cela pour l’autre clignotant. • Monter l’ensemble en position comme indiqué sur les photos du dessus. • Utiliser les 4 nouveaux boulons (articles 2) avec les rondelles d’origine pour fixer l’ensemble en position.
- Page 13 LP0249 CONSUMER NOTICE Page | 13 The catalogue description and any exhibition of samples are only broad indications of the Products and R&G may make design changes which do not diminish their performance or visual appeal and supplying them in such state shall conform to the order. The Buyer acknowledges no representation or warranty (other than as to title) has been given or will apply to the Products other than those in R&G’s order or confirmation and the Buyer confirms it has chosen the Products as being of merchantable quality and suitable for its particular purposes.
- Page 14 LP0249 MONTAGEANLEITUNG FÜR LP0249BK KENNZEICHENHALTER Kennzeichenhalter für Ducati Monster 821 '18-, 1200 (S) '17- & 1200R '18- sowie für Ducati Monster 821 (2018) Page | 14 ALLE KIT-TEILE SIND UNTEN ABGEBILDET UND GEKENNZEICHNET. BEVOR SIE MIT DER MONTAGE BEGINNEN, ÜBERPRÜFEN SIE, DASS ALLE TEILE VORHANDEN SIND.
-
Page 15: Sie Benötigen Folgendes Werkzeug
LP0249 Page | 15 LIEFERUMFANG ARTIKEL 1 = KENNZEICHENHALTER (TB0249BK-TEIL 1) (x1) ARTIKEL 2 = M8x30mm INBUSSCHRAUBEN (x4) ARTIKEL 3 = ADAPTER FÜR DIE MINIBLINKER (I0033) (x4) ARTIKEL 4 = DISTANZHALTER FÜR MONTAGE (S1121) (x4) ARTIKEL 5 = ABDECKUNG (TB0249BK-TEIL 2) (x1) ARTIKEL 6 = M4x5mm INBUSSCHRAUBEN (x2) ARTIKEL 7 = M4 UNTERLEGSCHEIBEN (x2) ARTIKEL 8 = KENNZEICHENBELEUCHTUNG (LA0002) (x1) - Page 16 LP0249 • Entfernen Sie die vier Metall-Distanzhalter, wie in Abbildung 6 abgebildet. • Entfernen Sie die vier Gummitüllen – siehe Abbildung 7. • Montieren Sie die vier Gummitüllen am neuen Kennzeichenhalter (Artikel 1), wie in Abbildung 8 abgebildet. • Montieren Sie die vier Metall-Distanzhalter in den vier bereits am neuen Kennzeichen- halter montierten Gummitüllen –...
- Page 17 LP0249 Funktion der Blinker und Kennzeichenbeleuchtung überprüfen (wenn sie nicht funktionieren sollte, einfach die Kabelverbinder untereinander tauschen). Bitte den Schrumpfschlauch (Artikel 11) benutzen, um die Kabel zu schützen. Es empfiehlt sich, zu diesem Zeitpunkt die Zündung einzuschalten und die ordnungsgemäße Funktion der kompletten Beleuchtung zu überprüfen.
Need help?
Do you have a question about the LP0249BK and is the answer not in the manual?
Questions and answers