Pilz PSS Series Installation Manual
Programmable safety systems
Hide thumbs
Also See for PSS Series:
- User manual ,
- Operating manual (77 pages) ,
- Hardware manual (34 pages)
Table of Contents
Advertisement
Advertisement
Table of Contents

Subscribe to Our Youtube Channel
Related Manuals for Pilz PSS Series


Summary of Contents for Pilz PSS Series
- Page 1 (217) 352-9330 | Click HERE Find the Pilz PSS 3056-1 at our website:...
- Page 2 Programmable Safety Systems PSS-Range PSS 3056 Series Installation Manual Item No. 19 025 The spirit of safety. Artisan Scientific - Quality Instrumentation ... Guaranteed | (888) 88-SOURCE | www.artisan-scientific.com...
- Page 3 All rights to this manual are reserved by Pilz GmbH & Co. KG. Copies may be made for internal purposes. In the interests of continual technical advancement we reserve the right to amend specifications without prior notice. No responsibility accepted for errors or omissions.
-
Page 4: Table Of Contents
Contents Introduction Definition of symbols Safety Regulations Supplying power to the PSS Supplying the I/Os Installation Connections Electromagnetic Compatibility (EMC) Overview Making the installation EMC-compatible Connecting the earth cables Cabling Equipotential bonding Screened cables Suppression of inductive loads Insulation voltage test Miscellaneous Installing within an enclosure or wall-mounting Testing the EMC-compatibility of an installation... - Page 5 Contents Connecting the Inputs and Outputs Configuration of the screw terminals and connector description Notes on wiring On-board digital inputs Configuration of the standard PSS 3056 Example: Single-channel, failsafe input device, unchecked Example: Dual-channel input devices, unchecked 5-10 Example: Single-channel, failsafe input device, with test pulse 5-12 Example: Dual-channel, failsafe input device, with test pulse 5-14...
-
Page 6: Introduction
Introduction This installation manual contains all the information you need to install a PSS system from the PSS 3056 series. It gives safety guidelines which should be followed during installation and also describes the installation procedure and measures which can be taken to ensure EMC compliance. Examples are also given to show how the on-board inputs and outputs should be connected. - Page 7 Introduction CAUTION! This refers to a hazard which can lead to a less serious or minor injury plus material damage, and also provides information on preventive measures which can be taken. NOTICE This describes a situation in which the unit(s) could be damaged and also provides information on preventive measures which can be taken.
-
Page 8: Safety Regulations
Safety Regulations To ensure that the safety system functions correctly, please follow the safety guidelines given below: • Electrical connections should be made by a qualified electrical engineer who is familiar with the information in this manual as well as the relevant regulations concerning health and safety at work. - Page 9 Safety Regulations • To achieve the lowest possible residual ripple (< ± 1.2 V), we recommend that you install a three-phase bridge rectifier or regulated supply. • The external 24 V power supply must be capable of supplying a minimum of 8 A for approximately 1 s. •...
-
Page 10: Supplying The I/Os
Supplying the I/Os • The digital inputs and outputs require a 24 V supply (see connection diagrams in Chapter 5). Check that the voltage supplied from the external power supply corresponds • We recommend that the PSS and the I/Os are fed through two separate power supplies. -
Page 11: Installation
Safety Regulations External power supply +24 V Supply terminals on the inputs/outputs Functional earth Connect to the 0 V mains Connect in star to the central and earth at a single point earth point Fig. 2-2: Connecting the power supply to the I/Os Installation •... -
Page 12: Connections
• Ensure there is sufficient ventilation to prevent heat building up within the control cabinet. • In extreme ambient conditions, additional measures may be required in order to keep within the prescribed value range (e.g. air-conditioning within the control cabinet). •... - Page 13 Safety Regulations Notes Installation Manual: PSS 3056 Series Artisan Scientific - Quality Instrumentation ... Guaranteed | (888) 88-SOURCE | www.artisan-scientific.com...
-
Page 14: Electromagnetic Compatibility (Emc)
Electromagnetic Compatibility (EMC) Overview The safety system is designed to be installed within an electromagnetic industrial environment. To ensure electromagnetic compatibility the correct procedures must be carried out when installing the system. A device is electromagnetically compatible if: • It functions without error in a given electromagnetic environment. •... -
Page 15: Making The Installation Emc-Compatible
Electromagnetic Compatibility (EMC) • Capacitive (electrical) coupling A different potential between the source and interference sink (e.g. two cables) creates an electrical field. Cross-coupling is proportional to the rate of voltage change. Possible sources of interference are contactors, static discharge, parallel signal cables. -
Page 16: Cabling
• The housing should be connected to the earth conductor “PE”. A cable cross section of at least 2.5 mm should be used. Connections should be kept as short as possible. • Always connect the earth conductor “PE” to the central earth point in star form. -
Page 17: Equipotential Bonding
Electromagnetic Compatibility (EMC) • Data and signal lines should be laid as close as possible to an earthed surface. Cabling to open air systems: • As far as possible use metal conduits. These should be electrically connected and earthed. • Ensure there is sufficient protection against lightning by: - Using metal conduits earthed at both ends, or concrete cable ducts with reinforcements connected across the joints. -
Page 18: Screened Cables
Screened cables Interference currents arising from electrical, magnetic or electromagnetic fields of interference must be diverted to cable screens via the earth bars connected to the enclosure. Please remember the following: • Connect the screens with low impedence to the earth conductor. •... -
Page 19: Miscellaneous
Electromagnetic Compatibility (EMC) Miscellaneous Connecting the programming device The programming device requires a mains connection in each cabinet. The mains connection must be connected to the same distributor as the earth conductor for the cabinet. Lighting inside the cabinet Use low interference panel lighting for inside the control cabinet. NOTICE Fluorescent lamps should be avoided as they create interference fields. -
Page 20: Testing The Emc-Compatibility Of An Installation
Testing the EMC-compatibility of an installation Use the following list to check that the safety system has been installed to conform with EMC-regulations. Check Action Done Before installation: Are there areas with a high Make detailed plans for EMC probability of interference? protection in these areas. (e.g. - Page 21 Electromagnetic Compatibility (EMC) Check Action Done During installation: Earthed parts connected Most important are the correctly? connections to base module racks, racking bars, earth conductors and earth bars. Inactive metal parts should be connected over a wide surface area and earthed to a central point. With insulated metal: Remove insulation or use special contact fixings.
-
Page 22: Installation
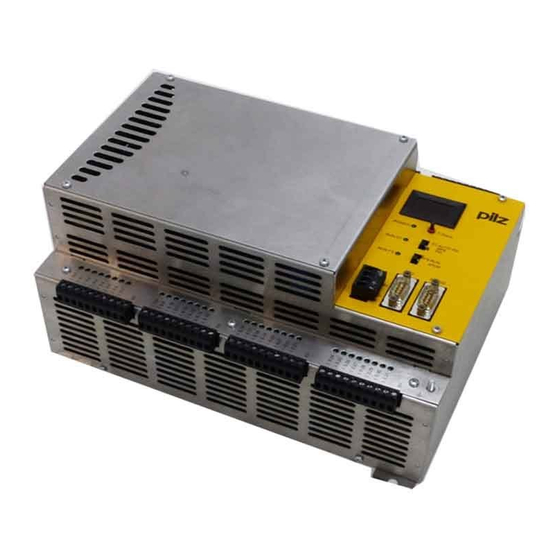
Installation Installing the system Drill 4 x M5 or M6 holes in the mounting plate of the control cabinet as shown in Fig. 4-1 (tolerance: +/-0.3 mm/0.012"). Screw the PSS to the mounting plate using washers. POWER ST AUTO PG RUN ST FS RUN RUN FS... -
Page 23: Installing The System In A Control Cabinet
Installation Installing the system in a control cabinet Distance from top min. 130 mm (5.12") 277 mm (10.91") POWER 201 mm ST AUTO PG RUN ST (7.91") FS RUN RUN FS STOP 10 mm (0.39") Cable duct max. (W x H): 100 x 50 mm (3.94"... -
Page 24: Connecting The Inputs And Outputs
Connecting the Inputs and Outputs Configuration of the screw terminals and connector description Connector Connector description: description: Fig. 5-1: Terminal configuration on the standard PSS 3056 Installation Manual: PSS 3056 Series Artisan Scientific - Quality Instrumentation ... Guaranteed | (888) 88-SOURCE | www.artisan-scientific.com... - Page 25 Connecting the Inputs and Outputs Connector Connector description: description: Fig. 5-2: Terminal configuration on the PSS 3056-1 Installation Manual: PSS 3056 Series Artisan Scientific - Quality Instrumentation ... Guaranteed | (888) 88-SOURCE | www.artisan-scientific.com...
- Page 26 Connector Connector description: description: Fig. 5-3: Terminal configuration on the PSS 3056-2 Installation Manual: PSS 3056 Series Artisan Scientific - Quality Instrumentation ... Guaranteed | (888) 88-SOURCE | www.artisan-scientific.com...
- Page 27 Connecting the Inputs and Outputs Connector Connector description: description: Fig. 5-4: Terminal configuration on the PSS SB 3056 (identical to the standard PSS 3056) Installation Manual: PSS 3056 Series Artisan Scientific - Quality Instrumentation ... Guaranteed | (888) 88-SOURCE | www.artisan-scientific.com...
-
Page 28: Notes On Wiring
Notes on wiring Where safety-relevant applications are concerned, it is essential that short circuits and line breaks are unable to cause a hazardous condition within a plant. The way in which this is done will depend on the degree of hazard within the plant itself, the switching frequency of the input devices and the level of safety of the input devices and actuators. -
Page 29: On-Board Digital Inputs
Connecting the Inputs and Outputs On-board digital inputs PSS 3056 PSS 3056-1 PSS 3056-2 PSS SB 3056 Number Configuration I0.0 - I0.31 I0.0 - I0.31 I0.0 - I0.31 I2.0 - I2.7 I2.0 - I2.15 Features: • One 0 V terminal per slot needs to be connected. This means that on the standard PSS 3056 and on the PSS SB 3056, one 0 V terminal belonging to inputs I0 - I31 must be connected. -
Page 30: Configuration Of The Standard Pss 3056
Configuration of the standard PSS 3056 24 V DC Please ensure safety regulations and EMC guidelines are observed! Installation Manual: PSS 3056 Series Artisan Scientific - Quality Instrumentation ... Guaranteed | (888) 88-SOURCE | www.artisan-scientific.com... -
Page 31: Example: Single-Channel, Failsafe Input Device, Unchecked
Connecting the Inputs and Outputs Example: Single-channel, failsafe input device, unchecked Features: • The input device must be approved for failsafe applications. • Please read the instructions provided with the input device. CAUTION! The connection shown overleaf is only approved for non-safety applications. - Page 32 Example: Single-channel, failsafe input device, unchecked Standard PSS 3056 Single-channel, failsafe input device 24 V DC Please ensure safety regulations and EMC guidelines are observed! Installation Manual: PSS 3056 Series Artisan Scientific - Quality Instrumentation ... Guaranteed | (888) 88-SOURCE | www.artisan-scientific.com...
-
Page 33: Example: Dual-Channel Input Devices, Unchecked
Connecting the Inputs and Outputs Example: Dual-channel input devices, unchecked Features: • This type of connection is mainly used for signal inputs with frequent operation. • The functionality of both input device channels should be monitored in the user program via feasibility checks (see example in the Programming Manual). - Page 34 Example: Dual-channel input devices, unchecked Standard PSS 3056 Input for other input devices Dual-channel input device with identical (homogenous) channels Dual-channel input device with different (diverse) channels 24 V DC Please ensure safety regulations and EMC guidelines are observed! Installation Manual: PSS 3056 Series 5-11 Artisan Scientific - Quality Instrumentation ...
-
Page 35: Example: Single-Channel, Failsafe Input Device, With Test Pulse
Connecting the Inputs and Outputs Example: Single-channel, failsafe input device, with test pulse Features: • The input device must be approved for failsafe applications. • Please read the instructions provided with the input device. • The test pulse must be allocated to the input via the configurator on the programming device. - Page 36 Example: Single-channel, failsafe input device, with test pulse Standard PSS 3056 Single- channel failsafe input device Additional input devices 24 V DC Please ensure safety regulations and EMC guidelines are observed! Installation Manual: PSS 3056 Series 5-13 Artisan Scientific - Quality Instrumentation ... Guaranteed | (888) 88-SOURCE | www.artisan-scientific.com...
-
Page 37: Example: Dual-Channel, Failsafe Input Device, With Test Pulse
Connecting the Inputs and Outputs Example: Dual-channel, failsafe input device, with test pulse Features: • This type of connection is mainly used for signal inputs with infrequent operation. • The operating system will detect all shorts between contacts and short circuits to L+ and L-. - Page 38 Example: Dual-channel, failsafe input device, with test pulse Standard PSS 3056 Input for other input devices Dual-channel input device with identical channels Dual-channel input device with identical channels Dual-channel input device with diverse channels 24 V DC Please ensure safety regulations and EMC guidelines are observed! Installation Manual: PSS 3056 Series 5-15 Artisan Scientific - Quality Instrumentation ...
-
Page 39: On-Board Single-Pole 2 A Outputs/Test Pulses
Connecting the Inputs and Outputs On-board single-pole 2 A outputs/test pulses PSS 3056 PSS 3056-1 PSS 3056-2 PSS SB 3056 Number Configuration O1.0 - O1.15 O1.0 - O1.15 O1.0 - O1.3 O1.8 - O1.11 Features: • The outputs are push-pull outputs. Do not use the push-pull level to drive a load to L-, otherwise the switch off test will detect a connection to L+ and will register an error. -
Page 40: Configuration Of The Standard Pss 3056
• Each output is protected against short circuit, overload and overtemperature. Outputs are designed for resistive and inductive loads. Configuration of the standard PSS 3056 Test pulse outputs or single-pole 2 A outputs Signals for input devices 24 V DC Please ensure safety regulations and EMC guidelines are observed! Installation Manual: PSS 3056 Series 5-17... -
Page 41: On-Board Dual-Pole 2 A Outputs
Connecting the Inputs and Outputs On-board dual-pole 2 A outputs PSS 3056 PSS 3056-1 PSS 3056-2 PSS SB 3056 Number Configuration O1.16 - O1.23 O1.16 - O1.19 O1.16 - O1.19 Features: • The outputs are dual-pole switching 2 A outputs. •... -
Page 42: Configuration Of The Standard Pss 3056
Configuration of the standard PSS 3056 Output O1.23 Output O1.20 Output O1.19 Output O1.16 24 V DC Please ensure safety regulations and EMC guidelines are observed! Installation Manual: PSS 3056 Series 5-19 Artisan Scientific - Quality Instrumentation ... Guaranteed | (888) 88-SOURCE | www.artisan-scientific.com... - Page 43 Connecting the Inputs and Outputs Notes 5-20 Installation Manual: PSS 3056 Series Artisan Scientific - Quality Instrumentation ... Guaranteed | (888) 88-SOURCE | www.artisan-scientific.com...
-
Page 44: Interfaces
Interfaces PG programming interface The programming interface is an RS 485 interface, enabling communication between the programming device and the PSS safety system. N. C. N. C. N. C N. C. N. C. N. C. N. C. N.C. = no connection Fig. -
Page 45: Pss Sb 3056: Safetybus P Interface
Interfaces PSS SB 3056: SafetyBUS p interface Connection to SafetyBUS p is via a male 9-pin D-Sub connector. Detailed information on SafetyBUS p can be found in the SafetyBUS p manual. N. C. N. C. brown CAN_L green CAN_H white CAN_GND N. -
Page 46: Appendix
Appendix Changes to the Installation Manual Changes from version IV to version V The Installation Manual was completely revised and is now also valid for the PSS SB 3056. The most significant changes are as follows: • Chapter entitled "Safety Regulations" was restructured and the contents corrected. - Page 47 Appendix Notes Installation Manual: PSS 3056 Series Artisan Scientific - Quality Instrumentation ... Guaranteed | (888) 88-SOURCE | www.artisan-scientific.com...
- Page 48 Pilz France Electronic Pilz Belgium Bijenstraat 4 1, rue Jacob Mayer 9051 Gent (Sint-Denijs-Westrem) BP 12 Pilz de Mexico, S. de R.L. de C.V. Pilz Skandinavien K/S Belgium 67037 Strasbourg Cedex Circuito Pintores # 170 Energigatan 10 B France Cd.
Need help?
Do you have a question about the PSS Series and is the answer not in the manual?
Questions and answers