
Related Manuals for weBoost DRIVE X


Summary of Contents for weBoost DRIVE X
- Page 1 A WILSON ELECTRONICS BRAND DRIVE X Vehicle Signal Booster Kit Installation Guide weboost.ca 866.294.1660 NEED HELP?
-
Page 2: Table Of Contents
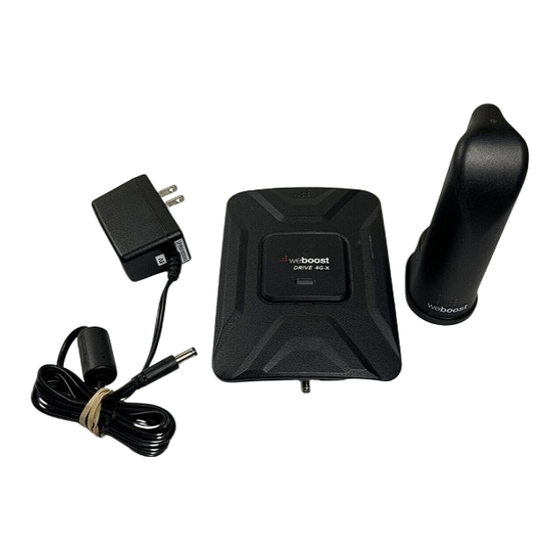
______ Index Package Contents ..................Mount Outside Magnetic Antenna ........STEP 1 Mount Inside Antenna .............. STEP 2 Connect Coax Cables To Booster ......... STEP 3 Connect Power Supply To Booster ........6 STEP 4 Plug Power Adapter Into Vehicle’s Power Supply ....7 STEP 5 Light Patterns ....................8 ................... - Page 3 ________ Package Contents Outside Inside Power Booster Antenna Antenna Supply & Bracket Optional: Adhesive disk for aluminum vehicles DRIVE X VEHICLE SIGNAL BOOSTER...
-
Page 4: Mount Outside Magnetic Antenna
Mount the outside antenna by placing on top of vehicle. 12 in. away from windows (including sunroofs) NOTE: For aluminum roofs, use the included adhesive disk to secure outside antenna in place. WORKS WITH ALL VEHICLES VEHICLE SIGNAL BOOSTER DRIVE X... - Page 5 Car/Sedan: Cable routed into rear side door. NOTE: When going through car wash, remember to remove your antenna. SUV/Van/Hatchback: Cable routed into top of hatchback door. Truck: Cable routed into side door. DRIVE X VEHICLE SIGNAL BOOSTER...
-
Page 6: Step 2: Mount Inside Antenna
18 inches but no more than 36 inches from where the cell phone device will be used. Use the Velcro® adhesive strip/adhesive strip provided and attach to desired location. In-Vehicle Antenna In-Vehicle Antenna VEHICLE SIGNAL BOOSTER DRIVE X... -
Page 7: Step 3: Connect Coax Cables To Booster
Step 3: Connect Coax Cables To Booster Connect the cable from the Mini-Mag Mount Antenna to the port labeled “Outside Antenna” on the Drive X booster. NOTE: Bracket can be used to fasten booster in a specific location if desired. from Outside Antenna Connect the cable from the In-Vehicle Antenna to the port labeled “Inside Antenna”... -
Page 8: Step 4: Connect Power Supply To Booster
______ Step 4: Connect Power Supply To Booster Connect the power supply cord to the end of the Drive X labeled “Power.” NOTE: Do NOT connect the power to the Signal Booster until you have connected both the Inside and Outside Antennas. -
Page 9: Step 5: Plug Power Adapter Into Vehicle's Power Supply
Into Vehicle’s Power Supply Plug the power adapter into vehicle’s 12V DC power supply. Power up your Drive X by flipping the switch on the back of the DC power adapter on. If your Drive X is working correctly, the light on the power adapter will be red, and the light on the booster will be green. -
Page 10: Light Patterns
Refer to Troubleshooting section below. Light Off If the Drive X Signal Booster’s light is off, verify your power supply has power. NOTE: The Signal Booster can be reset by disconnecting and reconnecting the power supply. -
Page 11: Troubleshooting
Note: Horizontal separation of the two antennas typically requires a shorter separation distance than perpendicular separation. If you are having any difficulties while testing or installing your booster, contact our weBoost Customer Support team for assistance (866.294.1660). FREQUENTLY ASKED QUESTIONS How can I contact customer support? Customer Support can be reached Monday thru Friday by calling 866.294.1660, or... -
Page 12: Safety Guidelines
______ Safety Guidelines Use only the power supply provided in this package. Use of a non-weBoost product may damage your equipment. All inside antennas must have at least 1.5’ separation distance from all active users. RF Safety Warning: Any antenna used with this device must be located at least 8 inches from all persons. -
Page 13: Specifications
Canada’s licence-exempt RSS(s). Operation is subject to the following two conditions: (1) This device may not cause interference, and (2)) This device must accept any interference, including interference that may cause undesired operation of the device. Changes or modifications not expressly approved by weBoost could void the authority to operate this equipment. DRIVE X VEHICLE SIGNAL BOOSTER... -
Page 14: Warranty
2 YEAR WARRANTY weBoost Signal Boosters are warranted for two (2) years against defects in workmanship and/or materials. Warranty cases may be resolved by returning the product directly to the reseller with a dated proof of purchase. Signal Boosters may also be returned directly to the manufacturer at the consumer’s expense, with a dated proof of purchase and a Returned Material... - Page 15 Notes weboost.ca 866.294.1660 NEED HELP? DRIVE X VEHICLE SIGNAL BOOSTER...
- Page 16 3301 East Deseret Drive, St. George, UT 866.294.1660 www.weboost.ca Copyright © 2017 weBoost. All rights reserved. weBoost products covered by U.S. patent(s) and pending application(s) For patents go to: weboost.com/us/patents NOT AFFILIATED WITH WILSON ANTENNA...
- Page 17 UNE MARQUE WILSON ELECTRONICS DRIVE X Kit d’Amplification du Signal pour Véhicule Guide D’Installation weboost.ca 866.294.1660 BESOIN D’AIDE?
- Page 18 ______ Table des Matières Contenu de l’Emballage ................Montage de l’Antenne Magnétique Extérieure ....ÉTAPE 1 Montage de l’Antenne Intérieure .......... ÉTAPE 2 Connecter les Câbles Coaxiaux à l’Amplificateur ....ÉTAPE 3 Connecter le Bloc d’Alimentation à l’Amplificateur ... 6 ÉTAPE 4 Brancher l’Adaptateur de Puissance dans la Source d’Ali- ÉTAPE 5...
-
Page 19: Contenu De L'emballage
________ Contenu de l’Emballage Antenne Antenne Bloc Amplificateur et Intérieure d’Alimentation Extérieure Support Optionnel: Disque adhésif pour véhicules en aluminium DRIVE X AMPLIFICATEUR DE SIGNAL CELLULAIRE POUR VR... -
Page 20: Étape
31 cm (12 po) de toute fenêtre (toits ouvrants compris) REMARQUE: Pour les toits en aluminium, utilisez le disque adhésif inclus pour fixer l’antenne extérieure en place. FONCTIONNE AVEC TOUS LES VÉHICULES DRIVE X AMPLIFICATEUR DE SIGNAL CELLULAIRE POUR VR... - Page 21 REMARQUE: N’oubliez pas de retirer votre antenne lorsque vous allez dans un lave-auto. VUS/Van/Hayon: Câble acheminé au haut de la porte hayon. Camion: Câble acheminé dans la porte latérale. DRIVE X AMPLIFICATEUR DE SIGNAL CELLULAIRE POUR VR...
-
Page 22: Étape 2: Montage De L'antenne Intérieure
46 cm (18 po), mais pas plus de 92 cm (36 po) de l’endroit où le dispositif cellulaire sera utilisé. Utilisez la bande adhésive Velcro® incluse et fixez à l’endroit voulu. Antenne pour véhicule intérieure Antenne pour véhicule intérieure DRIVE X AMPLIFICATEUR DE SIGNAL CELLULAIRE POUR VR... -
Page 23: Étape 3: Connecter Les Câbles Coaxiaux À L'amplificateur
Étape 3: Connecter les Câbles Coaxiaux à l’Amplificateur Connectez le câble de l’antenne mini-magnétique au connecteur étiqueté «Antenne Extérieure» (Outside Antenna) sur l’amplificateur Drive X. REMARQUE: Le support peut être utilisé pour fixer l’amplificateur à l’emplacement voulu. Depuis l’antenne extérieure Connectez le câble de l’antenne pour véhicule intérieure au port... -
Page 24: Étape 4: Connecter Le Bloc D'alimentation À L'amplificateur
Étape 4: Connecter le Bloc d’Alimentation à l’Amplificateur Connectez le bloc d’alimentation au port étiqueté «Power» du dispositif Drive X. REMARQUE: NE connectez PAS la source d’alimentation à l’amplificateur de signal tant que vous n’avez pas connecté les antennes intérieure et extérieure. -
Page 25: Étape 5 : Brancher L'adaptateur De Puissance Dans La Source D'ali- Mentation Du Véhicule
Branchez l’adaptateur de puissance dans la source d’alimentation du véhicule 12V C.C. Mettez votre dispositif Drive X en marche en actionnant l’interrupteur à l’arrière de l’adaptateur de puissance C.C. Si votre amplificateur Drive X fonctionne correctement, le voyant sur l’adaptateur de puissance est rouge, et le voyant sur l’amplifcateur est vert. -
Page 26: Voyants
Reportez-vous à la section Résolution des Problèmes ci- dessous. Voyant Éteint Si le voyant de l’amplificateur de signal Drive X est éteint, vérifiez l’alimentation. REMARQUE: Vous pouvez réinitialiser l’amplificateur en débranchant et en rebranchant son alimentation. Après avoir résolu le problème, vous devez initialiser un nouveau cycle en débranchant et en rebranchant l’alimentation de l’amplificateur. -
Page 27: Résolution Des Problèmes
Si vous avez des problèmes lorsque vous testez ou vous installez votre amplificateur, contactez notre équipe de Soutien technique weBoost au (866.294.1660). QUESTIONS FRÉQUEMMENT POSÉES Comment puis-je communiquer avec le service à... -
Page 28: Consignes De Sécurité
Utilisez uniquement le bloc d’alimentation fourni dans cet emballage. Si vous utilisez un produit qui n’est pas un produit weBoost, vous pourriez endommager votre matériel. Toutes les antennes intérieures doivent être installées à une distance d’au moins 4 cm (1,5 pouce) de tout autre utilisateur actif. -
Page 29: Caractéristiques
: 1) ce dispositif ne doit pas causer d’interférences; 2) ce dispositif doit accepter toutes les interférences, y compris celles pouvant entraîner un fonctionnement indésirable de l’appareil. Les changements ou modifications non expressément approuvés par weBoost pourraient annuler l’autorisation d’utiliser cet équipement. DRIVE X... -
Page 30: Garantie
GARANTIE DE 2 ANS Les amplificateurs de signal de weBoost sont garantis contre tout défaut de fabrication ou de matériaux pendant deux (2) ans. Les réclamations en vertu de la garantie peuvent être réglées en retournant le produit directement au revendeur avec une preuve d’achat datée. - Page 31 Remarques weboost.ca 866.294.1660 BESOIN D’AIDE? DRIVE X AMPLIFICATEUR DE SIGNAL CELLULAIRE POUR VR...
- Page 32 866.294.1660 www.weboost.ca Copyright © 2017 weBoost. Tous droits réservés. Les produits weBoost sont couverts par les brevets et demandes de brevet aux États-Unis Pour plus de détails sur les brevets, visitez le site: weboost.com/us/patents N’EST PAS AFFILIÉ À L’ANTENNE WILSON...
Need help?
Do you have a question about the DRIVE X and is the answer not in the manual?
Questions and answers