Advertisement
Quick Links
TC-96269-IP · Rev A · June 2019
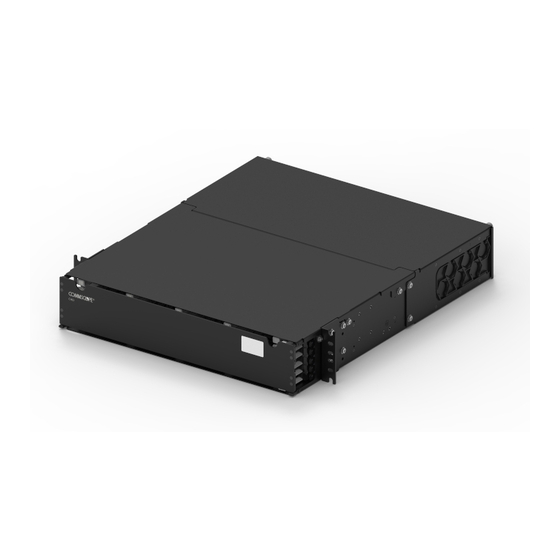
Compact High Density (CHD) Panel
Tools Required and Parts List
PARTS LIST
QUANTITY
DESCRIPTION
1
CHD PANEL
4
RACK SCREW
2
SIDE PLATE, LARGE CABLE
#2 PHILLIPS
SCREWDRIVER
CABLE BRACKETS ARE ACCESSORIES; MUST BE
ORDERED SEPARATELY.
This document shows the panel being installed on a 19-inch rack.
NOTE:
NOTE:
This document shows the 2RU model in most illustrations.
The CHD Panel is also offered in a 1RU and 4RU models. Procedural
and physical details are analagous for the 1RU and 4RU models.
Remove the CHD Panel from the Packaging
1
with accessories and this quick start manual.
There will be cardboard and/or plastic inserts inside of the
NOTE:
panel to prevent damage during shipment.
Front door and rear cover will need to be opened to
remove them.
For 19-in. Rack Mounting:
2
Remove the Two 23-in. Mounting/Shipping Brackets
The mounting/shipping brackets (one on each side of the panel) are
located behind the mounting brackets in the place shown. After being
removed from the panel, they can be discarded unless used
for 23 in. rack mounting.
860649630 Rev A
Quick Start
Select (a) Mounting Position, (b) Grounding Method,
3
and (c) Whether to Use Optional Side Plates.
(a) The panel mounts on front or rear of a 3-inch or
6-inch channel. The channel can be a frame or the
internal front supports of a cabinet. Mount as shown.
(b) Ground per local practice in the location
shown. Two-hole grounding requires
a 0.625-inch spacing
between mounting holes
(ground lug not
included).
CHD
PRODUCT PAGE
QR CODE;
ACCESS WITH
SMARTPHONE
FOR CHD
USER MANUAL
AND FIBER
FRONT OBLIQUE VIEW
CONNECTOR
CLEANING
INSTRUCTIONS
Mount Panel in Channel
Rack or Cabinet
4
Use M6 or #12-24 screws
(provided) as appropriate.
CHANNEL RACK MOUNTING:
Cable Mounting Bracket
(EHD-RMB) mounts to rear rail and
provides point to secure trunks.
Vertical Cable Mounting Bracket
(EHD-RMB-GAB) mounts to rear rail
and allows cable attachment
molding to snap into bracket for
top down or bottom up securing of
CommScope trunks with gland
adapters.
UMB Bracket (UMB-RMB-LG) can
be installed above or below panel
(usually not used on same rack as
EHD brackets).
CABINET MOUNTING:
is done using same accessories
(with different catalog numbers)
modified for use in cabinet.
NOTE: Front and back rails should
be 24 inches (60.96 cm) apart
when mounting with 3-inch
(7.62 cm) recess.
Cable Mounting Bracket
(EHD-CMB)
Vertical Cable Mounting Bracket
(EHD-CMB-GAB)
UMB Bracket (UMB-CMB-LG)
Usually not used in same cabinet
with EHD brackets.
CommScope (logo), CommScope, and CHD are trademarks.
MOUNTING POSITION
FOR FRONT OF
3-INCH CHANNEL
OF PANEL
CHANNEL RACK
UMB-RMB-LG
MOUNTING
FRONT OBLIQUE VIEW
MOUNTING POSITION FOR FRONT OF 3-INCH CHANNEL
MOUNTING POSITION FOR BACK OF 3-INCH CHANNEL
MOUNTING POSITION FOR BACK OF 6-INCH CHANNEL
3.0 IN.
RIGHT SIDE VIEW
(76.2 CM)
OF PANEL
6.0 IN.
(152.5 CM)
GROUNDING
LOCATION
(OPTIONAL)
MOUNTING
POSITION
FOR BACK
OF 6-INCH
CHANNEL
(c) Default side plates can be removed
by sliding them out. Slide in optional
side plates for larger sized cables.
MOUNTING POSITION FOR BACK
OF 3-INCH CHANNEL
CABINET
MOUNTING
UMB--CMB-LG
EHD-CMB
EHD-RMB
EHD-RMB-GAB
EHD-CMB-GAB
LEFT SIDE OBLIQUE VIEW
26886-A
24.0 IN.
(242.5 CM)
© 2019, CommScope, Inc. All Rights Reserved.
Advertisement

Related Manuals for CommScope CHD Series


Summary of Contents for CommScope CHD Series
- Page 1 (EHD-CMB-GAB) UMB Bracket (UMB-CMB-LG) EHD-RMB-GAB EHD-CMB-GAB Usually not used in same cabinet with EHD brackets. FRONT OBLIQUE VIEW LEFT SIDE OBLIQUE VIEW 860649630 Rev A CommScope (logo), CommScope, and CHD are trademarks. © 2019, CommScope, Inc. All Rights Reserved. 26886-A...
- Page 2 NOTE: as shown. Any CHD (standard width) or EHD (double width) for proper blade movement. Using a CommScope trunk with gland module, adapter pack, or cassette can be installed in the Always clean and shown below will usually provide this slack.
Need help?
Do you have a question about the CHD Series and is the answer not in the manual?
Questions and answers