
Related Manuals for Comica CVM-VP3


Summary of Contents for Comica CVM-VP3
- Page 1 CVM-VP3 Super-Cardioid Condenser Shotgun Microphone for Camera / Camcorder USER MANUAL...
-
Page 3: Main Features
Foreword Thanks for purchasing COMICA CVM-VP3 condenser shotgun microphone. Comica CVM-VP3 Super-cardioid condenser shotgun video microphone, is specially designed for video shooting, meeting, and interview for camera, camcorder ; Meanwhile the Microphone is designed with low Noise Circuit, two step high-pass filter, -10dB sensitivity adjustment, powered by AA battery, low self-noise , full metal material construction and super shielding, which provides your video a broadcast sound quality. -
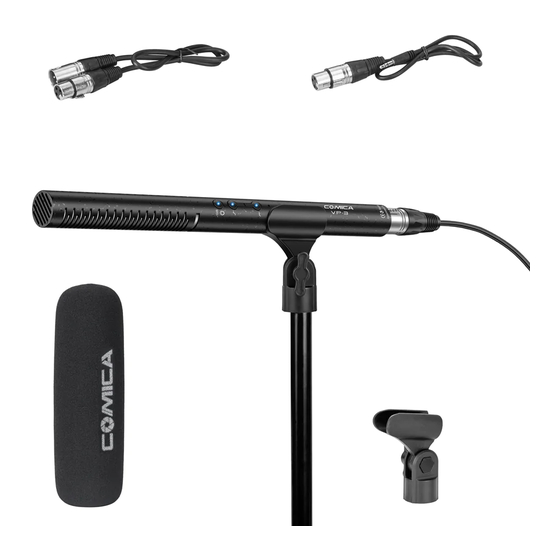
Page 4: Package Content
Notice When putting the batteries in, please notice the “positive and negative poles” to avoid reversed assembling to cause product damage. Please do not put the device beside the heat or interference source. Please avoid falling, collision or pounding during usage. Don’t expose the device in rain or moist environment . -
Page 5: Components Introduction
Components Introduction Microphone Audio Receiver End Power/-10dB Sensitivity Button Treble Boost Button Low-cut Filter Button Power Indicator Light Audio Output Jack Battery Holder... - Page 6 Installation and Operation 1. Installation 1.1 Installation of AA Battery 1.11 Rotate the tube , open the battery holder 1.12 Insert the battery 1.13 Rotate the tube, close the battery holder...
- Page 7 1.2 Install Mic onto Camera/Camcorder Connect the Mic and Camera/Camcorder Via Camera Bracket 1.21 Connect the mic onto Camera Bracket 1.22 Connect the mic onto camera/camcorder via Camera Baseplate , fasten the Tightness Adjusting Screw...
- Page 8 1.23 Connect the 3.5mm output cable / XLR output cable to the Camera/ Camcorder...
- Page 9 Connect the Mic and Camcorder Via Boom 1.31 Connect the Mic and Boom Bracket 1.32Connect the Boom Bracket and Boom...
- Page 10 1.33 Connect the 3.5mm / XLR output cable to the Camcorder...
- Page 11 2. Operation 2.1 Instructions for Buttons Power/-10dB Sensitivity Button Treble Boost Button Low-cut Filter Button Power Indicator Light Long Press the Power Button to turn on or off power. Short press the Power Button to turn on or off the -10dB adjustable sensitivity function. Short press the Treble Boost Button to open or off the treble booster function.
- Page 12 Tech Parameters Polar Pattern Super Cardioid Frequency Range 20Hz-20KHz Low-cut 100Hz Sensitivity -38dB ±3dB Output Impedance 200Ω >65dB Maximum SPL >105dB Output Form 3 Pin XLR Balanced Output Power AA Battery (Don’t Support Phantom Power Supply Alone) Size Φ22 mm x L 280 mm Net Weight 172g...
- Page 15 CVM-VP3 超心型电容式麦克风 用户使用手册...
- Page 17 前 言 感谢您购买科唛COMICA CVM-VP3超心型指向电容式麦克风。 此产品采用超心型指向技术,专为摄像、会议、采访,等场合设计,适用于摄像 机、相机录音;同时该麦克风具有超低噪音电路,两档音频-普通和低切模式, -10dB灵敏度可调,1.5伏AA电池供电,全金属结构,超强屏蔽,稳固耐用等特 点,能为您的视频提供广电级的优质音效! 使用前请认真阅读此使用说明书,本产品在出厂时已进行精密校准,请勿自行组 装拆卸零部件,否则不予保修! 产品主要功能 .超低噪音电路 .两档音频-普通和低切模式 .-10dB灵敏度可调 .AA电池供电 .全金属结构,超强屏蔽,稳固耐用 .广电级拾音效果 超低底噪 低切功能 -10dB的灵敏度可调 心形指向 全金属制造...
- Page 18 注意事项 装入电池时请注意正极朝上,避免电池装反给设备造成损坏 使用时请远离热源或干扰源 使用时请避免掉落,碰撞或重击 请勿在下雨或潮湿环境环境中使用,否则会有短路的危险 使用完成后,请注意关机后再进行存放 包装清单 标准配件 麦克风主体 XLR-3.5mm音频线 XLR-XLR音频线 相机固定座 挑杆固定座 防风棉 黑色便携包 说明书 保修卡 可选配件 防风毛 减震架...
- Page 19 部件介绍及说明 麦克风主体 拾音头 电源键/-10dB灵敏度键 高频提升键 低切键 电源指示灯 音频输出插孔 电池仓...
- Page 20 安装与使用 1.安装 1.1 电池的安装 1.11 旋转管体,打开电池仓 1.12 放入电池 1.13 旋转管体,关闭电池仓...
- Page 21 1.2 麦克风主体与相机/摄像机的连接 将麦克风安装至相机固定座与相机/摄像机连接 1.21 将麦克风安装上相机固定座 1.22 将相机固定座的冷靴底座安装至相机/摄像机,拧紧转牙锁盘 至固定...
- Page 22 1.23 将麦克风插上3.5mm/卡侬头音频输出线,与相机/摄像机相连...
- Page 23 将麦克风安装至挑杆与摄像机连接 1.31将麦克风固定在挑杆固定座上 1.32 将挑杆固定座安装至话筒挑杆上...
- Page 24 1.33 将麦克风插上3.5mm / 卡侬头音频输出线,与摄像机相连...
- Page 25 2.使用 2.1按键使用说明 电源键/-10dB灵敏度键 高频提升键 低切键 电源指示灯 长按电源键,开启或关闭电源 短按电源键,开启或关闭-10dB灵敏度功能 短按高频提升键,开启或关闭高频增益功能 短按低切键,开启或关闭低切功能 高频提升功能可以在录制一些低沉的声音时使用,激活这个功能之 后,高频部分会被提高,录制下来的声音会在高频和低频上作一个均 衡处理;低切功能可以有效减少因环境噪音对录音带来的影响,但有 时也可能损失一些声音细节,从而影响声音效果,需视情况使用。 2.2按键指示灯说明 蓝灯: 该键对应功能有效 2.3电源指示灯说明 蓝灯: 电池电量充足的正常工作状态 绿灯: 检测到+48V幻象电源 红灯: 电池处于低电量状态,需要更换电池...
- Page 26 技术参数 指向性 超心型 频率范围 20Hz~20KHz 低切 100Hz 灵敏度 -38dB ±3dB 输出阻抗 200Ω 信噪比 >65dB 最大声压等级 >105dB 输出形式 3针XLR平衡输出 电源供电 AA电池(不能使用幻象电单独供电) 尺寸 Φ22mm x L 280mm 净重 172g...
- Page 28 Email: support@comica-audio.com...
Need help?
Do you have a question about the CVM-VP3 and is the answer not in the manual?
Questions and answers