Table of Contents

Related Manuals for HydroPoint WeatherTRAK ET Pro2 SWM


Summary of Contents for HydroPoint WeatherTRAK ET Pro2 SWM
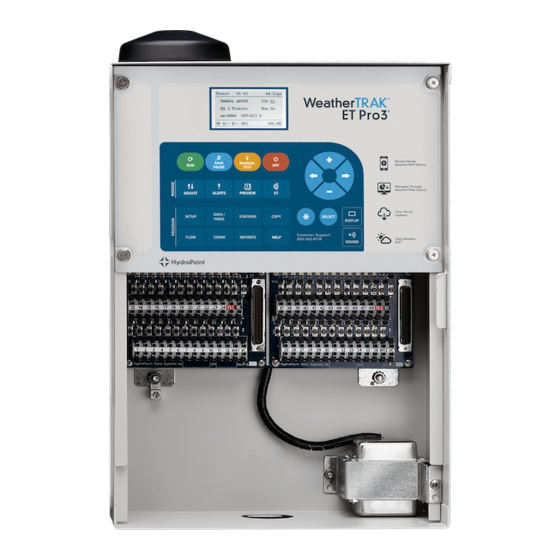
- Page 1 WeatherTRAK ET Pro2 SWM to WeatherTRAK ET Pro3 Upgrade Installation Guide Included in Guide: • Installation Procedure • Controller Activation Questions? Contact Customer Support at support@hydropoint.com or call (800) 362-8774...
-
Page 2: Table Of Contents
ONTENTS ..........................1 ONTENTS ........................1 ETTING TARTED ET P 2 SWM ET P 3 ....... 1 VERVIEW OF THE TEPS FOR PGRADING FROM ......................1 NCLUDED QUIPMENT ..................2 XISTING EQUIPMENT THAT WILL BE USED ......................... 2 OOLS EEDED (CIM) ............... -
Page 3: Contents
The higher station count option, additional flow management and monitoring, and increased scheduling flexibility make upgrading from the older WeatherTRAK ET Pro2 SWM controller a good decision. Overview of the Steps for Upgrading from ET Pro 2 SWM to ET Pro3 To upgrade your controller, you need to perform the following steps: Step 1 - Remove the command module and disconnect the power. -
Page 4: Existing Equipment That Will Be Used
Be sure to follow the step-by-step procedure when performing your upgrade. Use the WeatherTRAK ET Pro2 SWM and WeatherTRAK ET Pro3 upgrade checklist at the end of this document to ensure all steps are completed for the equipment and software transfer. -
Page 5: Step 1 - Remove The Command
WeatherTRAK ET Pro2 SWM to WeatherTRAK ET Pro3 Upgrade Installation Instructions Upgrade Instructions Step 1 - Remove the Command Module and Disconnect the Power Loosen the 4 corner pop-up screws. Lift the command module then turn it over. Carefully unplug the power cable from the mini-chassis. -
Page 6: Step 3 - Transfer The Station Keys
WeatherTRAK ET Pro2 SWM to WeatherTRAK ET Pro3 Upgrade Installation Instructions Step 3 - Transfer the station keys It is important to take the station keys from the ET Pro2 SWM and move them to the ET Pro3. The controller will not recognize the station valves unless the station keys have been transferred. -
Page 7: Step 6 - Remove The Weather
WeatherTRAK ET Pro2 SWM to WeatherTRAK ET Pro3 Upgrade Installation Instructions Step 6 - Remove the WeatherTRAK Pro2 SWM Mini-Chassis Verify that the power cable has been unplugged from the mini-chassis board. Remove the grounding wire. Remove the grounding lug by unscrewing the nut that is holding it to the mounting bolt using the 7/16”... -
Page 8: Step 7 - Install The Neww
WeatherTRAK ET Pro2 SWM to WeatherTRAK ET Pro3 Upgrade Installation Instructions Step 7 - Install the New WeatherTRAK ET Pro 3 Mini-Chassis Route the power connector behind the mini-chassis. Align the new ET Pro3 mini-chassis board over the mounting bolts and make sure it is properly seated. -
Page 9: Step 8 - Reconnect Thev
WeatherTRAK ET Pro2 SWM to WeatherTRAK ET Pro3 Upgrade Installation Instructions Step 8 - Reconnect the Valve Wires and Rain Sensor Reconnect the valve wires to their appropriate outputs. Reconnect the rain sensor if applicable. Step 9 - Install the WeatherTRAK Pro3 Command Module Connect the ribbon cable from the back of the command module to the mini-chassis. -
Page 10: Step 10 - Update Thed
WeatherTRAK ET Pro2 SWM to WeatherTRAK ET Pro3 Upgrade Installation Instructions Step 10 - Update the Date and Time Setting the Date Press the SETUP button. Press the button. The DATE (YEAR) screen displays. Press the + or − button to set the current year. -
Page 11: Valve Test
WeatherTRAK ET Pro2 SWM to WeatherTRAK ET Pro3 Upgrade Installation Instructions Step 11 - Activate Controller with HydroPoint Before calling Customer Service to activate the controller, you will need to know the serial number, SIM card number, and location of the controller. You can record this information on the checklist page at the end of this document. -
Page 12: Check
© Copyright 2018 HydroPoint Data Systems, Inc. All rights reserved. HydroPoint, WeatherTRAK, WaterCompass, and the HydroPoint logo are registered trademarks and FlowLink and OptiFlow are trademarks of HydroPoint Data Systems, Inc. Other trademarks may be held by their respective owners. Specifications, user interface, workflow, procedures, and content formats subject to change without notice. -
Page 13: Swm Checklist
Remove the WeatherTRAK ETPro2 SWM hardware parts that are being replaced: mini- chassis, command module, ribbon cable Dispose of WeatherTRAK ET Pro2 SWM parts in accordance with local E-waste laws WeatherTRAK ET Pro3 Checklist Record controller serial number:_____________________________________________ ... - Page 14 1 (800) 362-8774 support@hydropoint.com RevA20180215...
Need help?
Do you have a question about the WeatherTRAK ET Pro2 SWM and is the answer not in the manual?
Questions and answers