Table of Contents
Advertisement
Quick Links
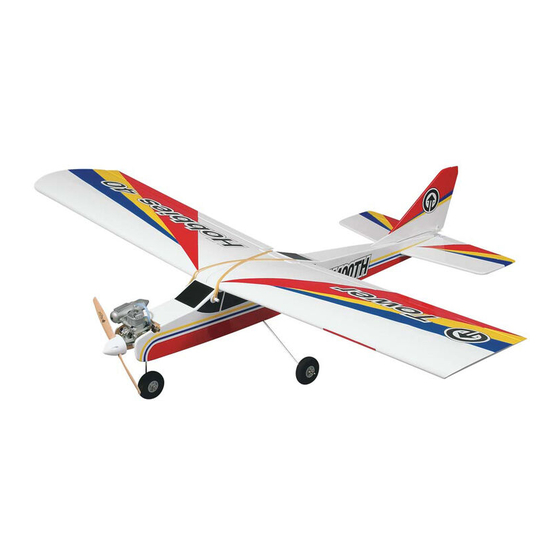
Tower Trainer
40 Ready-to-Fly
™
RADIO CONTROLLED MODEL AIRPLANE
WARRANTY
Tower Hobbies
®
guarantees this kit to be free from defects in both material and workmanship at the date of purchase. This warranty
does not cover any component parts damaged by use or modification. In no case shall Tower Hobbies' liability exceed the original
cost of the purchased kit. Further, Tower Hobbies reserves the right to change or modify this warranty without notice.
In that Tower Hobbies has no control over the final assembly or material used for final assembly, no liability shall be assumed nor
accepted for any damage resulting from the use by the user of the final user-assembled product. By the act of using the user-assembled
product, the user accepts all resulting liability.
If the buyer is not prepared to accept the liability associated with the use of this product, the buyer is advised to return this kit
immediately in new and unused condition to the place of purchase.
READ THROUGH THIS MANUAL BEFORE STARTING CONSTRUCTION. IT CONTAINS IMPORTANT INSTRUCTIONS AND
WARNINGS CONCERNING THE ASSEMBLY AND USE OF THIS MODEL.
© Copyright 2002 V1.0
TOWZ1154 for TOWA21**
Advertisement
Table of Contents

Related Manuals for Tower Hobbies Tower Trainer 40 Ready-to-Fly


Summary of Contents for Tower Hobbies Tower Trainer 40 Ready-to-Fly
- Page 1 Further, Tower Hobbies reserves the right to change or modify this warranty without notice. In that Tower Hobbies has no control over the final assembly or material used for final assembly, no liability shall be assumed nor accepted for any damage resulting from the use by the user of the final user-assembled product.
-
Page 2: Kit Inspection
If there is no hobby shop in your area, contact the AMA (Academy INTRODUCTION of Model Aeronautics), the governing body of model aeronautics. The AMA can direct you to the closest R/C club whose membership should have qualified flight instructors. With the added benefit of Congratulations and thank you for purchasing the Tower Trainer .40 insurance coverage provided by the AMA, most clubs require AMA Ready-to-Fly. -
Page 3: Engine Starting
1.5 Volt glow plug igniter. Your flight instructor may share his equipment with you for a while, but eventually you’ll need your own. Visit your local hobby dealer or see the Tower Hobbies catalog for a full selection, descriptions and pricing. You can also visit our web site at www.towerhobbies.com. -
Page 4: Charge The Batteries
ASSEMBLY Charge the Batteries 3. Use two metal straps and four 3 x 8mm screws (the small screws with the washers attached) to hold the wing halves together. (Note the metal strap near the trailing edge of the wing, partially concealed in the photo). - Page 5 Connect the clevis on charge the batteries as described in the instruction manual for the the rudder pushrod to the middle hole in the rudder control horn. Tower Hobbies radio control system that came with this kit.
-
Page 6: Check The Control Directions
Due to the great effect the control throws have on the way a model flies, the control transmitter. If necessary, refer to the instructions in the Tower Hobbies instruction manual to identify and operate the reversing switch. - Page 7 We’ll do the elevator first… Elevator Centered With Stab Stabilizer Elevator Elevator NOT Centered With Stab 3. View the elevator and stab from the end. The elevator should be centered as shown in the sketch at the top. If the elevator is not centered with the stab (as shown in the bottom sketch), disconnect the clevis from the elevator control horn.
-
Page 8: Adjust The Throttle
Here’s how to set up the carburetor… Trim Lever Down Throttle Stick Down 1. With the transmitter and receiver on, move the throttle trim lever and the throttle stick all the way down. To get the controls to move farther (increase the throw), connect the pushrod to a hole farther in on the control horn, or connect the pushrod to a hole farther out on the servo arm. -
Page 9: Identify Your Model
4. Move the throttle stick all the way up. The carburetor should be fully open. 5. If you are not able to achieve these settings, more or less movement may be required from the throttle pushrod. The same as the control surface throws, this is done by relocating the clevis on the 1. -
Page 10: Flight Preparation
Charge the Batteries If you haven’t already done so, refer to the Tower Hobbies instruction manual for the radio control system and charge the batteries in the plane and in the transmitter overnight the night before you go flying. - Page 11 Range Check the Radio Takeoff A range check must be performed before the first flight of a new If possible, takeoff directly into the wind. If you are experienced, model. It is not necessary to do a range check before every flight (but it taking off in a crosswind is permissible (and sometimes is not a bad idea to perform a range check before the first flight of each necessary–depending upon the prevailing wind conditions and...
-
Page 12: Maintenance Tips
3. After each day’s flying, use spray cleaner and paper towels to thoroughly clean the model. 4. The Tower Hobbies Trainer .40 Ready-to-Fly is factory-covered with iron-on model covering film. Should repairs ever be required, the covering can be patched with new pieces of iron-on covering.
Need help?
Do you have a question about the Tower Trainer 40 Ready-to-Fly and is the answer not in the manual?
Questions and answers