Table of Contents
Advertisement
Quick Links
TOWER HOBBIES
guarantees this kit to be free from defects in both material and workmanship at the date of purchase. This warranty
®
does not cover any component parts damaged by use or modification. In no case shall TOWER HOBBIES' liability exceed the
original cost of the purchased kit. Further, TOWER HOBBIES reserves the right to change or modify this warranty without notice.
In that TOWER HOBBIES has no control over the final assembly or material used for final assembly, no liability shall be assumed nor
accepted for any damage resulting from the use by the user of the final user-assembled product. By the act of using the user-assembled
product, the user accepts all resulting liability.
If the buyer is not prepared to accept the liability associated with the use of this product, the buyer is advised to return this
kit immediately in new and unused condition to the place of purchase.
To make a warranty claim send the defective part or item to Hobby Services at the address below:
Include a letter stating your name, return shipping address, as much contact information as possible (daytime telephone number, fax
number, e-mail address), a detailed description of the problem and a photocopy of the purchase receipt. Upon receipt of the package
the problem will be evaluated as quickly as possible.
READ THROUGH THIS MANUAL BEFORE STARTING CONSTRUCTION. IT CONTAINS IMPORTANT
INSTRUCTIONS AND WARNINGS CONCERNING THE ASSEMBLY AND USE OF THIS MODEL.
Entire Contents © Copyright 2006 V1.0
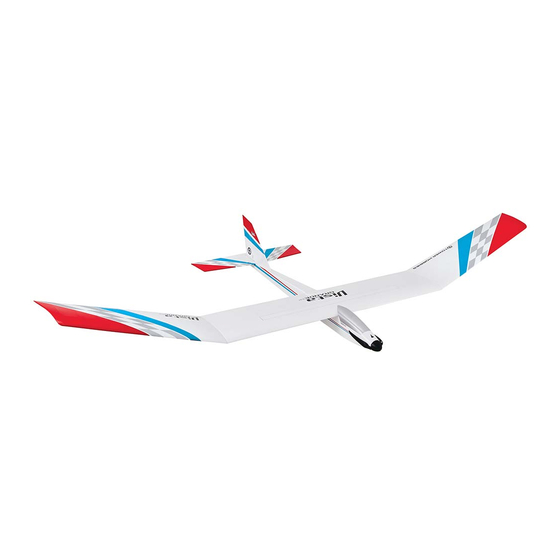
Wingspan: 78.5 in [2000mm]
Wing Area: 678 sq in [43.7dm
Weight: 45 – 50 oz [1275 – 1415g]
Wing Loading: 9.6 – 10.6 oz/sq ft [29 – 32g/dm
Length: 41 in [1035mm]
Motor: Included 550
Radio: Three-channel, two standard servos
WARRANTY
Hobby Services
3002 N. Apollo Dr., Suite 1
Champaign, IL 61822
USA
TOWER HOBBIES
P.O. Box 9078
Champaign, IL 61826
(800) 637-6050
www.towerhobbies.com
2
]
2
]
™
TOWZ0004 for TOWA4015
Advertisement
Table of Contents

Related Manuals for Tower Hobbies Vista EP


Summary of Contents for Tower Hobbies Vista EP
- Page 1 Further, TOWER HOBBIES reserves the right to change or modify this warranty without notice. In that TOWER HOBBIES has no control over the final assembly or material used for final assembly, no liability shall be assumed nor accepted for any damage resulting from the use by the user of the final user-assembled product.
-
Page 2: Table Of Contents
Check the ESC ..............11 SAFETY PRECAUTIONS Check the Control Directions ..........12 Set the Control Throws ............12 1. Your Vista EP ARF should not be considered a toy, but Balance the Model (C.G.) ..........13 rather a sophisticated, working model that functions very PREFLIGHT................14 much like a full-size airplane. -
Page 3: Additional Items Required
Radio Components ❍ 1/4" [6mm] R/C foam rubber (HCAQ1000) A minimum 3-channel radio (elevator, rudder, motor control) ❍ Custom Sealing Iron (TOWR3250) and two standard servos are required to fly the Vista EP ❍ Hot Sock ™ iron cover (TOPR2175) ARF. -
Page 4: Kit Inspection
If any parts are missing or are not of acceptable quality, or if you need assistance with assembly, contact Product Support. When reporting defective or missing parts, use the part names exactly as they are written in the Kit Contents list on this page. TOWER HOBBIES PRODUCT SUPPORT 3002 N. Apollo Drive, Suite 1 Champaign, IL 61822 Telephone: (217) 398-8970, ext. -
Page 5: Assembly
ASSEMBLY Preparations ❍ 4. Cut the covering from the holes in the battery hatch, from the bottom of the fuselage and from the air inlets on ❍ both sides of the fuselage. 1. Remove the protective foam from the tail. Join the Wings ❍... -
Page 6: Assemble The Fuselage
If any of the covering loosened, iron it back down with a covering iron on medium heat. Use a covering sock over the iron to protect the Vista EP ARF’s finish. ASSEMBLE THE FUSELAGE Join the Stabilizer ❍... -
Page 7: Join The Fin
❍ 6. Peel the covering from the bottom of the stabilizer. ❍ 3. Use a sharp hobby knife to cut the covering from the bottom only of the horizontal stabilizer (stab) over the half- circle notch in the trailing edge. Also cut the covering from both sides of the stab over the half-circle notch in the leading edge. - Page 8 ❍ ❍ 2. Working carefully without cutting into the balsa, use 6. While you have some epoxy mixed, glue in both your heated soldering iron or a sharp hobby knife to cut the wing dowels. covering from the sides of the fin and the top of the fuselage.
-
Page 9: Hook Up The Controls
Hook Up the Controls Note: If the silicone retainer on the clevis rubs against the inside of the fuselage sides, use a hobby knife to trim the inside of the fuselage as necessary for free, smooth movement. ❍ 1. Cut one of the wire pushrods to a length of 23" [580mm] by cutting off the non-threaded end. -
Page 10: Mount The Receiver
Mount the Receiver ❍ 10. Center the servo arms as shown, holding the elevator ❍ pushrod so the elevator is centered. Mark the pushrod where it 1. Connect the Velcro strips by overlapping them by crosses the holes in the elevator servo arm. 1-1/2"... -
Page 11: Get The Model Ready To Fly
hold it in place by cutting the 1/8" x 3/8" x 8" [3 x 9.5 x 200mm] GET THE MODEL READY TO FLY balsa stick to the correct length and gluing to the fuselage sides across the receiver to hold it in place. Note: For future Check the ESC reference, in most types of models mounting a receiver with ATTENTION!!! -
Page 12: Check The Control Directions
When the throttle stick is returned to the “off” position the motor will abruptly stop. This is the “brake” function which allows the propeller to fold backward, thus reducing drag when the Vista EP ARF is gliding. ❍ 9. The system will be turned off when the on/off switch on the model is turned off. -
Page 13: Balance The Model (C.g.)
❍ 2. Hook the rubber band already on the radio hatch to the tab IMPORTANT: The Vista EP ARF has been extensively on the former and position the hatch. If you haven’t done so, flown and tested to arrive at the throws at which it flies remount the propeller and spinner back onto the motor shaft. -
Page 14: Preflight
PREFLIGHT Keep these items away from the prop: loose clothing, shirt sleeves, ties, scarves, long hair or loose objects such as pencils or screwdrivers that may fall out of shirt or jacket Identify Your Model pockets into the prop. No matter if you fly at an AMA sanctioned R/C club site or if you fly somewhere on your own, you should always have your The motor could get hot! Do not touch it during or right name, address, telephone number and AMA number on or... -
Page 15: Check List
R/C pilot to check your model for airworthiness AND to teach FIND A SAFE PLACE TO FLY you how to fly. No matter how stable or “forgiving” the Vista EP ARF is, attempting to learn to fly on your own is dangerous and... -
Page 16: Flight
“racetrack.” Throttle back or cut power altogether when you get to an altitude where the Vista EP ARF will be able to Have a ball! But always stay in control and fly in a glide for a while.
Need help?
Do you have a question about the Vista EP and is the answer not in the manual?
Questions and answers