Table of Contents

Related Manuals for Ayra Compar Kit FX1


Summary of Contents for Ayra Compar Kit FX1
- Page 1 Compar Kit FX1 Complete light set with effects User manual The information in this user manual is subject to change at any time without notice. Version: Date of creation and author's initials:30-04-2018 RV Revision date and author's initials: -...
- Page 2 'Box contents' are included in the package. In the event that the Compar Kit FX1 does not function properly, or if you have any issues while operating it, please remove the plug from the power socket and contact your dealer for assistance.
- Page 3 Safety instructions WARNING! Keep this device away from moisture, water and rain to avoid the chance of electric shocks. WARNING! Only connect this device to a suitable power socket. This device functions on a specific power voltage. If it is plugged into a power socket with a different voltage, it could result in permanent damage and even dangerous situations such as fire or electric shocks.
- Page 4 - Should the device not be used in the manner described in this user manual, damages or even injuries could occur. Ayra cannot be held responsible for any injuries or damages that occur as a result of improper use of this product.
- Page 5 Every power and signal connector should be securely mounted. Do not use the device if the connectors are not secure. Avoid dust and dirt build-up. Clean the device once a month by disconnecting it from the power supply and wiping it down with a dry or slightly moist cloth. If the device is used frequently, the cleaning intervals should increase.
- Page 6 When batteries are recycled properly, they become a valuable source of sustainable material. Contact your local authority for information about how to dispose of batteries in an eco-friendly way. Contact: Ayra professional lighting products Verrijn Stuartweg 18 4462 GE Goes The Netherlands Please do not send any products to this correspondence address.
- Page 7 Guidelines and operation of this device 1. Foot controller - Strobe button 2. Foot controller - Auto button 3. Foot controller - Sound button 4. Foot controller - Blackout button 5. Effect B 2x 10 W RGBW LED Derby light effect 6.
- Page 8 Operation and mounting To activate the device, plug it into a mains socket. Once it's connected to an active power source, it will turn on automatically. During startup, ‘ES 4’ will be shown on the display and the device cannot be used. As soon as the device is ready to use, it will enter the mode last used.
- Page 9 You'll find an explanation of the various functions below: ADDR: With this function, you can set the DMX start address of the device. Set it to channel 001 and the device will respond to DMX channel 1. Set it to channel 003 and the device will respond to DMX channel 3, etc.
- Page 10 Foot controller The included, wired foot controller that comes with the Compar Kit FX1 gives users like musicians and DJs the chance to control basic light functions without using their hands. This makes it ideal for use during performances.
- Page 11 Strobe: Holding the button down will result in all of the effects turning white and flashing quickly to create a strobe effect. Releasing the button again will stop the strobe effects. Auto: Pressing the Auto button will select one of the built-in programs. Sound: Pressing the Sound button will activate the device's sound-controlled mode, but it can also be used to adjust the speed of automated shows.
- Page 12 Be aware that when you attempt to connect devices of different types and brands, they may behave strangely and you may not get the desired effect because certain functions are linked to the wrong channels. This is true of DMX lighting of all brands and types. DMX mode is the most comprehensive way to maintain ultimate control over all the functions this device has to offer.
- Page 13 Function Value LED main dimmer(Derby) 000 - 255: 0 - 100% intensity Stroboscope speed (Derby) 000 - 007: No function 008 - 249: Stroboscope speed (slow - fast) 250 - 255: Stroboscope speed (sound- controlled) Dimmer red (Derby) 000 - 255: Dimmer red, 0 - 100% intensity Dimmer green (Derby) 000 - 255: Dimmer green, 0 - 100%...
- Page 14 (stationary) 110 - 209: Laser movement speed (slow - fast) 210 - 255: Sound-controlled mode LED main dimmer (spotlight LEDs) 000 - 255: 0 - 100% intensity Stroboscope and pulse effects 000 - 007: Dimmer function on 008 - 015: Dimmer function off 016 - 131: Stroboscope speed, (slow - fast) 132 - 139: Dimmer function on...
- Page 15 190 - 253: Colour fades (slow - fast) 254 - 255: Colour selection via sound- controlled mode Derby rotation 000 - 127: Positions 128 - 249: Automatic rotation (slow - fast) 250 - 255: Sound-controlled movement LED main dimmer(Derby 2) 000 - 255: 0 - 100% intensity Stroboscope speed (Derby 2) 000 - 007: No function...
- Page 16 021 - 255: Stroboscope speed (slow - fast) Laser movement 000 - 099: Laser movement speed (fast - slow) 100 - 109: No laser movement (stationary) 110 - 209: Laser movement speed (slow - fast) 210 - 255: Sound-controlled mode LED main dimmer (Spotlight 1) 000 - 255: 0 - 100% intensity Stroboscope and pulse effects (Spotlight 1)
- Page 17 Dimmer blue (Spotlight 2) 000 - 255: Dimmer blue, 0 - 100% intensity Dimmer white (Spotlight 2) 000 - 255: Dimmer white, 0 - 100% intensity Colour selection (Spotlight 2) 000 - 005: No function 006 - 125: Fixed colours (various colours) 126 - 189: Colour jumps (slow - fast) 190 - 253: Colour fades (slow - fast)
- Page 18 Dimmer green (Spotlight 4) 000 - 255: Dimmer green, 0 - 100% intensity Dimmer blue (Spotlight 4) 000 - 255: Dimmer blue, 0 - 100% intensity Dimmer white (Spotlight 4) 000 - 255: Dimmer white, 0 - 100% intensity Colour selection (Spotlight 4) 000 - 005: No function 006 - 125: Fixed colours (various colours)
- Page 19 Installation and connection requirements Now that you know how the Compar Kit FX1 works, it's important to know how to use it correctly and safely according to the installation and connection requirements. Make sure the device and connection cables are out of reach of children, and if children are present, that they are under adult supervision at all times.
- Page 20 Spotlights The spotlights on the Compar Kit FX1 each have a flexible gooseneck that allows their position to be easily adjusted by hand. Simply move them until they give off light in the direction and at the angle required.
- Page 21 Cooling The Compar Kit FX1's derby light effects are cooled with a fan installed in the housing. Make sure that the fan is not blocked and regularly check that it is functioning properly. Substances like dust and smoke can be sucked into the unit and affect the fan's efficiency.
- Page 22 If corrosion is found, the device needs to be checked thoroughly. Power output The Compar Kit FX1 is equipped with a power output that has an IEC C13 connector. It can be used to power additional devices so that you don't need to use extra power cables.
- Page 23 DMX lighting troubleshooting If you have a problem with your device, please consult this troubleshooting section for possible solutions. If, after consulting this section, the problem remains unresolved, please contact your dealer for more information and/or help. This troubleshooting section contains information on how to solve the most common DMX light effect problems, but it does not and cannot cover every eventuality.
- Page 24 CR2025 battery Remote control not aimed properly Ensure that the remote control is pointed towards the front panel of the Compar Kit FX1 with a direct 'line of sight' between the remote control and the device at a distance of no more than 10 metres away.
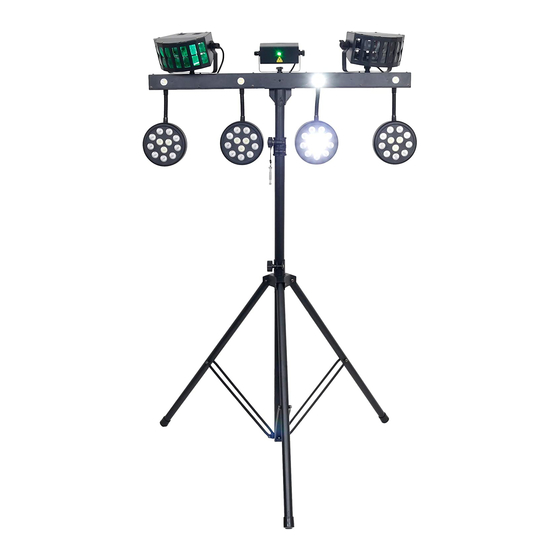
- Page 25 Specifications Contents: - basic light bar with electronics and four LED spotlights with goosenecks + 4 stroboscope LEDs - light stand + bag - carrying bag - 2x Derby LED light effect - 1x RG grating laser - bag for transport and storage Light bar properties: - four spotlights with manually-adjustable goosenecks (movable and rotatable) - four-character LED display with menu buttons for general control...
- Page 26 - fuse: F3AL 250V - power input via IEC C14 with fuse holder - power loop output via IEC C13, max. 2000 W - light bar dimensions: 100 x 17.5 x 48.9 cm - weight: 9.2 kg Light output and projection angle: LED projector (beam angle: 43 degrees) - 1 red spotlight: 1148 lumens @ 1m - 1 green spotlight: 2570 lumens @ 1m...
Need help?
Do you have a question about the Compar Kit FX1 and is the answer not in the manual?
Questions and answers