Table of Contents
Advertisement
Advertisement
Table of Contents

Subscribe to Our Youtube Channel
Related Manuals for Worldline Six VALINA


Summary of Contents for Worldline Six VALINA
- Page 1 INTEGRATION GUIDE VALINA...
-
Page 2: Table Of Contents
CONTENTS LIST OF ABBREVIATIONS .................................. 4 LOGISTICS INFORMATION ................................... 5 TERMINAL LABEL ....................................... PACKAGING ......................................... PALLETING ........................................VALINA SPARE PARTS ....................................APPROVALS ...................................... 6 CERTIFICATIONS ......................................APPROVALS RELATED TO USE IN A RAILWAY/ TRAMWAY ENVIRONMENT ..................VALINA KEY FEATURES .................................. 8 CONTACTLESS CARDS/DEVICES ................................CHIP (CONTACT) CARDS ..................................MAGSTRIPE CARDS .................................... - Page 3 FIGURES FIGURE 1: TERMINAL LABEL ..................................FIGURE 2: MAC ADDRESS LABEL ................................FIGURE 3: CARD READING WITH VALINA ..............................FIGURE 4: VALINA AND PIN PRIVACY SHIELD – EXAMPLE ........................FIGURE 5: VALINA – FRONT VIEW (LEFT) AND BACK VIEW ........................FIGURE 6: GENERAL DIMENSIONS ................................
-
Page 4: List Of Abbreviations
LIST OF ABBREVIATIONS Europay Mastercard Visa (card payment transactions) Electromagnetic compatibility (electric) Electronic Cash Register PCI PTS Payment Card Industry PIN Transaction Security Federal Communications Commission Near Field Communication WEEE Waste of Electrical and Electronic Equipment Vending Machine Controller The information provided in this documentation has been compiled with SIX Payment Services which relate to instances of material or immate- the greatest level of care. -
Page 5: Logistics Information
Examples of product labels are provided to show what information is given on each label. Minor differences in layout may occur. The VALINA terminal label shows: • Maker’s name: Worldline SA/NV • Model name: VALINA • Article number, referring to the specific terminal hardware. -
Page 6: Packaging
PACKAGING PALLETING All packages are designed to be as small as possible and to The palleting information is for a europallet with a pile-up height make it easy to check that all components are present. between 1600 and 1800 mm. In addition to the terminal, mains adaptor/USB adaptor, cable(s), Palleting –... -
Page 7: Approvals Related To Use In A Railway/ Tramway Environment
FCC 47 part 15 APPROVALS RELATED TO USE IN A RAILWAY/ The equipment has been tested and found compliant to the TRAMWAY ENVIRONMENT requirements of the FCC 47 part 15 for digital devices. Vibrations IC ICES-003 and RSS-210 Equipment used in a railway/tramway environments must be This class B equipment has been tested and found compliant able to resist vibrations in the vehicles where it is installed, to Canadian ICES-003 and RSS-210 for digital devices. -
Page 8: Valina Key Features
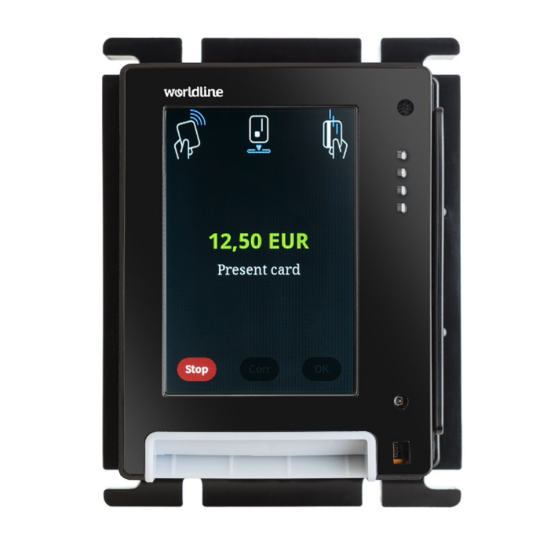
EMV and Mifare. It handles payments by chip card, Android apps or legacy apps (written for the MAPS platform) NFC cards and devices, and magstripe card. from Worldline. It is PCI certified, SRED included. Figure 3: Card reading with VALINA CONTACTLESS CARDS/DEVICES KEY HARDWARE FEATURES INCLUDE: The “landing zone”... -
Page 9: Network Considerations
NETWORK CONSIDERATIONS Because Spica packages for the VALINA are significantly larger There are two options for connecting a VALINA to the outside than their older SAMOA equivalents, broadband throughput world: and latency become more critical. Teleloading has specific • integrated comms card supporting mobile broadband requirements, including a minimum transfer-rate of 4 kbps over (GPRS, EDGE, 3G, 4G) 30 seconds. -
Page 10: Safety
SAFETY Follow the guidelines in this manual when integrating the VALINA. Always We will not bear any responsibility or cost for malfunctioning, • use only the power adaptor supplied, or a power adaptor breakdowns or any anomaly that may result from incorrect han- compliant with the appropriate specifications. -
Page 11: Security Recommendations
SECURITY RECOMMENDATIONS Security features are integrated at all levels of the VALINA MERCHANTS design, from the external housing to the “system-on-chip” For security reasons, merchants are advised to check their at the heart of the terminal. To combat fraud from external VALINA every working day and make sure that: sources, regular visual checks are essential. -
Page 12: Installing Valina
INSTALLING VALINA • Read Operating safety, on page 10, before you start installing • Make sure the vending machine has the necessary front a VALINA. panel/top panel openings and spot-welded connection bolts, • Make sure that: and that the weld seams are within permitted limits. –... -
Page 13: Selecting A Location
SELECTING A LOCATION • Make sure air can circulate freely around the components. The terminal is designed for unattended use both indoors and Take extra measures to avoid condensation or humidity inside outdoors. Electrical installations where the VALINA is installed the vending-machine or other location when the VALINA is must comply with local and regional codes for office and resi- being integrated in an outdoor environment. -
Page 14: Installing The Terminal
INSTALLING THE TERMINAL Step 2: Mount the VALINA in the vending machine 1. Line up the VALINA with the front panel opening on the vending machine. NOTE 2. Clamp the EVA frame to the rigid front plate of the machine If you are going to install a 4G communications board and using four locknuts. -
Page 15: Figure 10: Strain-Relief Points On Valina Mounting-Plates
Step 4: Power up VALINA and fasten cables 1. Open the TELECOM cover The VALINA requires an external power supply, using one Remove the retaining screw of the TELECOM cover of these three options: and open the cover. • connector 1 – 12 V DC 2A (RJ45 connector) •... -
Page 16: Figure 13: Inserting The Micro Sd Card
Step 6: Install micro SD card – optional 1. Open the TELECOM cover. Remove the retaining screw of the TELECOM cover and open the cover. 2. Insert the microSD card in the holder as shown. 6 MDB Figure 13: Inserting the micro SD card NOTE If you will be installing an optional communications board, do not close the TELECOM cover yet. -
Page 17: Installing The 4G Antenna
INSTALLING THE 4G ANTENNA For easy access, start by installing the SIM on the telecoms To use the VALINA with a 4G connection, you need a 4G commu- board. Next, install the telecoms board in the VALINA. Mount nications board and a 4G antenna. The recommended con- the VALINA in the vending machine, install the 4G antenna figuration, which has been certified, uses an MA412.A.BI.030 and connect the antenna cables to the telecoms board. -
Page 18: Installing The 4G Communications Board
INSTALLING THE 4G COMMUNICATIONS BOARD MicroSIM card cover SMA connector for Step 1: Prepare the 4G communications board MIMO 1/main antenna 1. Unpack the board, taking precautions to avoid electrostatic SMA connector for discharge (ESD). MIMO 2/diversity antenna 1751 2. -
Page 19: Ports And Pin-Outs
PORTS AND PIN-OUTS There are six sockets at the back of the VALINA: NOTE • four for data/peripherals VALINA cannot be powered through the Ethernet interface. • one for power supply and data/peripherals • one for power supply only Pinout for Ethernet 10 Mbit connector The VALINA is powered from an external power adaptor Description Direction... -
Page 20: Power Supply - Ttl
Pinout for USB-B interface POWER MANAGEMENT VALINA is equipped with smart power management profiles. Description Direction Each profile puts the terminal in a different state and supports different ways to wake up the terminal. Using the different profiles in a smart way will minimise the amount of energy the D–... -
Page 21: Jtag/Debug Port
JTAG/DEBUG PORT For development and repair purposes, the VALINA is equipped The JTAG/DEBUG Port is also available via a pinheader with with a JTAG/Debug port, underneath the TELECOM cover. a pitch of 1.27 mm, which is available on prototypes and devel- This port can be used to connect a PACIFIC Debug Interface opment terminals. -
Page 22: Cleaning
CLEANING For optimal functioning of your Worldline terminal and acces- CLEANING CARDS sories, clean them regularly. • The sliding brush type of card can be used for up to 12 clean- 1. Disconnect the equipment from the power supply. ings of the reader before you need to replace it. -
Page 23: Appendix Technical Specifications
APPENDIX TECHNICAL SPECIFICATIONS Display OPTIONAL ACCESSORIES 3.5", 320 × 480 pixels, 64K colour, capacitative touchscreen • Debug interface (backlit) • Power adaptor Input100-240 VAC, 50–60 Hz; output 12 V DC 2A Communications – on-board Ethernet 10/100 RS-232 ENVIRONMENTAL CONDITIONS Operating temperature/humidity Communications – optional extensions –20 °C to +70 °C;... - Page 24 YOUR LOCAL POINT OF CONTACT CAN BE FOUND AT: six-payment-services.com/contacts six-payment-services.com worldline.com 110.0588.02 INT_EN/08.2020...
Need help?
Do you have a question about the Six VALINA and is the answer not in the manual?
Questions and answers