
Related Manuals for Assa Abloy Yale Y-LL67AP


Summary of Contents for Assa Abloy Yale Y-LL67AP
- Page 1 Elektronik Kabin Kilidi Electronic Cabinet Lock Kullanma Kılavuzu / User Manual Y-LL67AP...
-
Page 3: Table Of Contents
İçindekiler 1. Ürün Görseli 2. Teknik Özellikler 3. Montaj 4. Kullanım Seçenekleri 5. Kullanım Modları 6. Tanıtma ve Kullanma 7. Pil Bitme Durumunda Acil Durum Açılışı 8. Fabrika Ayarına Dönüş... -
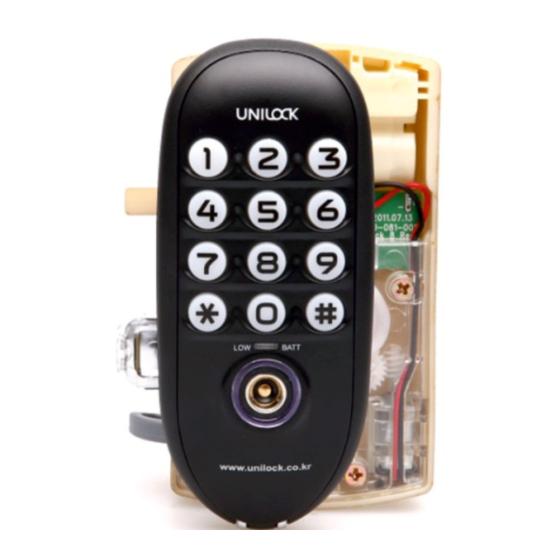
Page 5: Ürün Görseli
1. Ürün Görseli Tuş Takımı 2 AA Vida Deliği Pil Yatağı Kilit Destek Parçası Pil Durumu - LED Sürgü Açma/Kapama - LED Mandal ID Anahtar Soketi Acil Durum Harici 9V Vida Deliği Besleme... -
Page 6: Teknik Özellikler
2. Teknik Özellikler • Kullanım Yeri : Kabin ve Dolap uygulamaları • Ön ve Arka Gövde Malzeme : ABS Plastik • Sürgü Malzeme : Çelik Kaplama Plastik • Ön Gövde Renk : Siyah • Ön Gövde Boyutları (Y x G X D) : 121 x 52 x 22 mm •... -
Page 7: Montaj
Montaj ø8mm delik 52mm Yukarıya tolerans Aşağıya tolerans ø30 mm delik 40mm Sola 2mm tolerans Sağa 4mm tolerans 53mm 13mm 30mm 22mm 24mm 22mm 40mm 66mm 40mm... -
Page 8: Kullanım Seçenekleri
4. Kullanım Seçenekleri İlgili tuşa basılı tutulup Yetkilendirme ID Anahtarını sokete dokundurarak seçenekler arasında geçiş yapılır. Aksiyon Seçenekler Tek Kullanımlık Kullanıcı Şifresi / ID Anahtarı (Ortak Kullanım) Fabrika Ayarı “0” ve Yetkilendirme Anahtarı Sabit Kullanıcı Şifresi / ID Anahtarı (Müstakil Kullanım) Kullanıcı... -
Page 9: Kullanım Modları
5. Kullanım Modları Kullanıcı Şifresi tanıtın ve Kullanıcı Şifresi kullanarak kilidi açın veya Kullanıcı ID Anahtarı tanıtın ve Kullanıcı ID Anahtarı kullanarak kilidi açın. Kilitlenme Kullanım Kullanım Mod Ayarlama Prosedürü Modu Tanıtma Kilitleme Açılma Modu “0" (Tek Kullanımlık) - “2" (ID Anahtar) Manüel ID Anahtar ID Anahtar... -
Page 10: Tanıtma Ve Kullanma
6. Tanıtma ve Kullanma Yetkilendirme ID Anahtarı Tanıtma ve Kullanma - İlk tanıtılan ID anahtarı, Yetkilendirme Anahtarı olur. 1. Elektronik kabin kilidini monte edin 2. Pilleri takarak kilidi aktive edin 3. ID anahtar soketine Yetkilendirme ID Anahtarını (OWNER) dokundurun. 2 kere “bip” sesi ve 3 kere yeşil LED ışık yanma sönmesini takiben Yetkilendirme ID Anahtarı... - Page 11 Master Şifre Tanıtma ve Kullanma - Master Şifre AÇIK konuma getirilmesi için “8 tuşuna basılı tutarak Yetkilendirme ID Anahtarı” sokete dokundurulmalıdır. 1. Master Şifre Tanıtma (Kapı KAPALI olmalıdır) - ID anahtar soketine Yetkilendirme ID Anahtarını (OWNER) dokundurun. - ID anahtar soketine Master ID Anahtarını (MASTER) dokundurun. - “#”...
-
Page 12: Pil Bitme Durumunda Acil Durum Açılışı
Kullanıcı ID Anahtarı veya Kullanıcı Şifresi Değiştirmek / Silmek - Kullanıcı ID Anahtarı veya Kullanıcı Şifresi kaybolduğu/unutulduğu durumlarda. - Master ID Anahtarı dokundurun veya Master Şifre’yi girin. - Kullanıcı ID Anahtarı veya Kullanıcı Şifresi otomatik olarak silinir. 7. Pil Bitme Durumunda Acil Durum Açılışı Pillerin bitmesine yakın her açma ve kapamada 5 kere “Bip”... -
Page 13: Fabrika Ayarına Dönüş
8. Fabrika Ayarına Dönüş Fabrika ayarlarına dönmek ve tanıtılan tüm ID Anahtarları ve şifreleri sıfırlamak mümkündür. Sıfırlama Uçları Mandal Ön ve arka gövdeyi birbirine bağlayıp pilleri takın. Aşağıda gösterilen sıfırlama uçlarına metalik cımbız gibi bir alet ile kısa devre yaptırıp mandala bastırın. - Page 15 Contents 1. Product Image 2. Technical Specifications 3. Installation 4. Operation Options 5. Operation Modes 6. Registration and Operation 7. Out of Battery Emergency Opening 8. Back to Factory Mode...
-
Page 17: Product Image
1. Product Image Key Pad 2 AA Screw Hole Battery Slot Lock Support Part Battery Status - LED Deadbolt Open/Close - LED Latch ID Key Socket External 9V Battery Screw Hole... -
Page 18: Technical Specifications
2. Technical Specifications • Application Area : Cabinet and Locker applications • Front and Rear Body Material : ABS Plastic • Deadbolt Material : Plastic with steel cover • Front Body Colour : Black • Front Body Dimensions (H x W X T) : 121 x 52 x 22 mm •... -
Page 19: Installation
Installation ø8mm hole 52mm Upwards tolerance Downwards tolerance ø30 mm hole 40mm Leftwards 2mm tolerance Rightwards 4mm tolerance 53mm 13mm 30mm 22mm 24mm 22mm 40mm 66mm 40mm... -
Page 20: Operation Options
4. Operation Options By pressing and holding the number, touch Owner ID Key to the socket and the options are switched to the other. Action Options Beep LED One Time User Code / ID Key (Shared Use) Factory Default “0” and Owner Key Permanent User Code / ID Key (Assigned Use) User Code Use Factory Default... -
Page 21: Operation Modes
5. Operation Modes Register User Code and use User Code to unlock, or register User ID Key and use User ID Key to unlock. Locking Unlocking Locking User User Mode Setting Procedure Mode Register with with Mode Manual “0" (One Time) - “2" (ID Key) ID Key ID Key ID Key... -
Page 22: Registration And Operation
6. Registration and Operation Owner ID Key Registration and Operation - First ID key touched to the ID key socket become an Owner ID Key 1. Install electronic cabinet lock into the locker. 2. Insert batteries to activate the lock. 3. - Page 23 Master Code Registration and Operation - To enable Master Code, apply “Press and hold number 8, touching Owner ID Key to the socket”. 1. Master Code registration (Door should be CLOSED) - Touch Owner ID Key (OWNER) to the ID Key socket. - Touch Master ID Key (MASTER) to the ID Key socket.
-
Page 24: Out Of Battery Emergency Opening
Changing/Deleting User ID Key or User Code - When User ID Key or User Code is lost/forgotten - Touch Master ID Key (MASTER) to the ID Key socket or enter Master Code. - User ID Key or User Code is automatically deleted. 7. -
Page 25: Back To Factory Mode
8. Back to Factory Mode It is possible to go back to factory mode and reset all ID Keys and Codes. Resetting Tips Latch Connect front and back body, insert batteries. Make a short circuit by using a metalic tool like a tweezers touching resetting tips and press the latch . - Page 27 GARANTİ BELGESİ İthalatçı Firmanın: MALIN Ünvan: ASSA ABLOY Kilitleme Sistemleri San. ve Tic. Ltd. Şti. Cinsi Elektronik Kabin Kilidi Adres: İkitelli OSB İpkas San. Sit. 3. Etap Markası Yale C Blok No:15 Başakşehir - İstanbul Model Y-LL67AP Telefon: +90 (212) 503 41 00 Bandrol ve Seri No ........
- Page 30 Sürekli devam eden çalışmalar sebebiyle şirket, bildirimde bulunmaksızın içerikte değişiklik yapma hakkını saklı tutar.
Need help?
Do you have a question about the Yale Y-LL67AP and is the answer not in the manual?
Questions and answers