Table of Contents
Advertisement
Quick Links
Advertisement
Table of Contents

Summary of Contents for Barbco TRIBOR Series
- Page 1 TRIBOR Operation Manual Final 7-19-19, Rev B ARB...
- Page 2 To do both requires the company to be the “best that it can possibly be”. To achieve this end, Barbco recognizes that all members of the company must be focused on a common mission and set of shared goals. Thus in...
-
Page 3: Table Of Contents
Operation Manual TriBor Table of Contents Introduction Manufacturer’s Statement ......................1 Safety Safety Operation Practice ......................2 General Safety Statements ......................5 Safe Operation of Equipment ..................... 6 Safety Inspection of Equipment ....................6 Component Description Machine Lift Points........................7 Major Drill Unit Components .................... -
Page 4: Introduction
The equipment described in this manual is subject to change. Barbco Inc. reserves the right to change equipment at any time as part of normal product improvement. Some improvements may have been made after this manual was printed. -
Page 5: Safety
SAFETY Safety... - Page 6 Safety...
- Page 7 Safety...
-
Page 8: General Safety Statements
Safety... -
Page 9: Safe Operation Of Equipment
Safety... -
Page 10: Machine Lift Points
MACHINE LIFT POINTS A- BREAKOUT SYSTEM four eyelets, one on each corner. Manual track dogs must be retracted to lift out of the track. B- TRACK SECTION Four eyelets, one in each corner gusset. C- 48” MASTER PUSHER One eyelet located on top of assembly for balanced lift point. -
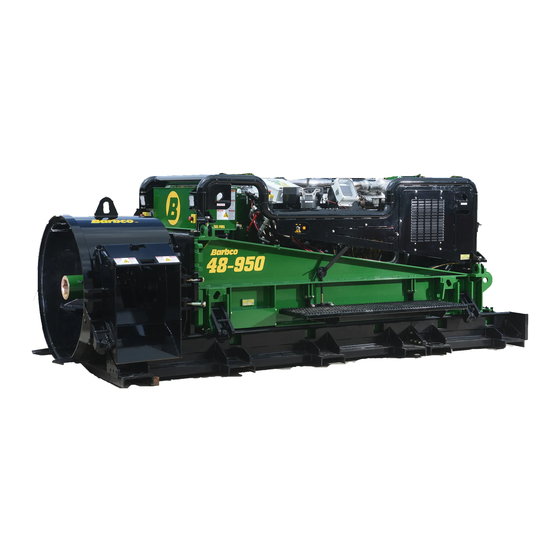
Page 11: Major Drill Unit Components
MAJOR DRILL UNIT COMPONENTS Auger Boring Mode Directional Drilling & Guided Pilot Mode Component Description... - Page 12 A. CASING ATTACHMENT: Optional accessory used to reduce the size of the Master Casing Pusher to accommodate smaller casing diameters. B. MASTER CASING PUSHER: Contains the spoil ejectors (not shown), spoil door and casing attachment, as needed for smaller diameters of casing. C.
-
Page 13: Minor Drill Unit Components
MINOR DRILL UNIT COMPONENTS Push Bar Sensor- Locates the Antenna- wireless system. One located on the drill and dog hole when the push bar is one on power pack. lined up. High Pressure Filter- in line Friction break adjustment- open loop filter. Located on the Controls the pressure the friction drill unit. - Page 14 Guide Bearing- Breakout guide Breakout Control Valve- Controls bearing can be adapted to any all the breakout functions. tool joint diameter. Crane- Full function crane with Deadman connections- wireless remote control Hydraulic disconnects located on the front of the breakout. Hose Support- Adjustable bracket Dump Valve- Hydraulic controlled ball valve designed to dump off...
-
Page 15: Major Power Pack Components
MAJOR POWER PACK COMPONENTS A. ROLL CAGE: Structure designed to protect the components of the power pack. Unit can be removed for maintenance. B. ENGINE ASSEMBLY: Complete engine unit to power all functions on the TriBor. C. MAIN CONTROL STATION: Operators station containing all functions available on the power unit. D. -
Page 16: Minor Power Pack Components
MINOR POWER PACK COMPONENTS Filter Station- Containing high DEF Tank- Storage for diesel pressure, and charge pressure exhaust fluid. hydraulic filters. Mixing Station- Control of the Quick Disconnects- Hydraulic mixer prop speed. Containing the connections to quickly connect all fluid pump in-line strainer. umbilical lines. -
Page 17: Main Operators Counsel Descriptions
MAIN OPERATORS CONSOLE A- Rotation and thrust hydraulic pressure gauges. B- Tool Box. C- Emergency stop button- puts the machine in a safe state. Will not shut down the engine. D- Control box- contains the drillers display, lock-out key, and the diagnostic port. E- Remote docking station. - Page 18 Button Identification: K- ROTATION LIMITER A- THRUST LIMITER J- ROTATION BRAKE B- THRUST BRAKE I- AUTO REAM C- AUTO RUN MASTER D- RETURN TO H- INSTRUCTIONAL MAIN SCREEN G- PAGE SCROLL RIGHT E- PAGE SCROLL F- ITEM UP/ DOWN LEFT Component Description...
-
Page 19: Wireless Remote Descriptions
WIRELESS REMOTE Functional Descriptions The white boxes contain the antennas for the wireless remote system. The one on the power pack includes a magnetic base so it can be moved as needed to get better reception. Component Description... - Page 20 A - ROTATION FUNCTION: SPEED TOGGLE- high, medium and low spindle speed setting adjusts the maximum torque per speed range. R LOCK LIGHT & BUTTON- push the button to lock in the rotation speed. See auto drill mode. ...
-
Page 21: Set Up
The backstop should be designed to withstand 1-1/2 to 2 times the maximum thrust of the boring machine being used. Barbco, Inc. strongly recommends using the services of a competent engineer to assist in the pit floor, anchoring and backstop design. -
Page 22: Pit And Overall Dimensions
ALL MINIMUM DIMENSIONS ARE FOR THE INSTALLATION OF 20 FT CASING LENGTHS. 14’ SIDE WALL TO SIDE WALL 35’- 5” Set Up... -
Page 23: Setting And Aligning The Track
SETTING AND ALIGNING THE TRACK The most critical part of the bore is the setting of the machine track on line and grade. If the alignment is not right when you start, it is not likely to improve. CAUTION! EQUIPMENT HAZARD! You must hold the track down! Allowing the track to lift will cause damage to the cylinders, pinion gears and other driveline components! CAUTION! EQUIPMENT HAZARD! Always set single track sections. - Page 24 TRACK ASSEMBLY The use of this machine requires a concrete pad to be poured. Make sure to add hold down provisions to the middle, and both ends of the track. Failure to do so will result in damage to the ends of the track, cylinders, pinion gears and other driveline components! To install the extension tracks, follow the steps below.
- Page 25 Rack Gear Assembly Place the master rack gear on top of the master track and back against the stops. EXTENTION SECTIONS HOLD DOWN BARREL BOLTS LINE UP HARDWARE MASTER RACK GEAR STOPS Place extension sections down the length of the track assembly, up against each other. Place the lineup gear against the inside seam.
-
Page 26: Machine Assembly
MACHINE ASSEMBLY DANGER! Always use correct lifting devices and NEVER hoist or transfer loads over personnel! Attach the spreader chains to the lifting eyes on the base push unit making sure that the two longer chains are attached to the push bar end of the machine. Be sure that the 4-hook roller assemblies are pinned in the upright position and that the push bar dogs are retracted into the push bar and pinned into place. - Page 27 DANGER! Stay clear of shear and pinch points while guiding the power package during assembly. Once the sub frame is seated, disconnect the chains from the lifting eye and remove the spreader bar from the bore pit. Connect the hydraulic quick disconnects and dog LED electrical cord at the rear of the machine and on the power pack.
- Page 28 Unpin and latch the 4-hook rollers into the down and locked position and secure with hitch pin. The lower pins are also used to hold the friction break in place. Make sure the pins are in place correctly. Latch and tighten all four corner swivel hold-down bolts. Bolt in the header wall cover.
-
Page 29: Engine Operating Instructions And Controls
ENGINE OPERATING INSTRUCTIONS AND CONTROLS A factory instruction manual for each specific engine is supplied with the Tribor. Operation and maintenance information is included in the engine manual. The following instructions cover only the starting and stopping procedures. All other engine-operating instructions are contained in the factory manual. -
Page 30: Turning The Remote Transmitter On
START/ STOP KEY SWITCH ENGINE DISPLAY- SYSTEM VITALS WARNING! Only use ESTOP in case of an emergency. Do not use to turn engine OFF. WARNING! Lower engine idle and allow system to cool down before engine shut down. WARNING! Never shut down the engine during the regen cycle. TURNING THE REMOTE TRANSMITTER ON: Turn the master switch on the drill unit operator station to the ON position. -
Page 31: Engine Shutdown
Place the Active toggle to the ACTIVE position to allow all functions. All functions are turned off when the transmitter is in the INACTIVE state. ENGINE SHUTDOWN: Turn the transmitter to the INACTIVE state. Turn the transmitter power switch to OFF position. Turn the master switch on the drill unit operator station to the LOCKOUT position. -
Page 32: Basic Operating Instructions
BASIC OPERATING INSTRUCTIONS (Machine is already set up. Engine is running. Ready to bore.) TURNING ON AND ACTIVATING THE REMOTE- 1- Turn the transmitter power to the ON position. “Control System required” will appear on the digital display. 2- Cycle the e-stop to clear by simply pushing it in and twisting it to the right to release it. The Transmitter process thru a self-diagnostic check during this time. - Page 33 ROTATION CONTROL- The transmitter is ON and Active. The Master Rotation Brake is off. 1- Paddle Operation- once the master break is off the Rotation paddle is live. Push the paddle forward for clockwise rotation. Pull the paddle back for counter-clockwise rotation. The paddle delivers variable control of the spindle.
- Page 34 THRUST CONTROL- The transmitter is ON and Active. The Master Thrust Brake is off. 1- Thrust Paddle Operation- once the master break is off the Thrust paddle is live. Push the paddle forward for forward travel. Pull the paddle back for reverse travel. The paddle is proportional, the farther you push or pull it, the faster the drill will travel.
-
Page 35: Pressure Limiters
PRESSURE LIMITERS- The transmitter is ON and Active. Master Thrust and Rotation Brakes are off. Thrust Limiter Rotation Limiter Button Button Max Set Points Limiter Set Points Adjustment Buttons The Pressure Limiters are always on when the drill is active. Limiter set points are displayed with the blue bars on the pressure scales as shown above. -
Page 36: Auto Run Operation
AUTO RUN The transmitter is ON and Active. Master Thrust and Rotation Brakes are off. 2- Turning on Auto Run- Push the master button on the display. The Auto Run icon will turn green and the option of Auto Ream will appear next to the Auto Mode button. 3- Selecting Auto Mode- Push the Auto Mode button to select the Auto Ream function. -
Page 37: Operation Of Friction Brake
OPERATION OF THE FRICTION BRAKE: The TriBor drill is equipped with a friction break. The brake is designed to drag against the track rail to help prevent a runaway condition as the assembly can be set up on a positive or negative grade up to 12%. -
Page 38: Operation Of Breakout Assembly
OPERATION OF BREAKOUT ASSEMBLY: 1- Make sure the Breakout assembly is properly locked into the track. All four pins are engaged. 2- Connect all umbilical hoses between the power pack and breakout assembly. CAUTION! EQUIPMENT HAZARD! To start the engine either all the hoses must be connected or all the hoses must be disconnected . -
Page 39: Operation Of Crane Assembly
OPERATION OF CRANE ASSEMBLY: The TriBor has an optional full function crane assemble. Unit is located above the breakouts. Perfect for loading and unloading drill pipe or pilot rod. HYDRAULIC LEVER BATTERY CRANE POWER DISCONNECT SWITCH Powering up the crane- The umbilicals are connected and the engine is running. 1- Turn the battery disconnect switch to the ON position. -
Page 40: Operation Of Drilling Fluid Delivery System
OPERATION OF THE DRILLING FLUID SYSTEM: the remote must be ON and ACTIVE for the drilling fluid functions to work. 1- Turn the drilling fluid system ON by pushing the master button on the display. The icon will turn from red (OFF) to green (ON). The blue light on the transmitter will turn ON. 2- The controls on the transmitter are now ready to use. - Page 41 PRESSURE GAUGE PRESSURE ADJUSTMENT 4- The fluid pump is located on the power pack. Increase the pressure by screwing the ½” bolt CW. Turn the bolt CCW to decrease the pressure. EMERGENCY MIXING PROP SPEED STOP PRESSURE PUMP SUPPLY SHUT-OFF 5- Fill with fresh water.
- Page 42 GLOSSARY OF TERMS ADAPTER A short section of tubing with a male hex connector on one end and a female hex connector on the opposite end used to increase or decrease hex sizes and transmit power from the front drive to the auger and cutting head.
- Page 43 CENTERLINE The vertical distance between the center of the front drive and the ground plane. CLEANING An action of a boring machine that occurs when the auger is rotating while axially stationary. CLUTCH A mechanical device that engages or disengages rotary torque from a power source. COLLARING The initial entry of casing or a cutting head into the earth.
- Page 44 GRADE The specified rise or fall of the proposed bore from a horizontal plane. GROUND PLANE The surface upon which the machine is placed. GROUT A material such as a cement slurry, sand pea gravel that is pumped into voids. GUARD A protective device fitted to the machine to minimize the possibility of inadvertent contact with hazards.
- Page 45 RECEIVING PIT see EXIT PIT RETRACT The motion of the machine away from the face of the entrance pit. REVERSE The counterclockwise rotation of the auger as viewed from the machine end. SADDLE A vertical support mechanism to hold the casing in position while starting (collaring) the bore. SADDLE MACHINE see CRADLE MACHINE SAFETY SIGN A notice attached to the machine which advises the nature and severity of a potential hazard which can cause injury or death.
-
Page 46: Glossary Of Terms
THRUST BLOCK A section of steel plate, concrete or a combination of steel and concrete located between the master track push plate and rear pit wall to provide stability and accept the thrusting force of the boring machine. THRUST PACKAGE The bottom section of a split boring machine containing the cylinders and push bar. - Page 47 Manufacturing Horizontal Earth Boring Machines Tunnel Equipment • Directional Drills • Tooling 315 Pekin Road, S.E. • East Canton, Ohio 44730-9462 Phone: 330-488-9400 • Toll Free 1-800-448-8934 • Fax 330-488-2022 Email: info@barbco.com • Web Site: www.barbco.com...