Advertisement
Quick Links
DETAILS
SODEX INTERNATIONAL
18 rue de l'avenir – Bât. 224
14650 CARPIQUET
Tel: + 33 (0) 2.31.53.78.70
Email: karine.chaigneau@sodexinternational.com
DESCRIPTION
Steel structure
Powder coated
CONFORM
European norm
NF EN 1271
The assemblage time of the volleyball posts is estimated at 20 minutes, with 1 person
The equipment has to be regularly maintained by the owner. It is advised to:
- Check every week that all the screws are correctly tightened
- Fix paint defects if the module has been damaged, using the adapted paint, specified by the manufacturer.
- Replace all damaged or missing parts with a spare part recommended by the manufacturer.
- Clean the product by using dishwasher soap, clean water, and soft cloth.
It is advised to carry out this cleaning once or twice a year, or even more regularly according to the environmental
conditions (saline environment, ...).If the forecast planned a bad weather (strong wind,...), the goal should be remo-
ved from the sheaths and put on the ground.
One full year parts and labor guarantee. Every claim regarding condition of the delivered equipment has to be done
within the legal period of the reception of the material. The warranty will not apply to:
-
all degradation during the transport.
-
all degradation due to use differing from which was intended.
-
all degradation due to poor maintenance.
-
any defect claimed after the end of the legal period.
-
any damaged due to a faulty installation and assembly of the module
ASSEMBLY INSTRUCTION
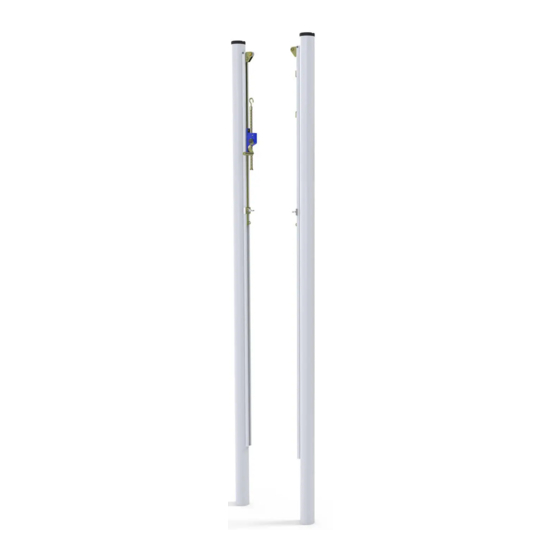
VOLLEYBALL POSTS Ø90,
PRODUCT
REF:
TIME
MAINTENANCE
WARRANTY
WINCH TENSION
S30161
PAIR
1 1
Advertisement

Related Manuals for Sodex Sport S30161


Summary of Contents for Sodex Sport S30161
- Page 1 ASSEMBLY INSTRUCTION VOLLEYBALL POSTS Ø90, WINCH TENSION S30161 PAIR PRODUCT REF: DETAILS SODEX INTERNATIONAL 18 rue de l’avenir – Bât. 224 14650 CARPIQUET Tel: + 33 (0) 2.31.53.78.70 Email: karine.chaigneau@sodexinternational.com DESCRIPTION Steel structure Powder coated CONFORM European norm NF EN 1271...
- Page 2 IMPLANTATION AND SEALING (FOR INDOOR AND OUTDOOR VOLLEYBALL) Axles Post Concrete block The distance between the axles of the posts should be 10m minimum and 11m maximum. We recommend 11m. Nevertheless, please check the length of your cable before choosing the position of the posts.
- Page 3 IMPLANTATION AND SEALING (FOR BEACH VOLLEY) The distance between the center of the posts must be between 9.5m and 10.1m. We recommend 9.6m. Nevertheless, please check the length of the cable before setting the anchorages. Dig two holes (1 per baseframe) with a depth of 500mm, a length of 1200mm and a width of 800mm, according to the opposite drawing.
- Page 4 IMPLANTATION AND SEALING (FOR BEACH TENNIS) We recommend a distance between the axis of the posts of 10m. Nevertheless, please check the length of the cable before setting the anchorages. Dig two holes (1 per baseframe) with a depth of 500mm, a length of 1200mm and a width of 800mm, according to the opposite drawing.
- Page 5 ASSEMBLY OF THE WINCH NECESSARY TOOLS (NOT INCLUDED) Screwdriver Wrench 13mm INCLUDED ITEMS Rack and pinion Stop Toothed wheel Alu body 1– PUT OUT THE RACK AND PINION STEP 1 STEP 2 Rack and pinion Remove the screw M5x20, and put the stop up then take out the rack and pinion.
- Page 6 ASSEMBLY OF THE WINCH 2– FIX THE ALUMINIUM BODY TO THE SLIDES AND PUT BACK THE RACK AND PINION FIX THE LOCK SCREW Screws BC M8x25 + washers 8 Screw M5x20 + nut M5 NECESSARY ITEMS 3– ASSEMBLY OF THE CRANK AND PUT THE RACK AND PINION AS HIGH AS POSSIBLE Crank Turn-knob...
- Page 7 ASSEMBLY NECESSARY TOOLS (NOT INCLUDED) Wrench 17mm Wrench 8mm INCLUDED ITEMS 1– ASSEMBLY OF THE PULLEYS (X2) Pulleys Screws BC M10x30 + washers 10 + lock-nut M10 Tighten the assembly softly to allow a good rotation of the pulley. NECESSARY ITEMS...
- Page 8 ASSEMBLY 2– ASSEMBLY OF THE SLIDES TO THE POSTS THE SLIDING BAR WITHOUT WINCH THE SLIDING BAR WITH WINCH Sliding bar Sliding bar Screw M5x50 + washers 5 Screw M5x50 + nut M5 + washers 5 + nut M5 U piece U piece Turn-knob M10 Turn-knob M10...
- Page 9 ASSEMBLY 3– ADJUST THE HEIGHT OF SLIDING BARS. (X2) The red line to determine the height of net Adhesive tape Turn-knob M10 Make sure that the height at the middle of the net once this one is tensioned is 2.43m for a men’s competition (2.24m for women’s competition).
-
Page 10: Packing List
PACKING LIST VOLLEYBALL POSTS Ø90, WINCH TENSION PRODUCT REF S30161 Index J PAIR NOMENCLATURE Package Weight Dim. Index Designation Description Quantity Packing Method N° (kg) (mm) Plastic bubbles S30161 Posts 1 + 1 + cardboard 5 3150x200x100 layers ACCESSORIES IN CLEAR PVC BAG... - Page 11 PACKING LIST ALU WINCH PRODUCT REF S25595B Index F UNIT NOMENCLATURE Package Weight Dim. Index Designation Description Quantity Packing Method N° (kg) (mm) Alu body + Rack and pi- 1 + 1 + 1 S25595B nion +Toothed wheel + Clear pvc bag 500x80x160 stop ACCESSORIES IN CLEAR PVC BAG...
Need help?
Do you have a question about the S30161 and is the answer not in the manual?
Questions and answers