Advertisement
Quick Links
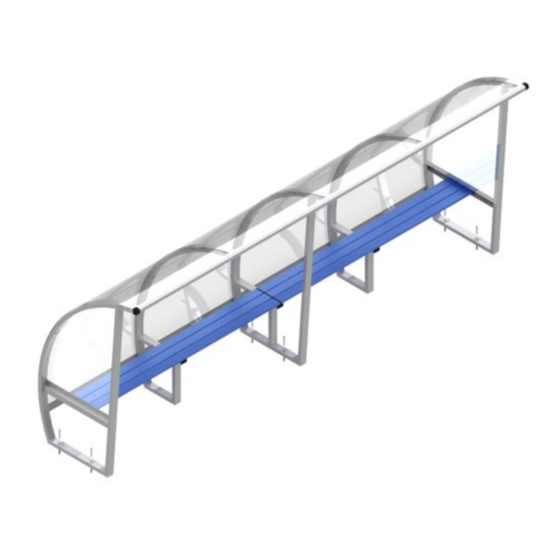
DESCRIPTION
Aluminium frame
Powder coated
With rear protection — transparent / sheeting
CONFORM
NOTE TO READER
This notice should be consulted simultaneously with
the packaging list in order to refer you to adequate
product. You will find the necessary number of ele-
ments for each part in this document.
The time to make the assembly of this team shelter is estimated for 2 persons, between 30 and 80 minutes. (without
sealing).
The equipement has to be regularly maintained by the owner. It is adviced to:
- Check every week that all the screws are correctly tightened
- Fix paint defects if the module has been damaged, using the adapted paint, specified by the manufacturer.
- Replace all damaged or missing parts with a spare part recommended by the manufacturer.
- Clean the product by using dishwasher soap, clean water, and soft cloth.
It is advised to carry out this cleaning once or twice a year, or even more regularly according to the environmental
conditions (saline environment, ...)
One full year parts and labor guarantee. Every claim regarding the condition of the delivered equipment has to be
done within the legal period,of the reception of the material.
The warranty will not apply to:
-
All degradation during the transport.
-
All degradation due to poor maintenance.
-
All degradation due to use differing from which was intended
-
Any defect claimed after the end of the legal period.
-
Any damage due to a faulty installation or assembly of the module
Ø
ASSEMBLY TIME
MAINTENANCE
ASSEMBLY INSTRUCTION
TEAM SHELTER 2m
PRODUCT REF
Remark: Non-contractual picture:
Refer to the the packaging list for the reference correspon-
ding to your product.
WARRANTY
S11XXX
UNIT
1
Advertisement

Related Manuals for Sodex Sport S11 Series


Summary of Contents for Sodex Sport S11 Series
- Page 1 ASSEMBLY INSTRUCTION TEAM SHELTER 2m S11XXX UNIT PRODUCT REF DESCRIPTION Aluminium frame Powder coated With rear protection — transparent / sheeting CONFORM Ø NOTE TO READER This notice should be consulted simultaneously with the packaging list in order to refer you to adequate Remark: Non-contractual picture: product.
- Page 2 IMPLANTATION & SEALING NECESSARY TOOLS (NOT INCLUDED) Drill Concrete drill D14mm Anchors axis Sealing for the Group of sealing for central intermediate support extremity distance d number n (between two groups of sealing) of sealing group SCELLEMENT Number of anchors Number ’n’...
-
Page 3: Included Items
ASSEMBLY NECESSARY TOOLS (NOT INCLUDED) Wrench 13mm Wrench 17mm Wrench 10mm Screwer INCLUDED ITEMS Anchors for concrete Joint bars M6x45 Caps 44x48 Washers M10 SS Self- Screws M10x70 tapping Locknuts M8 Plats screws 5x15 150x34x5 Joint bars Caps Screws M8x40 M6x25 20x80 Washers M8... - Page 4 ASSEMBLY 2– ASSEMBLY OF THE TOP BARS (x1) PLATE 150x34x5 SCREW M8x20 WASHER M8 2X SCREWS M8x20 2X WASHERS M8 Do not tighten when fastening the screws. NECESSARY ITEMS Plate Washers M8 Screws M8x20 150x34x5 3– ASSEMBLY OF JOINT BARS + CAP ON ALU SEATING BARS Insert the joint bars in seating Example for 6m: bars providing :...
- Page 5 ASSEMBLY 4–ASSEMBLY OF THE SEAT BARS (x3) Step 1: Installation of the seat bars Top profile Side: 3x Joint bars M6x25 Intermediate support: 3x Joint bars M6x45 We do recommend to not tighten firmly the screws on the frame to let the assembly loose, and an easier assembly of the bars.
- Page 6 ASSEMBLY 5–ASSEMBLY OF THE CENTRAL PROTECTION SHEETS (x1) Insert the central protection sheets into the gutters at the top and bottom of the shelter. Position the sides of the protection sheets in the middle of the inter. It is important to start with the central protection sheets ...
- Page 7 ASSEMBLY 6–ASSEMBLY OF THE EXTREMITY PROTECTION SHEETS (x1) Insert the extremity protection sheets into the gutters at the top and bottom of the shelter. The sides of the protection sheets should be in the middle of the sides. It is important to start with the central protection sheets ...
- Page 8 ASSEMBLY 7–ASSEMBLY OF THE BARS PLATES (x1) Plates with ”zigzag” holes are to be used Once you have ensured the correct positioning in the middle of all the protective sheets, fix them definitively with the bar plates. Plates with holes aligned on the same side are to be used for sides The bar plates must be positioned in the middle of the inter (5mm from...
- Page 9 ASSEMBLY 8–ASSEMBLY OF TOP COVER (x1) TOP COVER x2 PVC CAP 44x48 You can now tighten all screws. NECESSARY ITEMS Caps 44x48 9– OPTIONAL STEP: ASSEMBLY OF PVC SEAT 2X SCREWS M8X40 2X WASHERS M8 2X WASHERS M8 WITH BACK 2X LOCK NUTS M8 WITHOUT BACK Before fixing the seats, make sure that the...
- Page 10 ASSEMBLY 10–FIXATION OF THE SHELTER TO THE GROUND (x1) Side SCREWS M10x70 WASHERS M10 Central intermediate support Simple inter (no fixation) NECESSARY ITEMS Screws M10x70 Washers M10...
Need help?
Do you have a question about the S11 Series and is the answer not in the manual?
Questions and answers