Table of Contents
Advertisement
Advertisement
Table of Contents

Related Manuals for EMS Endo Master


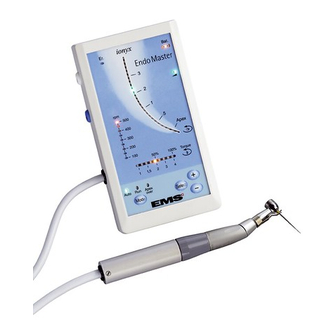
Summary of Contents for EMS Endo Master
- Page 3 Impugnatura lima per misurazione manuale Filhållare för manuell mätning EMS ofrece este aparato con diferentes variantes de equipa- Per questo apparecchio la EMS mette a disposizione una vasta EMS tillhandahåller apparater med olika tillbehör. "Packlistan" miento. Para información sobre el equipamiento exacto de su gamma di accessori.
- Page 4 DEAR CUSTOMERS, MADAME, MONSIEUR, CHERS LIEBE KUNDIN, LIEBER KUNDE, CLIENTS, Thank you for buying a new EMS product. Nous vous félicitons pour l'acquisition de ce Wir gratulieren Ihnen zum Kauf Ihres neuen It meets the highest quality and safety stan- nouveau produit EMS.
- Page 5 Les felicitamos por la adquisición de su nuevo Ci congratuliamo con voi per l’acquisto di questo Tack för att ni valde denna nya EMS produkt. Den producto EMS, el cual satisface las exigencias nuovo prodotto EMS. Esso soddisfa le più alte uppfyller högsta kvalitets- och säkerhetskrav.
- Page 6 PLEASE READ THIS BEFORE A LIRE ATTENTIVEMENT AVANT ERST LESEN, DANN STARTEN! BEGINNING WORK! DE COMMENCER! This operating instructions is to ensure the cor- Ce mode d’emploi est destiné à l’installation et Diese Bedienungsanleitung soll Ihnen helfen, rect installation and use of this product. à...
- Page 7 ¡LEA ATENTAMENTE ANTES DE LEGGERE QUESTE ISTRUZIONI LÄS DETTA INNAN NI BÖRJAR EMPEZAR! PRIMA DI COMINCIARE! ANVÄNDNINGEN! Este manual de empleo está destinado a la Queste istruzioni per l’uso sono destinate al- Denna bruksanvisning avser korrekt installation correcta instalación y utilización de este pro- l’installazione e all’utilizzo corretto di questo och användning av denna produkt.
-
Page 8: Table Of Contents
CONTENTS SOMMAIRE INHALT Installation and Connections ......2 Installation et branchements......2 Installieren und Anschliessen ......2 Connecting the contra angle......2 Branchement du contre angle....... 2 Anschliessen des Winkelstücks ....2 Install the measuring sensor......4 Mise en place du capteur de mesure ... 4 Anbringen des Messsensors ...... - Page 9 Viktig information om mätningen ....41 Área de medición de EndoMaster ....39 Modalità "Apice superato"......37 Viktigt ............41 Información importante sobre Area di misurazione dell’Endo Master ..39 Ansluta filhållaren ........43 la medición ..........41 Informazioni importanti Mäta apex utan motor......... 47 Importante ..........
- Page 10 ........ 70 Aufbewahren Ihres Produktes bei Warranty ............72 Mise au rebut du produit et längerer Nichtbenutzung ........ 70 de l’emballage ..........72 EMS-Service ..........74 Entsorgen des Produktes und des Garantie............72 Verpackungsmaterials ........72 Symbols............76 Service EMS........... 74 EMS-Service ..........
- Page 11 ............ 73 dell’imballaggio ..........73 Symboler ............77 Garantía............73 Garanzia ............73 Tekniska data..........82 Servicio técnico EMS ........75 Assistenza EMS ..........75 Felsökning ............89 Símbolos............77 Simboli............77 Especificaciones técnicas....... 81 Dati tecnici ............82 Medidas a adoptar en caso de Misure da adottare in caso d'incidente ...
-
Page 13: Instalación Y Conexión
INSTALACIÓN Y CONEXIÓN INSTALLAZIONE E INSTALLATION OCH COLLEGAMENTI ANSLUTNINGAR Conexión del contra ángulo Collegamento del contrangolo Ansluta vinkelstycke • Alinee los dos conectores dorados con los • Allineate sul contrangolo i due connettori • Passa in de två guldbelagda kontaktdonen dos orificios opuestos del contra ángulo. -
Page 15: Colocación Del Sensor De Medición
Colocación del sensor de medición Posizionamento del sensore di misu- Installera mätsensorn razione Enganche uno de los dos sensores en el cabe- Attaccate uno dei due sensori sulla testa del Sätt på en av de två sensorerna på vinkelstycket zal del contra ángulo asegurándose de que la contrangolo. -
Page 16: Install The Silicone Insulating Sock
Install the silicone insulating sock Mise en place de la chaussette iso- Anbringen der Schutzhülle aus Silikon lante en silicone • Move the sensor forward before slipping on • Mettre le capteur vers l’avant avant d’enfiler • Den Sensor nach vorn richten, bevor die the silicone insulating sock. -
Page 17: Colocación De La Cubierta Aislante De Silicona
Colocación de la cubierta aislante de Posizionamento del manicotto isolan- Installera isoleringsstrumpan av sili- silicona te in silicone • Coloque las patillas del sensor hacia arriba y • Spostate il sensore in avanti prima dello • För sensorn framåt innan du drar på isole- empuje la cubierta aislante de silicona. -
Page 19: Colocación De La Lima Y El Sensor
Colocación de la lima y el sensor Posizionamento della lima e del Installera borste och sensor sensore • Inserte la lima en el cabezal del contra ángu- • Inserite la lima sulla testa del vostro con- • Sätt i filen på vinkelstyckshuvudet och se till lo asegurándose que se ajuste bien. -
Page 20: Connecting The Cable And The Labial Electrode
• Stecken Sie das weisse Kabel in den weis- blanche. sen Steckverbinder. Endo Master does not turn on if the char- EndoMaster schaltet sich nicht ein, solange ger is connected to the unit. L'Endo Master ne s'allume pas si le char- geur est connecté... -
Page 21: Conexión Del Terminal Y Del Electrodo Labial
Endo Master startar inte om laddaren är El Endo Master no se enciende si el car- Endo Master non si accende se il carica- ansluten till enheten. gador está conectado al equipo. batterie è collegato all’apparecchio. -
Page 22: Preparing For Treatment
����� ���� ��� ���� ������ � � � ��� ��� �� ��� ���� ��� ��� ��� ��� ���� ������ � ��� � � � � ���� ��� ���� ���� ������ ���� �... -
Page 23: Preparación Para El Tratamiento
PREPARAZIONE PER IL FÖRBEREDELSE FÖR PREPARACIÓN PARA EL TRATTAMENTO BEHANDLING TRATAMIENTO Encendido/Apagado Accendere/Spegnere Slå av och på ����� ���� ��� ���� ������ � � � ��� ��� �� ��� ���� ��� ��� ��� ��� ���� ������ � ��� � � �... -
Page 24: Setting The Torque
��� ��� ��� ���� ������ ����� ���� ��� � ��� � � � ���� ������ � � � � ��� �� ���� ��� �� ��� ���� ���� ��� ������ ��� ��� � ��� ��� ���� ������ � ��� � � �... -
Page 25: Ajuste Del Par
Impostazione della coppia Ställa in moment Ajuste del par ����� ���� ��� ���� ������ � � � ��� ��� �� ��� ���� ��� ��� ��� ��� ���� ������ � ��� � � � � ���� ��� ���� ���� ������ ���� �... -
Page 26: Setting The Micro Motor Speed
����� ���� ��� ���� ������ � � � ��� ��� �� ��� ���� ��� ��� ��� ��� ���� ������ � ��� � � � � ���� ��� ���� ���� ������ ���� �... -
Page 27: Ajuste De La Velocidad Del Micro-Motor
Ajuste de la velocidad del micro-motor Impostazione della velocità del micro Ställa in mikromotorns hastighet motore ����� ���� ��� ���� ������ � � � ��� ��� �� ��� ���� ��� ��� ��� ��� ���� ������ � ��� � � � �... - Page 28 The torque is automatically limited when a Le couple est automatiquement limité Die Drehzahl ist automatisch begrenzt, high speed is selected to reduce the risk of the lorsqu'une vitesse élevée est sélectionnée wenn eine zu hohe Drehzahl ausgewählt wird, file breaking.
- Page 29 El par se limita automáticamente si se Quando viene selezionata una velocità För att begränsa risken för att filen går selecciona una velocidad alta para reducir el elevata, la coppia viene limitata automaticamente av begränsas momentet automatiskt om en riesgo de rotura de la lima.
-
Page 30: Setting The Stop
����� ���� ��� ���� ������ � � � ��� ��� �� ��� ���� ��� ��� ��� ��� ���� ������ � ��� � � � � ���� ��� ���� ���� ������ ���� �... -
Page 31: Ajuste Del Tope De Parada
Ajuste del tope de parada Impostazione dello stop Ställa in stopp ����� ���� ��� ���� ������ � � � ��� ��� �� ��� ���� ��� ��� ��� ��� ���� ������ � ��� � � � � ���� ��� ���� ���� ������... - Page 32 Programming: Programmation: Programmierung: • Press three times the "Select" switch to se- • Appuyer trois fois sur la touche "Select" afin • Drücken Sie dreimal den "Select" Druck- lect the stop (the "canal" indicator flashes). de sélectionner la butée (clignotement du taster um den Stop-Punkt einzustellen (die voyant dans le canal de votre appareil).
- Page 33 Programación: Programmazione: Programmering: • Pulse tres veces el botón "Select" (selec- • Premete tre volte l’interruttore "Select" per • Tryck tre gånger på brytaren "Select (välj)" ción) para seleccionar la parada (el indicador selezionare lo stop (l’indicatore "canale" för att välja stopp (indikeringen för kanal "canal"...
-
Page 34: Setting The Beep
��� ��� ����� ��� ���� Setting the beep Réglage du bip Einstellung des akustischen Signals ��� ��� ���� ������ ���� ������ ����� ���� ��� � ��� � � � ���� ������ � � � � � ��� ��� ���� ��� ��... -
Page 35: Ajuste Del Sonido
Ajuste del sonido Impostazione del beep Ställa in ljudsignalen ����� ���� ��� ���� ������ � � � ��� ��� �� ��� ���� ��� ��� ��� ��� ���� ������ � ��� � � � � ���� ��� ���� ���� ������ ���� �... - Page 36 When the beep is deactivated, the indicator Lorsque le bip est désactivé, le voyant ne Ist das akustische Signal deaktiviert, so does not flash. clignote pas. blinkt die Anzeige nicht. After each setting, the programming auto- Après chaque réglage, la programmation Nach jeder Einstellung hält die Program- matically stops after three seconds (the indicator...
- Page 37 Quando il beep viene disattivato, l’indica- El indicador deja de parpadear cuando se Om ljudsignalen stängs av blinkar inte tore non lampeggia. desactiva el sonido. indikeringen. Después de cada ajuste, el programa se Dopo ogni impostazione, la programmazio- Efter varje inställning avbryts program- para automáticamente tras tres segundos (el ne si arresta automaticamente dopo tre secondi...
-
Page 38: Operating The Unit
��� ��� ��� ��� ���� ������ ����� ���� ��� ���� ������ � ��� � � � � � � ��� � ��� �� ��� ���� ���� ��� ���� ��� ���� ��� ������ ��� ��� ���� ������ ���� � � ��� �... -
Page 39: Funcionamiento Del Equipo
FUNCIONAMIENTO DEL EQUIPO FUNZIONAMENTO ANVÅNDA ENHETEN DELL'APPARECCHIO ����� ���� ��� ���� ������ � � � ��� ��� �� ��� ���� ��� ��� ��� ��� ���� ������ � ��� � � � � ���� ��� ���� ���� ������ ���� � El botón "Mode" (modo) permite seleccionar tres L’interruttore "Mode"... - Page 40 ��� ��� ��� ��� ���� ������ ����� ���� ��� ���� ������ � ��� � � � � � � ��� � ��� �� ��� ���� ���� ��� ���� ��� ���� ��� ������ ��� ��� ���� ������ ���� � � ��� �...
- Page 41 ����� ���� ��� ���� ������ � � � ��� ��� �� ��� ���� ��� ��� ��� ��� ���� ������ � ��� � � � � ���� ��� ���� ���� ������ ���� � Al usar el equipo puede detener el giro del Mentre utilizzate l’apparecchio, potete Medan enheten används kan du när som motor en cualquier momento si pulsa el botón...
-
Page 42: Auto" Mode
"Auto" mode Mode "Auto" "Auto" Mode • Automatically starts file rotation when in con- • Mise en rotation automatique de la lime au • Feile beginnt automatisch bei Kanaleintritt zu tact with the pulp chamber. contact de la chambre pulpaire. rotieren. -
Page 43: Modo "Auto
Modo "Auto" Modalità "Auto" "Auto"-läge • La lima empieza automáticamente a girar • Avvia automaticamente la rotazione della • Filen börjar automatiskt rotera när den kom- cuando entra en contacto con la cámara lima quando è a contatto con la camera mer i kontakt med kanalen. -
Page 44: Run" Mode
"Run" mode Mode "Run" "Run"-Mode • Starts file rotation outside the pulp chamber. • Mise en rotation de la lime en dehors de la • Die Feile beginnt ausserhalb des Kanals zu chambre pulpaire. rotieren. • Measures apex, with automatic shutdown at the stop. -
Page 45: Modo "Run" (Funcionamiento)
Modo "Run" (funcionamiento) Modalità "Run" "Run"-läge • La lima empieza a girar fuera de la cámara • Avvia la rotazione della lima al di fuori della • Filen börjar rotera utanför kanalen. pulpar. camera pulpare. • Apex mäts, med automatisk avstängning vid •... -
Page 46: Apex Over" Mode
"Apex over" mode Mode "Apex over" "Apex over"-Mode • Automatically starts file rotation inside the • Mise en rotation automatique de la lime dans • Feile beginnt automatisch bei Kanaleintritt zu pulp chamber. la chambre pulpaire. rotieren. • Measures apex, but with no automatic shut- •... -
Page 47: Modo "Apex Over" (Ápice Sobrepasado)
Modo "Apex over" (ápice sobrepasa- Modalità "Apice superato" "Apex over"-läge • La lima empieza a girar automáticamente • Avvia automaticamente la rotazione della • Filen börjar automatiskt rotera när den kom- dentro de la cámara pulpar. lima all’interno della camera pulpare. mer ner i kanalen. -
Page 48: Messbereich Des Endomaster
EndoMaster’s measurement area Zone de mesure de l’Endo Master Messbereich des Endomaster ����� ���� ��� ���� ������ � � � ��� ��� �� ��� ���� ��� ��� ��� ��� ���� ������ � ��� � � � � ���� ��� ����... -
Page 49: Área De Medición De Endomaster
Área de medición de EndoMaster Endo Masters mätområde Area di misurazione dell’Endo Master 1. Área de aproximación indicativa 1. Area di accesso indicativa 1. Indikativt närområde 2. Valor real de medición 2. Valore di misurazione reale 2. Faktiskt uppmätt värde... -
Page 50: Wichtige Informationen Über Die Messung
Important information about the Informations importantes concernant la Wichtige Informationen über die measurement mesure Messung The value read as your file moves toward the La valeur lue lors de la progression de votre Der Wert, der abgelesen werden kann, während apex corresponds to approach information be- lime vers l’apex correspond à... -
Page 51: Información Importante Sobre La Medición
Información importante sobre la Informazioni importanti sulla Viktig information om mätningen medición misurazione El valor obtenido conforme la lima avanza hacia Il valore letto quando la vostra lima si sposta Det värde som läses av när filen närmar sig el ápice corresponde a la información de aproxi- verso l’apice corrisponde all’informazione di apex svarar mot information om närmandet från mación entre el inicio de la barra luminosa y 1.0. -
Page 52: Connecting The File Holder
Connecting the file holder Branchement du grip lime Verbinden des Feilengrips ����� ���� ��� ���� ������ � � � ��� ��� �� ��� ���� ��� ��� ��� ��� ���� ������ � ��� � � � � ���� ��� ���� ���� ������... -
Page 53: Conexión De La Sonda Para Limas
���� ��� ���� ���� ������ ���� � • Enchufe el otro terminal blanco al conector • Collegate l’altro cordone bianco al connet- • Sätt i den andra vita sladden i det blå kon- azul del endo master. tore blu. taktdonet. - Page 54 Insert the file holder into the cable end. Insérer le grip lime à l’extrémité du cordon. Den Feilengrip in das Ende des Kabels ein- fügen. The file holder is for clamping the files. Le grip lime sert a serrer les limes. Der Feilengrip erlaubt es, die Feile zu erfassen, Push the rear part of the file holder to catch Pousser la partie arrière du grip lime pour at-...
-
Page 56: Measure Apex Without Motor
��� ��� ��� Mesure d'apex sans moteur Messung des Apex ohne Motor Measure apex without motor ��� ���� ������ ����� ���� ��� ���� ������ � ��� � � � � � � � ��� ��� �� ��� ���� ��� ���� ����... -
Page 57: Medición Del Ápice Sin Motor
� � Medición del ápice sin motor Come misurare l’apice senza il motore Mäta apex utan motor ��� ��� ����� ���� ��� ���� ������ ��� � � ��� � ��� ��� �� ��� ���� ��� ��� ��� ��� ��� ���� ������ ���... -
Page 58: Cleaning, Disinfecting And Sterilizing
CLEANING, DISINFECTING AND NETTOYAGE, DÉSINFECTION ET REINIGEN, DESINFIZIEREN UND STERILIZING STÉRILISATION STERILISIEREN Cleaning the unit Nettoyage de l’appareil Reinigen des Geräts Clean the unit only with an alcohol-based, Nettoyez l'appareil uniquement avec un Reinigen Sie anschliessend das Gerät mit commercially available (ethanol, isopropanol), co- désinfectant sans colorant à... -
Page 59: Limpieza Del Aparato
LIMPIEZA, DESINFECCIÓN Y ES- PULIZIA, DISINFEZIONE E RENGÖRING, DESINFICERING TERILIZACIÓN STERILIZZAZIONE OCH STERILISERING Limpieza del aparato Pulizia dell’ apparecchio Rengöring av apparaten Limpie el aparato sólo con un desinfec- Pulire l’apparecchio soltanto con un disin- Rengör endast apparaten med alkohol- tante sin colorantes a base de alcohol comercial fettante incolore a base di alcool disponibile in baserat och färglöst desinficeringsmedel som... -
Page 60: Regular Maintenance
REGULAR MAINTENANCE ENTRETIEN PÉRIODIQUE REGELMÄSSIGE WARTUNGSARBEITEN Lubricating the contra angle with an Graissage du contre angle avec Schmieren des Winkelstücks mit aerosol bomb bombe de spray Aerosolspray To lubricate with an aerosol bomb, insert part 1 Pour un graissage avec une bombe de spray, Zur Schmierung mit einem Aerosolspray ste- at the rear of your contra angle. -
Page 61: Mantenimiento Periódico
Lubricación del contra ángulo con Lubrificare il contrangolo con una Smörja vinkelstycke med sprayolja aceite en botella de espray bombola di aerosol Para lubricar con aceite en botella de espray, Per lubrificare con una bombola di aerosol, in- Smörj med sprayolja genom att föra in del 1 i vin- inserte la pieza 1 en la parte trasera del contra serite la parte 1 nella parte posteriore del vostro kelstyckets bakre del. -
Page 63: Lubricación Del Contra Ángulo Con Un Sistema Automatizado (Sin Autoclave)
Lubricación del contra ángulo con un Lubrificare il contrangolo con un si- Smörja vinkelstycke med ett automa- sistema automatizado (sin autoclave) stema automatico (senza autoclave) tiskt system (utan autoklav) Para lubricar con un sistema automatizado, Per lubrificare con un sistema automatico, inse- För att smörja med ett automatiskt system för inserte primero la pieza 1 y luego la pieza 2, rite la parte 1, e in seguito posizionate la parte... -
Page 65: Extracción Y Limpieza Del Contra Ángulo
Extracción y limpieza del contra Togliere e pulire il contrangolo Ta bort och rengöra vinkelstycke ángulo • Retire el cabezal con la llave suministrada • Usando la chiave fornita, togliete la testa • Använd den medföljande nyckeln och för de- montering av huvudet •... -
Page 66: Charging The Batteries
Charging the batteries Charge des batteries Aufladen der Batterien ����� ����� ����� ���� ���� ��� ��� ���� ��� ���� ������ ���� ������ � � � � ���� ������ � � ��� ��� ��� ��� �� �� ��� ��� ���� ���� ���... - Page 68 Betriebszeit: ca. 3 Stunden mit dem Mikromo- motor. moteur. tor. If the Endo Master is no longer used, the unit Si l’Endo Master n’est plus utilisé, arrêt automa- Wird der EndoMaster nicht mehr verwendet, automatically stops after 5 minutes. tique de l’appareil après 5 minutes.
- Page 69 Autonomia: circa 3 ore con il micro motore. Batteriernas livslängd: omkring tre timmar med micro-motor. mikromotorn. Se l’Endo Master non viene più usato, l’ap- El Endo Master se apagará automáticamente si parecchio si arresta automaticamente dopo 5 När Endo Master inte använts på fem minuter no se utiliza durante 5 minutos.
-
Page 71: Byta Batterier
Sustitución de las baterías Sostituzione delle batterie Byta batterier • Desconecte los dos terminales blancos. • Scollegate i due cordoni bianchi. • Dra ur de två vita sladdarna. • Quite los dos tornillos de la parte trasera del • Svitate le due viti sulla parte posteriore dello •... -
Page 72: Safety Precautions
Gerät darf nicht mehr and must be replaced. Use original EMS spare être utilisé. Il doit être remplacé. N’utilisez que verwendet werden und ist zu ersetzen. Verwen- parts and accessories only. -
Page 73: Säkerhetsföreskrifter
In caso di skadad enhet får inte användas och ska bytas ello. danni all’apparecchio o agli accessori questi ut. Använd endast EMS original reservdelar och Compruebe antes de cada tratamiento non devono essere usati, ma sostituiti. Utilizzare tillbehör. - Page 74 Before each use, clean, disinfect and steril- Avant chaque utilisation, nettoyez, dé- Vor jedem Einsatz reinigen, desinfizieren ize the different pieces of this product. Please sinfectez et stérilisez les différentes pièces de und sterilisieren Sie bitte die Bestandteile dieses refer to the information provided in the operat- ce produit.
- Page 75 Se sterilizzate i differenti componenti di questo reparación autorizado EMS. den information som finns i bruksanvisningen. prodotto. Si prega di rispettare a questo scopo le indicazioni riportate nelle istruzioni per l’uso.
- Page 76 Make sure that the file is fully inserted in Assurer vous que la lime est entièrement Stellen Sie sicher, dass die Feile ganz in its recess. Pull slightly on the file to ensure it is insérée dans son logement. Tirer légèrement ihre Aufnahme gesteckt wurde.
- Page 77 Asegurarse de que la lima esté comple- Assicurarsi che la lima sia del tutto inserita Se till att borsten sitter ordentligt på plats. tamente insertada en su alojamiento. Tirar lige- nel suo alloggiamento. Tirare leggermente sulla Dra försiktigt i borsten för att säkerställa att den ramente de la lima con el fin de comprobar que lima per assicurarsi che questa sia posizionata är rätt installerad.
- Page 78 Because of metal wear, nickel titanium En raison de l’usure du métal, les limes en Aufgrund der Abnutzung des Metalls kön- files may break. Never use the same file to treat nickel titane peuvent éventuellement se briser. nen Nickel-Titan-Feilen abbrechen.
- Page 79 Debido al desgaste del metal, las limas de Per via dell’usura del metallo, le lime in Borstar av nickel-titan kan gå av på grund níquel titanio eventualmente se pueden agrietar. nickel titanio si possono eventualmente rompere. av metallförslitning. Använd aldrig samma borste No utilizar la misma lima para tratar más de 10 Non adoperare la stessa lima per trattare più...
-
Page 80: Storing The Product When Out Of Use For Extended Periods
RANGEMENT DE VOTRE AUFBEWAHREN IHRES PRODUIT EN CAS DE NON PRODUKTES BEI LÄNGERER UTILISATION PROLONGÉE NICHTBENUTZUNG Nous vous conseillons de conserver l’em- Bewahren Sie die Originalverpackung bis ballage d’origine jusqu’à la mise au rebut de zur endgültigen Entsorgung Ihres Produktes auf. votre produit. -
Page 81: Conservación De Su Producto En Caso De Inactividad Prolongada
CONSERVACIÓN DE SU CONSERVAZIONE DEL VOSTRO FÖRVARNING AV PRODUKTEN PRODUCTO EN CASO DE PRODOTTO PER PERIODI DI VID LÄNGRE UPPEHÅLL I INACTIVIDAD PROLONGADA INATTIVITÀ PROLUNGATI ANVÄNDNINGEN Le aconsejamos conservar el embalaje Conservate l’imballo originale fino allo Behåll originalförpackningen tills produkten original hasta el momento de deshacerse de smaltimento definitivo del vostro prodotto. - Page 82 DISPOSING OF THE PRODUCT MISE AU REBUT DU PRODUIT ENTSORGEN DES AND PACKAGING MATERIAL ET DE L’EMBALLAGE PRODUKTES UND DES VERPACKUNGSMATERIALS The product and its packaging (except for bat- Le produit et son emballage (excepté les batte- Dieses Produkt (mit Ausnahme der Batterien) teries) do not contain any substances that are ries) ne contiennent pas de substances dange- und seine Verpackung enthalten keine für die...
-
Page 83: Eliminación Del Productoy Del Material De Embalaje
ELIMINACIÓN DEL PRODUCTO SMALTIMENTO DEL PRODOTTO AVFALLSHANTERING AV Y DEL MATERIAL DE E DELL’IMBALLAGGIO PRODUKT OCH EMBALLAGE EMBALAJE El producto y el material de embalaje (excepto Il prodotto e il suo imballaggio (eccetto che per Denna produkt och emballage innehåller inget las baterías) no contienen sustancias nocivas le batterie) non contengono sostanze nocive material som är skadligt för miljön. - Page 84 Für alle anderen Wartungs- oder Reparaturar- or repairs, please send it to your dealer or our ou de réparation, envoyez votre produit à votre beiten schicken Sie Ihr Produkt bitte an EMS- approved EMS repair center. distributeur ou directement à votre centre de Fachändler oder direkt an unse EMS Nieder-...
-
Page 85: Servicio Técnico Ems
Ricordatevi di pulire, disinfettare e steri- Om du skickar produkt direkt till ett av EMS god- Antes de enviar su producto, sea tan ama- lizzare il prodotto come descritto nelle istruzioni känt serviceställe ber vi dig ange återförsäljarens ble de limpiar, desinfectar y esterilizar todo el per l’uso prima del trasporto. - Page 86 SYMBOLS SYMBOLES SYMBOLE Distributor’s logo Logo du distributeur Logo des Vertriebs "Mode" switch ���� Touche "Mode" "Mode" Drucktaster Value decrease switch Touche de diminution des valeurs Taste zum Verringern der Werte Value increase switch Touche d'augmentation des valeurs Taste zum Steigern der Werte "Select"...
-
Page 87: Símbolos
SÍMBOLOS SIMBOLI SYMBOLER Logo del distribuidor Logo del distributore Tillverkarens logotyp Botón "Mode" ���� Tasto "Mode" Brytare för "Mode (läge)" Botón de disminución de valores Tasto di riduzione dei valori Brytare för att sänka värde Botón de aumento de valores Tasto di aumento dei valori Brytare för att höja värde Botón "Select"... - Page 88 à la directive européenne 93/42/CE incluant les réclamations pour les compatibilités ® électromagnétiques ���� Der Endo Master entspricht der europäischen Richtlinie 93/42/EG inklusive Forderungen hinsichtlich der elektro- ® magnetischen Verträglichkeit (EMV) Disposal of Old Electrical & Electronic Equipment (Applicable in the European Union and other European countries with separate collection systems) Traitements des appareils électriques et électroniques en fin de vie (Applicable dans les pays de l’Union Européenne...
- Page 89 ¡Precaución! Ver instrucciones de empleo Attenzione! Vogliate leggere le istruzioni per l’uso Viktigt! Läs bruksanvisningen El Endo Master es conforme a la directiva europea 93/42/CE que incluye las reclamaciones por compatibilidades ® electromagnéticas L’Endo Master è conforme alla direttiva europea 93/42/CE, inclusi i reclami per le contabilità elettromagnetiche ®...
- Page 90 Contra angle Vitesse de rotation maximale: 600 tr/min Tools: diameter 2.35 – type 1 Outils : diamètre 2.35 – type 1 Special coupling for Endo Master Accouplement spéciale pour Endo Master Electrodes and contra angle Autoclavable at 135°C or cold sterilizable Electrodes et contre angle Autoclavable à...
-
Page 91: Especificaciones Técnicas
Winkelstück Maximale Drehzahl: 600 U/Min Herramientas: diámetro 2.35 – tipo 1 Werkzeug: Durchmesser 2.35 – Typ 1 Acoplamiento especial para Endo Master Spezialkupplung für Endo Master Electrodos y contra ángulo Autoclavable a 135°C o esterilizable en frío Elektroden und Winkelstück Im Autoklav bei 135°C behandeln oder kalts-... -
Page 92: Dati Tecnici
Vinkelstycke Maximal rotationshastighet : 600 tr/min Attrezzi: diametro 2.35 – tipo 1 Verktyg: diameter 2.35 – type 1 Accoppiamento speciale per Endo Master Speciell hoppkoppling för Endo Master Elettrodi e contrangolo Autoclavabile a 135°C o sterilizzabile a Elektroder och vinkelstycke Kan steriliseras i autoklav vid 135°C eller... - Page 94 Type of problem Solutions The file doesn’t rotate in the pulp • Endo Master doesn’t work with files with plastic or aluminum sleeves chamber with the micro motor • Make sure that a speed has been correctly selected. Indicator not flashing •...
- Page 95 Solutions La lime ne tourne pas dans la chambre • L’Endo Master ne fonctionne pas avec des limes à manches en plastique ou en aluminium pulpaire avec le micro moteur • Vérifier qu’une vitesse a bien été sélectionnée. Voyant non clignotant •...
- Page 96 • Sicherstellen, dass der Messsensor unter dem Kopf des Kontrawinkels richtig positioniert ist • Sicherstellen das der Endo Master nicht mehr mit dem Ladegerät verbunden ist Die Messung startet zu nahe am • Den Kanal mit einem leitfähigen Spülmittel spülen (Dakin-Lösung, Hypochlorite…) Apexbereich Wenn die Messung unmöglich...
-
Page 97: Medidas A Adoptar En Caso De Incidentes
Solución La lima no gira en la cámara • El Endo Master no funciona con limas que tengan mangos de plástico o aluminio pulpar con el micro-motor • Comprobar que se ha seleccionado una velocidad adecuada. El led luminoso no parpadea •... -
Page 98: Misure Da Adottare In Caso D'incidente
Problema Rimedio La lima non gira nella camera • L’Endo Master non funziona con lime a manici in plastica od in alluminio pulpare con il micromotore • Verificare che una velocità sia stata effettivamente selezionata. Spia che non lampeggia •... -
Page 99: Felsökning
FELSÖKNING Feltyp Lösning Filen roterar inte i pulpakam- • Endo Master fungerar inte med filar med hylsor av plast eller aluminium maren med mikromotorn • Kontrollera att en hastighet har valts på rätt sätt. Indikeringslampan blinkar inte • Tryck på "+" för att starta motorn •...
Need help?
Do you have a question about the Endo Master and is the answer not in the manual?
Questions and answers