Akuvox E21 Series Admin Manual
Emergency station
Hide thumbs
Also See for E21 Series:
- Admin manual (47 pages) ,
- User manual (32 pages) ,
- Quick manual (4 pages)
Table of Contents
Advertisement
Quick Links
Advertisement
Table of Contents

Related Manuals for Akuvox E21 Series


Summary of Contents for Akuvox E21 Series
- Page 1 E21 Series Emergency Station Admin Guide E21V E21A...
- Page 2 About This Manual Thank you for choosing Akuvox’s E21 series door phone. This manual is intended for end users, who need to use and configure the door phone. It provides an overview of the most essential functions and features of the product, whose firmware version is 21.0.2.34.
-
Page 3: Table Of Contents
Contents 1. Product Overview.................................1 1.1 Product Description..........................................1 1.2 At a glance............................................2 1.3 Connector Introduction........................................3 1.4 Daily Use............................................4 1.4.1 Making a Call..........................................4 1.4.2 Receiving a Call........................................4 2. Basic Setting..................................5 2.1 Getting Started..........................................5 2.1.1 IP Announcement........................................5 2.1.2 Access the device website....................................5 2.2 Network Setting..........................................6 2.2.2 DHCP............................................ - Page 4 2.4.1 No Answer Call........................................10 2.4.2 Push Button..........................................10 2.4.3 Web Call..........................................11 2.4.4 Call&Dial Time........................................11 2.4.5 Push to Hang up........................................11 2.4.6 Custom button........................................12 2.5 Relay&Input.............................................12 2.5.1 Relay............................................. 12 2.5.2 Open Relay via HTTP......................................13 2.6 Input..............................................14 3. Advance Setting................................. 15 3.1 LED Settings........................................... 15 3.2 Live Stream(E21A only).........................................15 3.3 RTSP(E21V only)...........................................
- Page 5 3.7 Network-Advance........................................... 24 3.8 Time/Lang............................................26 3.9 Call Feature.............................................27 3.10 Voice...............................................29 3.11 Multicast............................................29 3.12 Upgrade-Basic..........................................30 3.13 Upgrade-Advanced........................................31 3.13.1 PNP............................................. 31 3.13.2 DHCP Option........................................31 3.13.3 Manual Autop........................................32 3.13.4 Automatic Autop........................................ 33 3.13.5 System Log........................................33 3.14 Security-Basic..........................................34 3.14.1 Web Password Modify......................................34...
-
Page 6: Product Overview
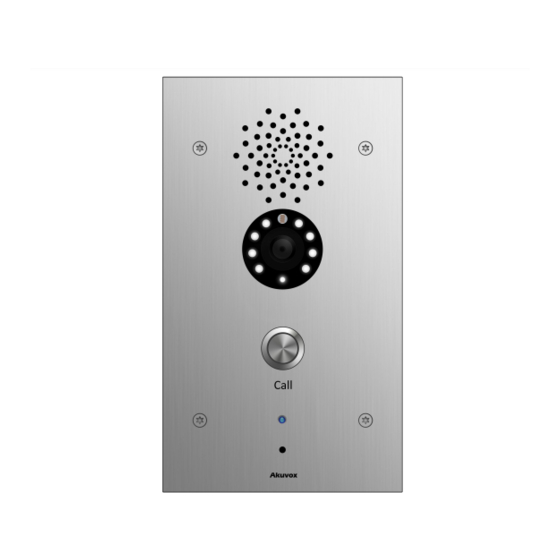
1. Product Overview 1.1 Product Description Akuvox E21 Series are outdoor-rated, SIP-compliant and hands-free Voice over IP (VoIP) Emergency Stations. It helps the emergency teams to coordinate their rescue missions with high efficiency. E21 supports two types: E21A(Audio) and E21V(Video).They are often used in public locations such as: parking facilities, college campuses, medical centers, and industrial parks. -
Page 7: At A Glance
1.2 At a glance Features Body material: 316 grade stainless steel Camera: 3 Mega pixels, automatic lighting, 120° wide angle Physical & Power Button: 1 call button 12V DC connector&POE Water-proof & Dust-proof: IP65 SIP v1(RFC2543), SIP v2(RFC3261) Audio codecs: G.711a, G.711μ, G.722, G.729 Sip Endpoint Video codecs: H.264 Echo Cancellation... -
Page 8: Connector Introduction
Relays controlled individually by DTMF tones Camera permanently operational White balance: auto Door Entry Features Auto-night mode with LED illumination Office door phone with on-site or hosted IP-PBX Remote site entry over Internet 1.3 Connector Introduction Ethernet(POE):Ethernet(POE) connector which can provide both power and network connection. -
Page 9: Daily Use
1.4 Daily Use 1.4.1 Making a Call Press the call button to call out the predefined number or IP address and if LED turns green, it means the call has been answered. 1.4.2 Receiving a Call User can use IP phone or indoor monitor to call E21 and E21 will answer it automatically by default. If user disable auto answer, pressing call button to answer incoming call. -
Page 10: Basic Setting
2. Basic Setting 2.1 Getting Started 2.1.1 IP Announcement While E21A/V starts up normally, hold the call button for several seconds after the Status LED turns blue, voice system will enter IP announcement mode. In announcement mode, the IP address will be announced periodically and “IP 0.0.0.0” would be announced if no IP address is gained. -
Page 11: Network Setting
2.2 Network Setting Go to Network->Basic, dynamically or statically to obtain address. 2.2.2 DHCP E21A/V uses DHCP by default, it will get IP address, Subnet Mask, Default Gateway and DNS server address from DHCP server automatically. 2.2.3 Static IP If selected, you could manually set IP address, Subnet Mask, Default Gateway and DNS server. -
Page 12: Account
2.3 Account Go to Account->Basic to configure sip account and sip server. 2.3.1 SIP Account Status: To display register result. Display Label: To configure label displayed on the phone ’ s LCD screen. Display Name: To configure name sent to the other call party for displaying. -
Page 13: Sip Sever 2
Registration Period: Registration Period: The registration will expire after Registration period, the IP phone will re-register automatically within registration period. 2.3.3 SIP Sever 2 Server IP: To display and configure Secondary SIP server settings. This is for redundancy, if registering to Primary SIP server fails, the IP phone will go to Secondary SIP server for registering. -
Page 14: Transport Type
2.3.5 Transport Type To display and configure Transport type for SIP message UDP: UDP is an unreliable but very efficient transport layer protocol. TCP: Reliable but less-efficient transport layer protocol. TLS: Secured and Reliable transport layer protocol. ... -
Page 15: Call Setting
2.4 Call Setting Go to Intercom->Basic, to configure basic call setting. 2.4.1 No Answer Call Enable it, if there is no answer from push button number over 60s (default value) E21A/V will call predefined 'No Answer Call' number. 2.4.2 Push Button Push Button: To configure the destination number or IP you want to contact with. -
Page 16: Web Call
2.4.3 Web Call To dial out or answer incoming call from website. 2.4.4 Call&Dial Time Max Call Time: To configure the max call time. Dial In Time: To configure the max incoming dial time, available when auto answer is disabled. Dial Out Time:To configure the max no answer call time. -
Page 17: Custom Button
2.4.6 Custom button This function is used to connect an extra button for opening the door from the inside. To select which relay(A or B) the custom button’s settings would apply to. 2.5 Relay&Input Go to Intercom->Relay, to configure relay. 2.5.1 Relay Notes:Relay operate a switch and does not deliver There are three terminal of relay: NO, NC and COM. -
Page 18: Open Relay Via Http
Relay ID: E21A/V supports two relays, user can configure them respectively. Relay Type: Default state means NC and COM are normally closed, while Invert state means NC and COM are normally opened. Relay Delay: To configure the duration of opened relay. Over the value, the relay would be closed again. -
Page 19: Input
http://IP_address/fcgi/do?action=OpenDoor&UserName=&Pa ssword=&DoorNum=1 2.6 Input E21A/V supports two input triggers Input A/B(DOOR A/B), and go to Intercom->Input to configure. Input Service: To enable or disable input trigger service. Call Number: To setup management center number for alarm. Display Name: Which is sent to the other call party for displaying Call Timer: The interval of calling. -
Page 20: Advance Setting
3. Advance Setting 3.1 LED Settings There are five LED statuses for E21A/V: NORMAL, OFFLINE, CALLING, TALKING and RECEIVING. Go to Intercom->Led setting, to configure corresponding LED response. 3.2 Live Stream(E21A only) Go to Intercom->Live Stream, check the real-time video from E21V In addition, user also can check the real-time picture via URL: http://IP_address:8080/picture.jpg... -
Page 21: Rtsp(E21V Only)
3.3 RTSP(E21V only) E21V supports RTSP stream, go to Intercom->RTSP, to enable or disable RTSP server. The URL for RTSP stream is: rtsp://IP_address/live/ch00_0 RTSP Stream: To enable RTSP video and select the video codec. R27X supports H264 video codec. H.264 Video Parameters: H264 is video stream compression standard. -
Page 22: Onvif(E21V Only)
video function with great communication application integration ability and less core program space. To modify the resolution,framerate and bitrate of MPEG4 3.4 Onvif(E21V only) E21V supports ONVIF protocol, which means E21V’s camera can be searched by other devices, like NVR, which supports ONVIF protocol as well. -
Page 23: Aec Setting
3.5 AEC Setting AEC Level: AEC(Configurable Acoustic and Line Echo Cancelers) is used to adjust the echo effect during the communication. The default value is 700. Increase the level, the echo control is better. Photoresistor: The setting is for night vision, when the surrounding of R27A/C is very dark, infrared LED will turn on and R27A/C will turn to night mode. -
Page 24: Account-Advanced
3.6 Account-Advanced Go to Account->Advanced to configure advanced settings for account. 3.6.1 Audio Codec Sip Account: To choose which account to configure. Audio Codec: E21A/V support four audio codec: PCMA, PCMU, G729, G722. Different audio codec requires different bandwidth, user can enable/disable them according to different network environment. -
Page 25: Video Codec
3.6.2 Video Codec E21V supports H264 standard, which provides better video quality at substantially lower bit rates than previous standards. Codec Resolution: E21V supports four resolutions: QCIF, CIF, VGA, 4CIF and 720P. Codec Bitrate: To configure bit rates of video stream. Codec Payload: To configure RTP audio video profile. -
Page 26: Call
3.6.4 Call Max Local SIP Port: To configure maximum local sip port for designated SIP account. Min Local SIP Port: To configure maximum local sip port for designated SIP account. Caller ID Header: To choose Caller ID Header format Auto Answer: If enabled, incoming call will be answered automatically. -
Page 27: Session Timer
Anonymous Call Rejection: If enabled, calls who block their information will be screened out. Missed Call Log: If enabled, any missed call will be recorded into call log. Prevent Hacking: If enabled, it will prevent sip message from hacking. 3.6.5 Session Timer If enabled, the on going call will be disconnected automatically once the session expired unless it’s been refreshed by UAC or UAS. -
Page 28: Nat
3.6.7 NAT To display NAT-related settings. UDP Keep Alive message: If enabled, IP phone will send UDP keep-alive message periodically to router to keep NAT port alive. UDP Alive Msg Interval: Keepalive message interval. Rport: Remote Port, if enabled, it will add Remote Port into outgoing SIP message for designated account. -
Page 29: Network-Advance
3.7 Network-Advance Local RTP:To display and configure Local RTP settings. Max RTP Port: Determine the maximum port that RTP stream can use. Starting RTP Port: Determine the minimum port that RTP stream can use. SNMP: To display and configure SNMP settings. Active: To enable or disable SNMP feature. - Page 30 VLAN: To display and configure VLAN settings. Active: To enable or disable VLAN feature for designated port. VID: To configure VLAN ID for designated port. Priority: To select VLAN priority for designated port. Notes: Please consult your administrator for specific VLAN settings in your networking environment.
-
Page 31: Time/Lang
Periodic Inform: To enable periodically inform. Periodic Interval: To configure interval for periodic inform. Notes: TR-069(Technical Report 069) technical specification entitled CPE WAN Management Protocol (CWMP).It defines an application layer protocol for remote management of end-user devices. 3.8 Time/Lang Go to Phone->Time/Lang, to select suitable web language and local Time Zone for NTP server. -
Page 32: Call Feature
3.9 Call Feature Go to Phone->Call Feature, to configure Phone-Call Feature. DND: DND (Do Not Disturb) allows IP phones to ignore any incoming calls. Return Code when DND: Determine what response code should be sent back to server when there is an incoming call if DND on. - Page 33 Intercom: Intercom allows users to establish a call directly with the callee. Active: To enable or disable Intercom feature. Intercom Mute: If enabled, once the call established, the callee will be muted. Others Return Code When Refuse: Allows user to assign specific code as return code to SIP server when an incoming call is rejected.
-
Page 34: Voice
3.10 Voice Go to Phone->Voice, to configure volume and upload tone file. Mic Volume:To configure Microphone volume. Speaker Volume:To configure Speaker volume. Open Door Warning: Disable it, you will not hear the prompt voice when the door is opened. Opendoor Tone Upload:To upload the Opendoor tone by yourself. -
Page 35: Upgrade-Basic
3.12 Upgrade-Basic Go to Upgrade->Basic, user can upgrade firmware; Reset to factory setting and reboot. Upgrade: Choose .zip firmware from your PC, then click Submit to start update. Reset To Factory Setting: Directly click Submit to reset E21A/C. Use this function with caution. All configuration will be removed. -
Page 36: Upgrade-Advanced
3.13 Upgrade-Advanced To display and configure manual update server’s settings. 3.13.1 PNP Plug and Play, once PNP is enabled, the phone will send SIP subscription message to PNP server automatically to get Auto Provisioning server’s address. By default, this SIP message is sent to multicast address 224.0.1.75(PNP server address by standard). -
Page 37: Manual Autop
3.13.3 Manual Autop Autop (Auto-Provisioning) is a centralized and unified upgrade of IP telephone. It is a simple and time-saving configuration for IP phone. It is mainly used by the device to download corresponding configuration document from the server using TFTP / FTP / HTTP / HTTPS network protocol. -
Page 38: Automatic Autop
Common AES Key: Used for IP phone to decipher common Auto Provisioning configuration file. AES Key (MAC): Used for IP phone to decipher MAC-oriented Notes: AES is one of many encryption, it should be configured only when configure file is ciphered with auto provisioning configuration file(for example, file name AES, otherwise left blank. -
Page 39: Security-Basic
System log level: From level 0~7.The higher level means the more specific system log is saved to a temporary file. By default, it’s level 3. Export Log: Click to export temporary system log file to local PCAP: To capture packet which is useful for us to address issue.
Need help?
Do you have a question about the E21 Series and is the answer not in the manual?
Questions and answers